Red, White & Blue Mini Trifles

trif3
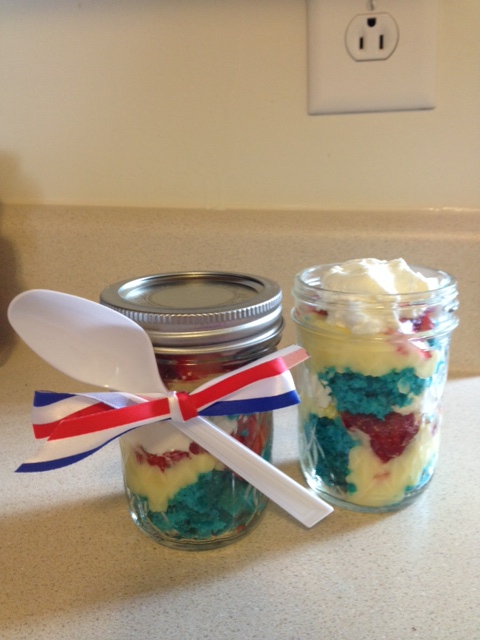
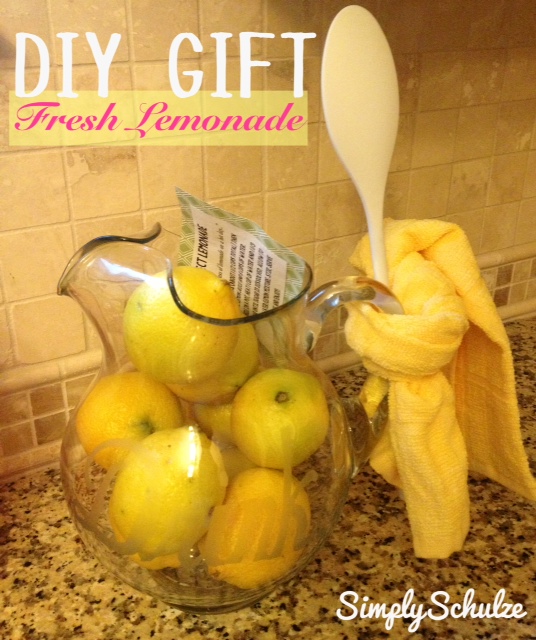
Before the month of July gets completely away from us, as these summer months tend to do, I wanted to put up a quick post about my mini 4th of July themed trifles! Independence Day has always been my favorite holiday, as I like holidays that are more centered around fun than presents. Well, on my first 4th of July as a parent I very quickly realized that a holiday whose activities include mainly drinking, staying up late and explosives, is not baby friendly, lol. We already knew that the fireworks show on base wasn’t in the cards for us because of P’s six o’clock bedtime, but we did manage to keep him up an extra two hours to attend a BBQ at a friend’s. Coincidentally, this was the same friend who had P and I over for a Memorial Day while J was at fleet week, so I had to come up with another patriotic dessert since they had already experienced my Patriotic Tie-Dye Cupcakes. I had been seeing a lot of flag cakes online, particularly an adorable one by Ina Garten (love her), so these patriotic trifles were my little deconstructed version of a red, white and blue cake. I like to do individual desserts when baking for a casual get-together or party, this way everyone can take one at their convenience and there doesn’t have to be a big to-do with cutting the cake or pie (people are always really weird about taking the first piece! haha). Also, the fact that it is served in a jar makes it easy for people to take one to go on their way out to enjoy at home later. So again, I went the semi-homemade route with this recipe, as I’ve mentioned before my baking skills are quite limited but if you are more blessed than I in the baking know-how department this can be made from scratch as well. Happy Be-lated 4th of July, I was so happy to be able to spend it with great friends enjoying mini desserts 🙂

trif1

RED, WHITE & BLUE MINI TRIFLES (makes 16 trifles in 8 oz. mason jars)

INGREDIENTS

NOTE: If “blue” velvet cake mix is not available you can always purchase white cake mix and add blue food coloring or use red velvet and substitute blueberries for the strawberries to keep with the “red, white and blue” color scheme. 

  • 1 Box Blue Velvet Cake Mix (and required ingredients – eggs, oil/butter and water)
  • 2 Boxes Vanilla Instant Pudding (I used the “cook and serve” kind, but whatever works for you is fine) – don’t forget to pick up whole milk to prepare! 
  • 1 carton strawberries
  • 2 cups heavy whipping cream or 1 regular sized container whipped topping (I opted to make my own whipped cream but if you don’t feel like doing so simply use cool whip instead)
  • 4 Tbsp. sugar, divided (if using prepared whipped topping you will only need 2 Tbsp.)

DIRECTIONS

Step 1: Begin by preparing cake mix and pudding according to package directions.

Step 2: While cake is baking and pudding is chilling, slice your strawberries. I cut off the stems then halved, quartered and then thinly sliced the berries, however you want to cut them up is fine! Once your berries are all sliced, place in a bowl along with 2 Tbsp. of sugar and mix then allow to chill in fridge until you are ready to assemble the trifles. 

Step 3: While cake is cooling and pudding is chilling in fridge, begin preparing your whipped cream by combining the 2 Tbsp. sugar and cold whipping cream and whisking with an electric mixer or by hand until stiff peaks form. Place in the fridge until you are ready to assemble trifles. If you are going the whipped topping route just hang tight!

Step 3: Once you are ready to assemble your trifles, start by cutting the cake into small cubes (although it will probably just end up crumbling when you handle it, which is fine). Place about 2 Tbsp. of cake in the bottom of each jar, then top with about 1 Tbsp. of pudding followed by 2 Tbsp. of strawberries and a heaping Tbsp. of whipped cream. Repeat in this fashion for a second layer, ending with whipped cream.

They will look something like this :)

They will look something like this 🙂

Step 4 (optional): If you are not serving your little masterpieces right away, place the lid on the jar and use a ribbon to tie a plastic spoon to the jar (this is just a fun little “to-go” touch for your guests), then chill until ready to serve! *While these are still good the following day, I don’t suggest making them too far in advance as the whipped cream tends to “deflate”.   
trif

DIY Scrap Fabric Banner

scrap4

Let me start by saying I am in love with this craft. This is the quicker, shabby-chic version of a traditional fabric pennant banner (if this isn’t quite your thang, check out my DIY no-sew fabric pennant banner tutorial or my DIY rustic burlap pennant banner tutorial). I plan to come back to this craft time and time again, especially for holiday and party decor. I have seen these done before, however, never had a reason to attempt one until it came time to throw my friend a baby shower and of course I got way carried away when it came to decor and decided that this would make a great last minute addition. Using scrap fabric left over from the wreath I had made the mama-to-be (I will post about the wreath and the shower itself soon!), I was able to create this adorable scrap fabric banner in about 20 minutes! I think my favorite thing about this banner (aside from the fact that it was free to make since I reused left over supplies), is that while it is simply strips of fabric tied to a string, it is a great way to tie all of your decor together by incorporating all of the colors in your color scheme. This would also make an adorable addition to a nursery, I will absolutely come back to this idea for any future nurseries I may be decorating in the distant future! If you have an event coming up and are looking to add a little something extra, just dig around in the depths of your fabric scraps and chances are you can throw something together with scrap that you already have. If you are making this with no fabric on hand, no problem – hit up the remnants or clearance bin at your local fabric store or Walmart, you can often get close to a yard for under a dollar which is much more than you will need for this project anyway! I hope this inspires your next holiday or party decor project and remember not to throw away any of those fabric scraps along the way 🙂 

scrap5

The banner as we displayed it at the baby shower over a chalkboard with baby’s monogram!

DIY SCRAP FABRIC BANNER

YOU WILL NEED:

  • Fabric – the amount and color will depend on your color scheme and the size/length of your banner. There is no limit to the kind of fabric either, mix textures and prints and get creative!
  • Twine/Ribbon/String – to tie your scraps around, I used left over twine from another project but a ribbon of a complimentary color would have been nice as well!
  • Scissors

INSTRUCTIONS:

Step 1: Begin by cutting your strips of fabric. Whether or not all of your strips are the same width and length is up to you. When cutting my strips I started with one fabric and cut a bunch of the same width and length, then moved onto the next fabric and cut them about the same width but a different length from the original group. 

scrap3

Step 2: Lay out a piece of twine or ribbon, the length will depend on how long you want your banner to be. Make sure you leave enough slack on either end for hanging.

Step 3: Fold a fabric strip in half (as shown) and lay it across the twine or ribbon, then pull the two “tails” of the fabric under and through the “loop” (see picture), pulling it tight to form a knot. 

scrapscrap1

Step 4: Continue in this fashion, after each knot is made slide it down so that it fits snugly against the one before. I arranged mine in no particular order but you can follow a pattern of colors to make the banner look more uniform if you wish. 

scrap6

Finished product! This would be great to hang above the crib in a nursery, I know my hubby was too paranoid to let me hang anything heavy over baby P (even wooden letters lol) so this would be a great worry-free piece of decor! 🙂

DIY Hostess Gift – Fresh Lemonade

lem

When life gives you lemons … make an adorable hostess gift!!! Since I’ve been cooking up a storm and my last two posts have been recipes, I wanted to make sure I threw a craft up on the ol’ blog since I have SO many that I’ve yet to post! This particular DIY gift I put together as a baby shower prize for a shower that we threw to honor one of our dear friends who was expecting a sweet baby boy (I say “was” because the sweet little baby has since arrived and is just perfect). This gift is adorable, cheap and so simple to put together. If you are heading to a party or BBQ and are not the cooking type or simply don’t have the time or the will to whip something up, this is the perfect substitute – your host will love it! There are so many ways to personalize this, adapt it to different drinks and add your own special touch. The etching was my way of jazzing up the plain old Walmart pitcher (see my glass etching tutorial to see how simple it is to do!) but is by no means necessary to create this adorable gift! You can make this on the cheap (using Walmart/Dollar Store components) for around $15.00 or so (if your dollar store carries glass pitchers then the cost would go down significantly, mine didn’t so I went the Walmart route). Personally I am always looking for new ideas for hostess gifts and have had many “crap! What do I bring!?” moments, so hopefully this helps you out should you ever have one 🙂 

HOW I DID IT:

  • Glass Pitcher – I purchased mine at Walmart because I happened to be there already, it cost around $8 or so. If you have a cheaper option go for it! 
  • Hand/Tea Towel – Dollar Tree
  • Spoon – Dollar Tree, the plan was to include a wooden one but they didn’t have any at that particular Dollar Tree, so I got a 5 pack of these white plastic spoons of varying sizes and used the longest one.
  • Lemons – Just use however many will fit in your pitcher, I bought a value pack of lemons from Walmart which came with about 10.
  • Lemonade Recipe – I Googled a lemonade recipe and printed it out on a recipe card to stick in the pitcher and titled it “The Perfect Lemonade”.
  • Etching Supplies – Optional, but it’s a great personal touch. See my etching tutorial for supplies needed. Since I did not know who my pitcher was going to I simply etched “Drink.” on the pitcher, but since your recipient will be known, you could always do the first letter of their family name.

lem1

The assembly is self explanatory if you take a look at the picture. You could also do a DIY pitcher of sangria or orange juice, the options are endless especially once alcohol is added to the mix, haha. Check back for other variations on this DIY hostess gift as I’m sure this will become my go-to when I don’t have time to cook!


Faux Sangria

sang3

As if my Mom wasn’t already amazing enough, she is also the creator of this amazing drink that I am about to share with you! Whether or not she will actually read this post is debatable, as it took her about three years to finally master Facebook and a whole seven years to finally hop on the iPhone bandwagon (although she did just learn how to post pictures from her iPhone to Facebook, so there may be hope for her after all lol). Whenever I tell her about my blog she seems confused so either she doesn’t know how to navigate it or she is just too busy being awesome to find the time to read my nonsensical babble, so to give her the benefit of the doubt I’ll say it’s the latter lol.

Anyway, on my recent trip home my Mom offered me “faux sangria” and while all I heard was “diluted alcohol”  (yuck lol) when I tasted it I was pleasantly surprised to find that it actually tasted exactly like the sangria at one of our favorite mexican joints back home, day = made! I was even more excited when she told me that you could make it using only two or three ingredients, whaaaaaaaat?! Needless to say when we got back to NC the ingredients for “faux sangria” were at the top of my shopping list (and here I sit enjoying a glass as I write this post and pray that hurricane Arthur doesn’t knock out my power lol). I love a good summer cocktail and I especially love one that is easy to whip up and doesn’t cost a fortune in ingredients you will only use an ounce of (a problem I encountered when making  my whiskey punch for J’s 30th, I will post about this soon). While I know this isn’t the most creative recipe and is I’m sure, by no means an original, I still think it’s worth posting because I for one am always looking for new budget friendly cocktails, especially those that lend themselves to social gatherings a.k.a. ones that are cheap lol. I hope you whip up a batch for your next fiesta, even if you’re like me and your “fiesta” involves working on your blog while hubby and baby snooze haha.

sang4

I let baby P have at one of the apples while I was making the sangria, only 20 years and three months until he can give it a taste lol


FAUX SANGRIA

NOTE: This recipe can be doubled, tripled etc. It is GREAT for a party and you can use any combination of fruit, I actually plan to come up with a variety of “faux sangrias” using different wine, fruit and oj combos. If you’re on the “skinny” train lighten it up by using Trop50 or if you like a sweeter cocktail add some simple syrup.

INGREDIENTS

  • 1 750 mL bottle red wine (I like dry wines and think that the OJ gives the cocktail enough sweetness but if you’d like it sweeter use a sweet red)
  • 3 cups orange juice
  • Juice of half a lemon (this just brightens up the flavors, feel free to omit it if you don’t like/have lemons)
  • 1 Apple, cubed
  • 1 Orange, quartered and sliced thin

Combine all ingredients in a pitcher and refrigerate for at least an hour before serving – enjoy!

sang2  sang

Italian Chicken Dijonnaise

cd3

If you ask my hubby about the best day of his life, he will either tell you it was the day baby P was born or our wedding day. I now know that he will be lying, because as much as it pains him to admit it, the best day of his life was in fact today, when I successfully came up with a copy-cat recipe of his favorite dish from one of our favorite restaurants (haha kidding of course, nothing trumps baby P). The idea for this dish came about on our recent trip home when J and I were able to have our first actual date night since baby P was born (a whole nine months ago, eek, needless to say not living near family can suck for various reasons, a big one being no free babysitters lol). We went to one of our favorite Italian restaurants, La Volpe , not only because we love it but because it is about four miles from my mom’s house and is about the only fine dining option the Moriches have to offer, lol. Now as much as I love a good date night or simply dining out in general, I still think it is ridiculous to spend close to $100.00 for two people to have a meal. Even without drinks, our bill still would have come in at around $50.00 for two main courses, no appetizers – crazy! However, no matter how overpriced the meal my hubby waits all year round for our trip home so he can order the “Chicken Dijonnaise”, which even frugal J will pay $25.00 for, haha. This time as we were enjoying our meal I told J that in the interest of not having to wait all year round for it, I would attempt to make it myself.

Since we rolled right into another vacation (4th of July) upon our return home, I decided as usual, to make the hubs a nice dinner to celebrate his impending four days off but this time I would make it extra special and try to duplicate the “chicken dijonniase”. Additionally, his four day weekends are the best time to try out new recipes anyway since I’ll get lots of alone time in the kitchen, although I do love my squishy baby looking on, he can get a little impatient if a recipe is taking too long lol. So here you have it, recipe numero uno for our 4th of July weekend (and if we lose power due to hurricane Arthur it may be the only one I get to post, who knows haha), a delicious chicken dish, an Italian “chicken cordon bleu”, if you will. Since the recipe was such a success I’m sure this will be a very frequent request in our household from now on, nothing like some restaurant quality food at a homemade price 🙂

cd2 cd

ITALIAN CHICKEN DIJONNAISE

NOTE: Sorry for my lack of step-by-step pictures, I was doing the prepping while J was still at work so I was working as fast as I could and trying to entertain/avoid getting chicken juice on my squishy baby lol. Next time I make this dish, which I’m sure will be very soon, I will update pictures 🙂

INGREDIENTS

  • 4 Boneless Skinless Chicken Breasts
  • 1/2 cup flour
  • 2 cups bread crumbs (I used Italian Seasoned but I may try again using panko, check back for an update!)
  • 3 eggs
  • 8 thin slices of mozzarella cheese or 1 1/2 cups grated
  • 8 thin slices of ham
  • 8 Fresh Basil Leaves
  • Salt and Pepper
  • Italian Seasoning (I happened to have it on hand, if you do not just substitute a little dried basil and oregano)
  • 1/4 cup vegetable or canola oil for frying

DIRECTIONS

Step 1: Take your chicken breasts and butterfly them by taking a knife, inserting it into the side of the breast and slicing it in half almost all the way through (as if you were cutting a sandwich roll) making sure to leave it attached along one edge. You should be able to open it like a book.

Step 2: Open each of your chicken breasts (like a book).place them between two pieces of clear plastic wrap and use a meat tenderizer to pound your pieces to about 1/2 an inch or so of thickness (don’t get too violent lol, you want them to remain attached). Once you have achieved your desired thickness, season each piece generously with salt and pepper on either side.

Step 3: Preheat oven to 375 degrees. Then working one at a time open each of your chicken breasts and layer two pieces of basil, two pieces of mozzarella and two pieces of ham in each, then close so the contents are sandwiched between the two halves of the breast.

Step 4: In three separate dishes place flour, eggs (beaten) and bread crumbs. Taking one chicken breast holding firmly closed so that the contents do not fall out, place first in the flour dish, coating on both sides. Then dip carefully in the egg mixture and finally the bread crumbs (again, be careful not to allow your contents to fall out!). Place on a platter or dish until ready to cook.

Step 5: In a large skillet or pan (I used a cast iron skillet) suitable for the oven, heat your oil. Once oil has come to temp, place each of your chicken breasts in the oil (I placed them upside down so that when I flipped them and placed in the oven they would be right-side up for the remainder of the cooking time, although this does not matter) and cook until browned on both sides. *If you don’t have a pan big enough to fit all four breasts just cook them in batches and place them on a baking sheet for the oven portion of the cooking, as cooking them in the same pan is simply to create less dishes (I hate dishes lol).

Step 6: Once you have finished browning all of your breasts, move the pan to the oven and bake for approximately 25 minutes (this may vary depending on the thickness of your breasts, mine cooked for 25 minutes and were cooked perfectly, if yours seem thinner than mine you may want to adjust time time down a bit). If you feel that there is too much oil remaining in the pan after frying you can drain some out before transferring to the oven or simply move the breasts to a baking sheet and cook them off on that. While chicken is cooking prepare dijonnaise sauce (recipe below).

Step 7: After your chicken breasts have finished cooking remove the pan from the oven and allow to cool for a few minutes before serving. Pour dijonnaise sauce over each breast and enjoy!!!

DIJONNAISE

*If you do not want to make your own sauce, Hellman’s makes a “Dijonnaise” ready-made and available in the condiment section of most grocery stores, I would just add a little milk or mayo to it as it is on the thicker side.

INGREDIENTS

  • 4 Tbsp. Mayo
  • 2 Tbsp. Dijon Mustard
  • 1 Tbsp. Stone Ground Mustard (this is simply to add a grainier texture to the sauce, if you do not have stone ground mustard or want a smoother sauce just use dijon instead).
  • 1 Tbsp. Sour Cream (this can be omitted if you wish, I just added it because I had it on hand)
  • 1 Tbsp. Lemon Juice
  • 1/4 cup whole milk

DIRECTIONS

Whisk all ingredients together. If the sauce is too thick add a little more milk or if you feel it is too fluid or wish to use it as a dipping sauce add a little more mayo and mustard. Serve atop the chicken or use as a dipping sauce!

DIY 4th of July Burlap Wreath


4th

Hi everyone! I know I have been just awful about updating the ‘ol blog these past few weeks but between moving and heading back up north for a mini family vaca I have been all over the place! Good news is that I am back on the grid lol, and prepared to pollute blogland with TONS of new posts including my hubby’s surprise 30th birthday bash (a whiskey and cigar themed party, a huge success btw) which I had to keep off the blog until now, as well as some new crafts and recipes I have been working on in between organizing the house and ripping my hair out in frustration over moving haha.

Okay, back to the wreath. Being that we were heading out of town just one short week before Independence Day, I knew I had to eek out my 4th of July wreath if I wanted it to be displayed leading up to holiday. This was not my first burlap wreath rodeo, I had tried my hand at it once before for my Easter wreath (a post that I am yet to get around to lol) and was super surprised at how easy it was to create given how impressed I was with the final product. So while J did his best to wrangle baby P (who is crawling lightening fast these days and getting into everything) I managed to get this wreath done in just about 20 minutes! I will give you a run down of the specific products I used but obviously it is not necessary that these items be used, as the thing I love most about burlap wreaths is that there are a variety of ways on which to elaborate on such a simple idea and that they can be adapted to fit any color scheme or holiday. If you’ve seen one on Pinterest and are hesitant to try it out, don’t be – it is almost impossible to mess up. I know a lot of the written explanations for weaving the burlap can be confusing but if you YouTube “burlap wreath tutorial” you will find a much more helpful guide to making one, I promise! Happy 4th of July everyone, please watch some fireworks for me, baby P goes to bed at six so chances are I will not be watching any aside from what I can see from my porch lol.

4th3

baby P looking adorable right before he started slamming the bouquet violently then trying to eat the petals lol.


4TH OF JULY BURLAP WREATH 

WHAT I USED:

4th1

  • 18″ wire wreath frame – I purchased mine for $2.50 at a local craft store specific to my area but you can get them on Amazon for around $5.00 or so.
  • 2 rolls of red and blue chevron wired burlap ribbon (10 ft. each) – I purchased mine from Walmart for $3.47 per roll but a Google search revealed that it can be purchased just about anywhere, lol.
  • 1 roll of plain burlap ribbon 5 1/2″ X 15 ft – available at any craft store.
  • white satin 1″ wired ribbon
  • Flag Print Faux Daisies – these just happened to work perfect and were available at Walmart, however, any red/white/blue flower combo would work or even a bow instead!  
  • 1 white wooden letter

HOW I DID IT:

Step 1: I began by weaving my burlap into my wreath, I will refer you to YouTube for the tutorial on how to actually weave the burlap in and out of the wire frame so as to not embarrass myself with an explanation that will make no sense, haha. I will say, however, that I did work by weaving the plain burlap for a few loops, then exchanging it with the chevron ribbon and I worked in “sections” of burlap instead of weaving the whole 15 feet through at once because that would have taken FOREVER. I would just work it through for a few feet then cut it and start over in the next section, since my chevron ribbon was wired it was easy to secure it even though I was not using the whole roll at once.

4th2

Step 2: Once I was done weaving my burlap and chevron interchangeably. I wove my 1″ white ribbon through the wreath in no particular pattern. This was simply to be the “white” in the red/white/blue holiday color scheme, the wreath looked perfectly fine without it.

Step 3: I cut three of each print of daisy from the bunch and stuck them through the wire frame, weaving the stem through the three metal bars so that the flower would remain secure. Then using a piece of twine I tied the wooden “S” to the wreath right atop the flowers.

inspecting the flowers again lol

inspecting the flowers again lol

Step 4: Once the wreath was complete, I took a few minutes to “poof” my loops and rearrange my flowers so they looked just right!

4th6

finished product!

This wreath cost me right around $15.00 to make and just out of curiosity I did a quick Etsy search for a “4th of July Burlap Wreath” and almost spit out my drink when I saw that the average wreath was going for an average of $50.00 plus shipping – WHAAAAAAAAT???!!! NO, NO, NO, people, you are getting ripped off, especially because you can buy almost all of the necessary components for one of these wreaths at Walmart. Furthermore, if you make a plain burlap wreath you can simply adjust it to each holiday or season by adding embellishments (a big benefit of the burlap wreath is that it is not permanent, if you mess it up or want to change it simply unweave and re-do) so potentially you can have the best wreath on the block time and time again for just around $10.00 for the year. So please, to keep me from having anxiety over thinking of people swipin’ that credit card for a $60.00 burlap wreath, at least attempt to make your own! Friends don’t let friends pay good money for cheap crafts lol. 

“Whale-of-a-Time” Diaper Cake

diapercake5

So lately I have been super intrigued by diaper cakes. When making gifts for friends and family I love to get creative with the items I am gifting rather than simply sticking them in a gift bag with a card. Diaper cakes lend themselves perfectly to this idea of creative gifting, so while you may just be plucking items off the registry like everyone else, you can still present them in a way that is fun and unique and will most  certainly be remembered by the mama-to-be! First let me say my original inspiration was of course, Pinterest but also my friend Courtney of Wildly Domestic who has made some absolutely fab diaper cakes, definitely check out her blog section on diaper cakes as that is the tutorial I used in creating mine. The idea for this particular diaper cake came about because my sweet friend K of about 15 years is expecting her third baby boy!!! Sweet new baby boy Brian is going to have a whale themed nursery, which I think is just the cutest. After creating this diaper cake I couldn’t wait to share it because after my trial run with a two-tier cake this past weekend this was my first real attempt at a diaper cake! I also decided that I love the whale idea for a baby boy, it’s kind of along the same line as owls (check out baby P’s nursery for some owl-inspiration), and if you’re like me and not into characters or sports themes whales could very well be the boy theme that you’re looking for! Again for some super involved diaper cakes see Courtney’s tutorial above, this one was thrown together in the midst of our big move so I didn’t have time to make it as snazzy as I wanted (actually J came home from making multiple trips to the new house with household items while I was supposed to be packing/patching wall holes and came home at 10pm and was like “ummm are you making a diaper cake?” .. umm yea, is that not what I’m supposed to be doing? lol). Another word to the wise, these are NOT cheap to ship lol which I learned the hard way, so make sure you leave enough time to ship it standard post, unlike me who shipped it out two days before I needed it to arrive haha.

diapercake4

Baby P helping me ship the giant box at the post office!

WHAT I USED:

* I just kind of got some items together and made them work with the cake and you can do the same, there is no need to use exactly what I did. I would suggest using diapers though because uh .. diaper cake lol.

  • About 80 Size 2 Diapers – I used Luvs because I was able to order a box of 216 for $32.99 via Amazon Prime (umm what?! I know, awesome! I’m not lying, see link here). I know Luvs are not everyone’s preferred brand but I do use them on baby P (during the day, when I use them at night I will ultimately end up doing a 3am outfit change, no fun!) when I’m feeling the money pinch so I feel like I can promote them here lol.
  • Cake pans (6″, 8″, 12″, 16″) – If you don’t have cake pans they are not necessary, just a helpful guide. You can still form the “cake layers” without the use of a pan it may just require a little more balancing and manipulation but you will wind up with the same result, I promise.
  • Wooden Dowel (Optional) – Because I was going to be mailing the diaper cake I wanted to use any extra reinforcement I could get, I just cut a dowel I had to the height of the cake. If you are going to be transporting the cake yourself, you can just thread something through it (as I did with the towel).
  •  Round Cardboard Cake Bottom or Cardboard cut to size – I opted for the latter option because all my Amazon purchases yield lots of leftover cardboard, lol. If you would like a prettier option Walmart and Michael’s sell cake bottoms for cheap. I wrapped my cardboard in blue wrapping paper.
  • Ribbon – regular wrapping ribbon to hold the diapers in their cake form (my friend Courtney uses large rubber bands but I didn’t have any on hand) and to decorate the top, 2″ ribbon to wrap the edges, 1″ ribbon to wrap around the entire cake and feed through the cardboard bottom for further reinforcement (I reused the ribbon that the receiving blankets were wrapped in).
  • 2 Receiving Blankets – Purchased via Amazon in a pack of 4. I split them up and used two for the diaper cake and included the other two in another gift (SO many babies happening lately!)
  •  3 Bibs – Pack of 3 via Amazon. I purchased them because the one had a whale on it, they don’t lend to the functionality of the cake. I wrapped the other two around the top of the dowel on the top tier of the cake to help hold it in place and prop up the towel on top.
  •  Soft Sole Whale Shoes – Available via Amazon. They have other animal options as well, super cute and seem to be great quality!
  • Whale Rattle – Purchased via Amazon. I purchased it on clearance but now the price has gone up to $10.00 (for a rattle!?? what?! lol) I would do an Amazon search for a whale toy to yield something more budget friendly.
  • Whale Towel – By Carter’s. Purchased at Walmart for $5.99 but it is also available here on Amazon for about $7 more.
  • Wooden Letter – I purchased my unfinished wooden letter at Walmart for $1.97 and my plan was to cover it in scrapbook paper (see my tutorial for an easy scrapbook wooden letter here), but didn’t have time to run to Michael’s. Instead I simply used my laser printer to print out the lyrics to “Baby Beluga” on a blue piece of cardstock and used that in lieu of scrapbook paper (please check my tutorial first if you plan to do this for instructions on use of laser printer vs. inkjet printer).


WHAT I DID: 

*Since I was supposed to be packing not crafting, I didn’t take the time to take step-by-step pictures but thankfully Wildly Domestic’s blog will offer you a much more detailed and informative tutorial than I would have provided. I will describe to you as best I can what I did.

  1. I began by using my cake pans to fan out the diapers, fold facing out, arranging them as best I could. Once I had them arranged to my liking I used a piece of ribbon to tie the diapers together.
  2. After all of my tiers were complete, I fed the length of the hooded baby towel through the layers, leaving the whale hood visible at the top. I also stuck the dowel down the middle for further reinforcement.
  3. I then cut a piece of cardboard in a circular shape to fit the bottom of the cake and cut a small hole in the bottom of the cake and fed the end of the towel through the bottom, manipulating it so it would lay flat (not cause the cake to sit crooked) and used shipping tape to flatten the excess towel on the bottom of the cardboard.
  4. To  prop the hood up on top, I wrapped the two non-whale bibs around the top of the dowel and draped the hood over them.
  5. Working with bottom and second layer, I wrapped the receiving blankets around the layers and tucked them under to secure them. I used a piece of clear shipping tape to hold them in place (I think my friend Courtney uses pins but I didn’t have any and knew the decorative ribbon would end up covering the tape anyway). See Wildly Domestic’s tutorial on “fondant style” diaper cakes for further instruction on how to fold and wrap the receiving blankets.
  6. I then took my 2″ ribbon and cut four pieces of the necessary length to wrap around each of the tiers. I would hold one end tight in place over the diapers and then use a dot of glue on the ribbon to attach it to itself at the back.
  7. Once you are done adorning the layers with ribbons you are ready to add your embellishments. I wrapped a piece of blue ribbon around the tail of my whale rattle and secured him around the middle of the top and second layer. Then I used a mini clothespin left over from another project to hold the shoes in place on the ribbon and a piece of twine to attach the letter “B” to the ribbon at the bottom layer. For the whale bib I simply used its velcro to attach it between two layers and folded it under so the whale image was showing at the front.
  8. After all of the embellishments were added I stuck gift basket shredded paper between the layers (I didn’t use any adhesive, just stuck them in there). I also cut a hole in the bottom of either side of the cardboard edges and fed a 1″ piece of ribbon through each hole underneath the cake and tied it at the top (this was not necessary but since I was going to be shipping the cake I wanted to make sure it held together).
  9. Finally I tied a bow around the bottom layer at the front and attached some gift ribbon to the top and used scissors to curl it!

diapercake3 diapercake2 diapercake1diapercake


Documenting Baby P’s First Year – Month 8

mo8

These last two weeks have been CRAY-ZY and have left me absent from blogland as I scramble to try to get us all set up to move into our new home TOMORROW! I promise to get back to it once we’re settled (hopefully with some great new posts on how to spruce up these cookie cutter military homes!). Over the weekend my sweet baby P turned eight months old and I did find the time to eek out a cute little beach themed summer chalkboard. I must say that these last two months with baby P have been my favorite, he is crawling and eating by himself and learning new things everyday. He is SO much fun and really loves spending time with J and I, each day I feel more and more like he is a real active part of our little fam now (as opposed to a little prince on a pillow lol). Here he is in all his eight month glory right before we headed down to the beach on Sunday for one last day of relaxation before this crazy week! Check out baby P at month seven and his other chalkboards here!

mo85 mo84 mo83 mo82

mo81

Baby P’s Nursery

parkroom

“Whoooooo” has the best nursery of all? Baby P!!! This week has been crazy to say the least, J returned from fleet week (yay!) and most importantly I was able to snag us a beautiful house on base, ya know, so we won’t be homeless when we close on this one in just a few short weeks! Since we will be moving very shortly and will need to rearrange it, I am excited to share baby P’s original nursery, as it is my favorite room in the house!

Before we found out if we were having a boy or a girl, I began brainstorming ideas for a nursery for our little babe. Since I had been hoping for a girl (sorry baby P, don’t worry I’ve changed my mind, haha), I hadn’t given much thought to a boy’s room at all but ironically, once I stared looking, I realized that I wasn’t really in love with any particular girl items but was quickly becoming obsessed with the idea of an owl themed nursery for a boy. After picking out a bunch of owl items I actually got a little sad thinking that I might not get to purchase any of them if the baby turned out to be a girl, haha! Once we found out that baby P was in fact a boy, I had SO much fun bringing his owl themed nursery to life, mostly thanks to my sweet family and friends who spoiled unborn baby P rotten. We kept the room pretty simple but I think it turned out so cute and although owls are getting super popular they are still more popular with girls than boys for some reason, so if you’re in search of a boy-themed nursery but are like me and don’t necessarily care for characters or typical sports themes, owls are a great option! Since I was too lazy to change the wall color of the upstairs bedrooms upon moving in, I was lucky enough to have the color work with nursery theme that I chose, so all that we needed to do was decorate (I will provide sources for all of the items below). I hope you love baby P’s nursery as much as he does 🙂

pr10pr6pr5pr7pr9pr8pr17 pr16] pr15 pr14 pr13 pr12 pr11 pr4pr3 pr2 pr1 pr


pr18

Baby P enjoying his room at 7 months (in an owl PJ outfit no less!)

SOURCES

Crib // Catalina Fixed Gate 3-in-1 Crib in “Sun Valley Espresso” available via Pottery Barn Kids for $549 (mine was purchased as a gift using a 20% off coupon so it came in at around $495 after shipping costs).

Dresser // Craigslist find for $45.00. See my post here on how I refinished it using gel stain. The changing pad was a shower gift along with it’s light blue minky cover and the basket I purchased at Michael’s for about $5.99 using a 40% off coupon.

Bookcase // Thrift store find for $5.00. See my tutorial on refinishing laminate furniture which features this very bookcase! The “Parker” wooden letters were purchased at Michael’s for $3.99 a piece using a 30% off of purchase coupon, if you are looking for a cheaper option see my post on easy scrapbook wooden letters here!

Green Owl Lamp // Purchased at Hancock Fabrics for $11.99 (sale item, woo-hoo!) but it is also available here. The lampshade is part of the Sweet JoJo Designs owl collection which matches the bedding purchased here via Amazon for $25.99 plus shipping.

Owl Bedding // The owl bedding set I chose included the comforter, crib bumpers, throw pillow, toy bag, diaper holder, fitted sheet, two widow valences (that I ended up not using) and the crib skirt. The set is by Sweet JoJo Designs and available here via Amazon for $179.99.

Owl Mobile // Purchased via Amazon as part of the Sweet JoJo Designs “Night Owl” collection. Available here for $42.99.

Owl Curtains // The curtains are part of the Sweet JoJo Designs set purchased via Amazon but available at Target for $49.99 for a set of 2 panels. We ended up trading out the curtains for blackout curtains once daylight savings rolled around, but I plan to try my hand at lining the owl curtains myself once we move into our new place so be on the lookout for that post!

Brown Glider/Rocker // Purchased via Amazon for $160.00. I thought this was a great deal as it was a prime item so shipping was free and it included the ottoman which many didn’t. I’m so glad I decided to puchase it becuase

Floating Shelves // Purchased from Home Depot in espresso for about $24.00 a piece, but no longer available. The “BYOB” sign and feathered owls were all gifted to baby P from generous friends :).

Owl Tree Poster// This was an activity at my baby shower which doubled as a guest book, each guest was to sign a leaf for baby P. The poster was purchased via Etsy from Peachwik, it was originally a listing for a wedding guest book but the graphic artist was kind enough to add a baby owl so we could use it for the shower instead!

Three Owl Fabric Wall Hangings // Purchased via Amazon as an accessory to the bedding set for $22.99 for the set.

“Grow Wise Little Owl” Decal // Purchased from wallartsy via Etsy for $32.00.

Owl Tree Decal // Purchased from StickitDecalDesigns via Etsy for $69.00.

Crochet Owl Stuffed Animal // Purchased from YouHadMeAtCrochet via Etsy for $36.50.

Large Brown/Blue Owl Stuffed Animal // Purchased from OneCraftyKing via Etsy for $26.00.

For the nursery we obviously threw caution to the wind when it came to budget as baby P was our first and we were just so excited to create this nursery, thankfully we were so blessed to have many of the expensive items ($69 decal!! wth!? lol) gifted to us which helped a lot with the cost. Wait to see how we recreate baby P’s nursery in our base house coming soon! 

DIY “Little Lady” Hair Bows

hairbow

I feel like with all of the “little man” projects I’m churning out I need to give a nod to my girls, don’t worry ladies I didn’t forget about you! Here is a quick tutorial for my “little lady” hair bows, which are so easy to make and are just the cutest little gifts for that special baby girl in your life. Also, this would make a great baby shower activity, I will explain below. Anyone who knows me will attest to the fact that I am obsessed with bows, and even on the 30 side of 20, I still think wearing hair bows is acceptable. Since I couldn’t let J steal all the glory with the matching bow tie set I made for him and baby P, when I tested out this little hair bow, I made mine to match one of P’s little man onsies as well – so cute. As for the tutorial itself, it is basically identical to the “little man” bow ties with slight variation depending on what size hair bow you would like, but lucky for you, the hair bow making process is much easier than bow tie as all you will be doing is gluing it to a clip, barrette or hair band. That being said, if you are planning on making these as a gift an adorable idea would be to make a bunch and display them on a personalized hair bow holder (yes, this actually exists, lol, check one out here.I will definitely be DIYing my own version of one of these if my friends ever stop having boys, so be on the lookout for that!). Hope you have as much fun making these as I have wearing them, you’re only as old as you feel (eight, I feel eight lol)!!! 🙂

YOU WILL NEED:

  • Fabric  (this is a good way to use up fabric scraps or hit up your fabric store’s remnants bin since you need so little.)
  • Glue Gun
  • Scissors
  • Small Plain Hair Clip, Barrette or Headband (all of which are available at the dollar store, Walmart for right around $1.00, so if you’re going the clip route, your cost will be a few cents per clip!)
hairbow1

I chose to use these clips since I was making them for myself. If you are making them for a “little” lady, purchase the fabric covered version.


DIRECTIONS:

Step 1:   Use this bow tie tutorial to create as many bows as you want. I used the hot glue method and wherever it said to iron I didn’t (I’m lazy, lol) and my project still came out great. Quick note about sizing, the bow in the tutorial will be about 3.5″ across (give or take), so for an infant this would be fine on a headband but way too big on a clip. If you are looking to make a smaller bow I would change the measurements to 5X3 and 1.5X1.5 for the two fabric squares. Once I play around with this a little more I will give exact measurements and pictures but as I’ve mentioned, all my friends are having boys!

Step 2: Once your bow is complete use hot glue to secure it to your clip or hairband and there you have it! It took me under 5 minutes to complete a bow so you could definitely churn out about ten in a half hour’s time and have a great gift! NOTE: If you want to attach the bow to a hair tie just stop at the step before you glue the smaller piece of fabric (center) or the bow and instead, glue it so that the underneath of the bow wraps around the hair tie (hair tie is inside of the bow).

hairbow2

Fun Idea: Remember when I said this would make a great baby shower activity? Precut the squares of fabric for your guests and set them up along with a glue gun and several different options for barrettes, clips, hair bands and hair ties and embellishments. Give a quick tutorial to your guests and then allow them to make their own hair bow creations at their leisure throughout the course of the party. SO much fun and super cute, you could even present them to the mama-to-be on a hair bow holder.  


check out my post on DIY hair bows to see how I made my matching bow!

check out my post on DIY “Little Man” Tie Applique Onsies to see how I made baby P’s matching onsie!