Skinny Berry Sangria

IMG_0606

This is a GREAT drink! So good in fact, that I had to wait for the after effects (and the memory of the after effects, lol) to wear off enough for me to stomach writing up the recipe for you guys, haha. The good news is as long as you don’t let these go down like water (as we did on our girl’s night) they shouldn’t give you any trouble but I will warn you it’s difficult because MAN are they delicious! This drink was my effort to create a fruity and fun “girl’s night” cocktail while keeping the calories at bay (the sugar content is still a factor but at least it’s from fruit and fruit juice, we do what we can right? haha). I love getting together with my girls for drinks but especially during the winter those extra calories hiding in your cocktails can definitely do some damage to the waistline. While it’s no secret that the best way to keep healthy and fit is to eliminate alcohol altogether, you’ll feel a little bit better about your decision to have a drink or two knowing that you were able to lighten them up even just a little bit! This is a great big-batch drink to make for a crowd and would be super fun for a bridal shower or summer event. That being said, cheers to warmer weather hopefully being on the horizon for us NOVA folks (but if not I can always warm up with this cocktail).

IMG_0596

Like my champagne glasses? They’re available here on Amazon in sets of four (“toast”, “sparkle”, “cheers” and “celebrate”) – so cute!

INGREDIENTS

IMG_0593

  • 1 bottle Sparkling Brut Rose (if you prefer a sweeter drink try a sparkling moscato or regular sparkling rose but I felt plenty of sweetness came from the fruit and cranberry juice)
  • 1/2-1 cup Berry Vodka (depending on how strong you want your sangria)
  • 1 cup berry or raspberry seltzer
  • 2 cups light or diet cran-raspberry juice
  • 1/2 cup each strawberries (sliced), raspberries and blueberries
  • frozen mixed berries for serving (optional)

INSTRUCTIONS

  1. Combine the fresh berries, vodka and cran-raspberry juice in a pitcher and allow to refrigerate for at least an hour.
  2. When ready to serve pour in seltzer and brut rose and stir. I served mine in champagne glasses with frozen mixed berries in lieu of ice cubes!

Sweet Potato Curry Lentil Soup

sweetpotatocurry

When I first started this blog (a year ago this month! Wow, time flies!) I maintained a pretty good balance of posting both recipes and crafts. Lately I’m realizing that as my squishy baby becomes less squishy and more of little marathon runner/mountain climber in-training, I’ve defaulted to a lot of my go-to recipes – things that are tried and true and can be prepared either with one hand as Baby P “helps” or that I can prepare in the time it takes him to finish his own dinner while he is confined to his high chair, lol. The other night when I was meal planning for this week and scanning through my “tried and true” Pinterest board, I kept coming across my own original recipes and became determined to test out one of the many recipes that I’ve been cooking up in my head recently but haven’t had the time to actually try out. So that is how I came to whip up this delicious Indian-inspired soup, perfect for a chilly fall or winter day! Aside from the fact that I love a jazzed-up spin on an old classic like lentil soup, I also love that this could totally be a “pantry-meal” a.k.a. something you could make using items that you already have on hand which makes it SUPER easy and super cheap as well. Two final and super important benefits of this recipe is that it is both super healthy and freezable! I made a big batch so that I was able to freeze the half we didn’t eat and simply heat it up for a quick meal another night.

SWEET POTATO CURRY LENTIL SOUP

INGREDIENTS

  • 2 Tbsp. olive oil
  • 3 cloves garlic, minced
  • 1 medium onion, diced
  • 2 carrots, chopped
  • 2 stalks celery, chopped
  • 2 large sweet potatoes, peeled and diced into 1 inch cubes
  • 1 large tomato diced (or substitute 1/2 cup canned diced tomatoes)
  • 8-10 cups chicken or vegetable broth OR 8-10 cups water and 2 Tbsp. bullion or chicken/vegetable base
  • 1 1/2 cups lentils, rinsed
  • 2 Tbsp. curry powder
  • 1/2 tsp. coriander
  • 1/2 tsp. cumin
  • salt and pepper to taste

DIRECTIONS

Step 1: In a dutch oven or large pot heat the olive oil and add in garlic, onions, carrots and celery and cook until just soft.

Step 2: Add in diced tomatoes and spices, season with salt and pepper and allow to cook for about 2 minutes then stir in lentils and sweet potatoes. Bring to a boil then reduce to simmer for about 35-45 minutes until lentils are cooked and sweet potatoes are soft.

Step 3: If you like your soups really chunky you can omit this step but I use an immersion blender to blend the soup up a bit, leaving some chunks but so that the smoothness of the portion of blended potatoes and lentils give the illusion of a heavier soup even though this is a light recipe. NOTE: If you don’t have an immersion blender simply ladle about 2-4 cups of soup into a regular blender or food processor, blend and then return that to the pot with the rest of the soup.

Our Favorite Meatloaf Recipe

photo (7)

When it comes to comfort food I’m a huge fan. Lucky for my waistline my hubby doesn’t share my love for comfort food so we don’t really indulge in it too often, however, the one thing I do require that we eat on occasion in order to satisfy my comfort food fix is meatloaf. I love a good meatloaf, partly because I love anything that you can put ketchup on (lol) but also because it’s kind of an all-in-one type meal (since I include lots of veggies in mine). That being said I have tried out a lot of recipes for “the loaf” (as my hubby refers to it, ha) trying to find one that would magically convert J to a meatloaf lover like me. While I am still yet to have him go ga-ga over a plate of meatloaf this recipe below is the one that I’ve had the most success with. I am a huge fan of this recipe because I was successfully able to use beef with a lower fat content and still achieve a nice moist meatloaf! Additionally I include lots of veggies and top it a special glaze (that is also great on chicken!) that yields a yummy caramelized crust. I am also happy to report that this recipe was baby P approved 🙂

Baby P enjoying some meatloaf for lunch! Did I mention it makes great leftovers? :)

Baby P enjoying some meatloaf for lunch! Did I mention it makes great leftovers? 🙂


INGREDIENTS

FOR MEATLOAF:

  • 1.5 lbs. lean ground beef (I used 93% lean)
  • 1/2 lb. ground pork
  • 1 zucchini, diced
  • 1 red bell pepper, diced
  • 1 yellow pepper, diced
  • 1/2 yellow or white onion, diced
  • 5 cloves garlic
  • 1/4 cup parsley
  • 2 large eggs
  • 1 cup panko bread crumbs
  • 1/2 cup Parmesan cheese
  • 1/2 tbsp. dried thyme
  • 1/2 cup ketchup
  • olive oil
  • salt and pepper, to taste

FOR GLAZE:

  • 3/4 cup ketchup
  • 1 tbsp. oregano
  • juice of half of a lemon
  • 3 Tbsp. honey
  • 3 tbsp. olive oil
  • salt and pepper, to taste

DIRECTIONS

Step 1: Begin by dicing your veggies, then heat about 2 tbsp. of olive oil in a pan and add onion, garlic, peppers, zucchini, thyme and a bit of salt and pepper. Cook until just soft, stirring constantly. Set aside to cool.

Step 2: In  a bowl combine beef, pork, parsley, eggs, panko, parmesan cheese, ketchup, salt, pepper and cooked veggies. Mix by hand until just combined, don’t over mix.

Step 3: To make glaze combine all ingredients and mix together, set aside.

Preheat oven to 425 degrees. On a sheet pan covered with parchment paper form meatloaf into a log (mine was about 10″ long), baste with some of the glaze and bake for about 1 hour, basting again halfway through cook time. Once meatloaf has finished cooking, allow to rest for 5 minutes before slicing. Enjoy!

photo 2 (2)

I serve mine with mashed potatoes, yumm!!!


Adapted from Food Network

Inside-Out Jalapeno Popper Burgers

jalabur

So you’re probably reading this post and thinking “wait, she cooks?”, lol. On account of my crafting spree the past few weeks I haven’t tried out many new recipes but luckily I have an arsenal of easy favorites that I can rely on during the weeks that I lack creativity in the kitchen. Last night I came up with this amazing new burger recipe that I am so excited to share with you! I like to think of this recipe as rolling two bar favorites, a burger and a jalapeno popper, into one delicious bite. In the interest of full disclosure I will tell you that the motivation for this burger was actually to get rid of some lingering cheese, sour cream and scallions in the fridge (throwing out food drives me nuts!) which reminded me of typical dip ingredients and then somehow my mind wound up at jalapeno popper, lol. No idea how that happened but I’m glad it did because I love a good burger and I’m so happy to add this one to my list of favorites (I’ll have to write a burger collective post soon!). I wouldn’t classify any recipe containing cream cheese and sour cream as “skinny” (lol) but for what it’s worth I did lighten it up by using reduced fat ingredients and lean beef feel free to adapt it to your liking whether that be dialing back the amount of cheese or using full fat ingredients! With football season officially upon us I hope you can feature these at your next game day get together, served up with lots of cold ones 🙂

Even though baby P wasn't awake for burger deliciousness he still thought our weekend was fab! :)

Even though baby P wasn’t awake for burger deliciousness he still thought our weekend was fab! 🙂


INSIDE-OUT JALAPENO POPPER BURGERS

INGREDIENTS (makes 8 regular burgers)

  • 2 lbs. lean ground beef
  • 4 oz. reduced fat cream cheese
  • 1/4 cup light sour cream
  •  1 medium jalapeno, diced (I removed the ribs and seeds to reduce the heat a bit, but prepare to your liking)
  • 1/3 cup crumbled bacon or bacon bits
  • 1 cup mild shredded cheddar cheese (pepper jack or mozzarella cheese would also work)
  • 1 scallion, sliced
  • 1/2 tsp. garlic powder
  • salt and pepper, to taste
  • olive oil

INSTRUCTIONS

Step 1: Combine cream cheese, sour cream, diced jalapeno, bacon, cheese, scallions, garlic powder, salt and pepper, stir to combine.

jalabur2

Step 2: Separate your ground beef into eight equal portions. Working one at a time, separate each section of beef and form two equal patties. Take about 1-2 Tbsp. of the cream cheese mixture and place it in the center of one of your patties, then take the other patty and place it on top of the filling using your fingers to pinch the edges of the two patties together around the filling and reform the burger. Continue until you have eight equal sized burgers.

jalabur1

Step 3: Brush your burgers on both sides with a bit of olive oil and sprinkle with a generous amount of salt and pepper. Grill on conventional grill or grill pan to your liking! These would be delicious served with homemade onion strings but if you’re lazy like I am just throw your onions on the grill while your burgers are cooking 🙂

jalabur5

ignore my weird choice of lettuce, yet another fridge item I was trying to burn lol

jalabur6

For two other great burger recipes check out my recipe for Kitty’s Mediterannean Turkey Burgers and Greek Sliders!

Chicken Sushi Rolls with Bacon & Red Pepper Aioli

sushch2 

Okay, I know I’ve been really heavy on the recipes these past few days (or is it weeks? I don’t even know how to measure time anymore it’s going so fast, haha) but I promise I’ve been crafting like crazy I just need to get around to writing the posts! This particular recipe was born out of our recent sushi making kick because once our first go at it produced fab results we decided to keep coming up with new sushi recipes and have been on a roll ever since (get it? Roll, lol). Now I’ve been a sushi enthusiast for as long as I can remember and even whipped up some basic homemade sushi with my Dad as a kid, but nothing could have prepared me for the deliciousness that is the roll that I’m about to share with you. First let me warn you there isn’t much about this roll that is “skinny” and it definitely deviates from my normal style of healthy cooking, but if you’re looking for a good homemade cheat meal or a specialty sushi roll that won’t cost you $15, this may be it!

Now about this magic roll – since the first one we made was a pretty basic California Roll, I wanted the next one to be whacky and different from what you’d normally come across on a specialty sushi menu. I recalled my friend telling me that she’d once tried a roll with chicken and bacon and thought that this would be perfect, especially because jazzing up simple ingredients is my favorite (you won’t find this gal traipsing to any specialty food stores to find a pickled ostrich foot or whatever the foodies are into nowadays, haha)! Basically this roll is comprised of fried chicken, bacon, avocado, onions (sauteed in the bacon fat! I told you it wasn’t healthy, lol) and an easy to prepare red pepper aioli. It’s kind of like a California BLT in sushi form and is mindblowingly delicious and really fun to make! Since it takes a little extra time in the kitch we usually prepare this on weekends when J and I can enjoy a night of sushi making and sake drinking 🙂 Give this one a try, I promise you won’t be disappointed!

Sake Selfie :)

Sake Selfie 🙂

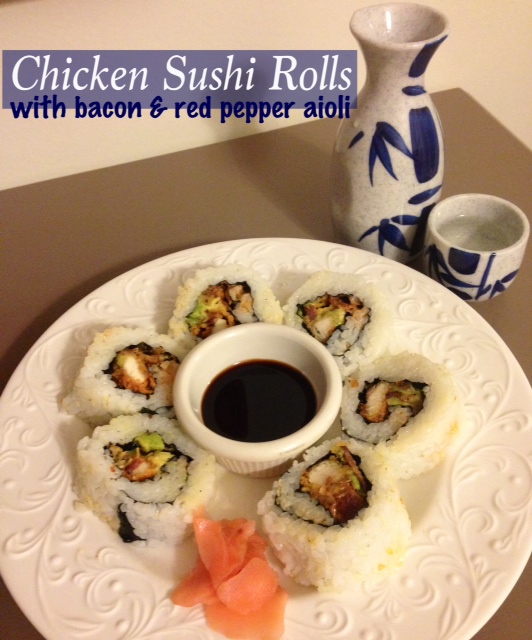
CHICKEN SUSHI ROLLS WITH BACON & RED PEPPER AIOLI

*You will need a bamboo sushi roller for this recipe, these are available on Amazon and in most major grocery stores.

INGREDIENTS (Makes 3 Rolls, 6 pieces each)

  • 3 cups sushi rice, prepared
  • 3 Dried Seaweed Sheets
  • Sesame seeds
  • 2 boneless, skinless chicken breasts
  • 2 cups Panko bread crumbs
  • 1/2 cup flour
  • 2 eggs
  • 1/2 onion, thinly sliced
  • 3 slices of bacon
  • 1/2 avocado, sliced into thin strips
  • canola or vegetable oil for frying
  • salt & pepper
  • 1/2 cup mayo
  • Juice of half a lemon
  • 2 roasted red peppers (I used jarred)
  • 1 tsp. siracha 

DIRECTIONS

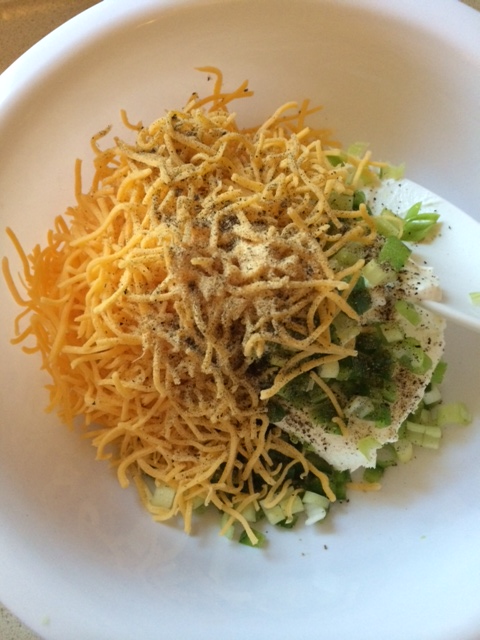
Step 1: Prepare your aioli by combining mayo, lemon juice, red peppers and siracha in a blender or food processor and blend until smooth (I use my nutri-bullet). 

Step 2: Next pan fry your bacon. While bacon is cooking, pound your chicken breasts to tenderize, then slice them into very thin (1/2-inch to 1 inch strips). Once bacon has finished cooking remove from pan and set aside, reserving bacon fat in pan.

Step 3: Add sliced onions to pan with reserved bacon fat and saute until they just begin to crisp. Remove and set aside.

Step 4: Okay, here is where it gets tricky (not the method but rather my explaining of the method, lol). If at any point my description of how to assemble this roll is lost on you, simply YouTube “how to make an inside out sushi roll” and I promise you will be able to do it in no time flat no matter what your ingredients. Take your bamboo sushi mat and wrap it in one layer of plastic wrap then lay it flat. Place a dried seaweed sheet atop and flick a little water on it to moisten it, then wet your fingers and spread about a cup of prepared sushi rice onto the seaweed sheet coming just about to the very edge (wetting your hands helps the sticky rice not to stick to your fingers, it helps to keep a bowl of water near by while preparing your rolls). Once your rice is spread into a thin layer, sprinkle it with about 1 tsp. of sesame seeds.

Step 5: Very carefully turn your seaweed sheet which is now topped with rice upside down so that the rice side is laying on the plastic wrapped bamboo mat and the seaweed side is facing up. Now, at the top of your seaweed sheet, place one strip of fried chicken, 1 strip of bacon (I crumble mine), 2-3 pieces of avocado and about 1 Tbsp. of sauteed onions, finally drizzle on about a tablespoon of the red pepper aioli. Now you are ready to roll (literally, lol)!

Step 6: Starting at the edge where you have placed your ingredients, use your bamboo mat to fold that side of the roll onto itself, squeezing tight to ensure that the filling will be tightly encased in the roll. Next roll your roll up the rest of the way (using your bamboo mat to guide it) and once it has been fully rolled use your bamboo mat to squeeze it firmly along the length of the roll.

Step 7: Lay your roll on a cutting board, wet a sharp knife and gently cut the roll into six equal pieces. Ta-da! Beautiful chicken-y goodness ready to be devoured! Even though this roll’s ingredients are not traditional, I still serve mine up with soy sauce, wasabi, ginger and of course sake 🙂

NOTE: I am more than aware that my description of the rolling process is vague at best, so next time I create one of these delicious rolls I will be sure to document the process step by step with photographs and update the post. 

Red, White & Blue Mini Trifles

trif3Before the month of July gets completely away from us, as these summer months tend to do, I wanted to put up a quick post about my mini 4th of July themed trifles! Independence Day has always been my favorite holiday, as I like holidays that are more centered around fun than presents. Well, on my first 4th of July as a parent I very quickly realized that a holiday whose activities include mainly drinking, staying up late and explosives, is not baby friendly, lol. We already knew that the fireworks show on base wasn’t in the cards for us because of P’s six o’clock bedtime, but we did manage to keep him up an extra two hours to attend a BBQ at a friend’s. Coincidentally, this was the same friend who had P and I over for a Memorial Day while J was at fleet week, so I had to come up with another patriotic dessert since they had already experienced my Patriotic Tie-Dye Cupcakes. I had been seeing a lot of flag cakes online, particularly an adorable one by Ina Garten (love her), so these patriotic trifles were my little deconstructed version of a red, white and blue cake. I like to do individual desserts when baking for a casual get-together or party, this way everyone can take one at their convenience and there doesn’t have to be a big to-do with cutting the cake or pie (people are always really weird about taking the first piece! haha). Also, the fact that it is served in a jar makes it easy for people to take one to go on their way out to enjoy at home later. So again, I went the semi-homemade route with this recipe, as I’ve mentioned before my baking skills are quite limited but if you are more blessed than I in the baking know-how department this can be made from scratch as well. Happy Be-lated 4th of July, I was so happy to be able to spend it with great friends enjoying mini desserts 🙂

trif1

RED, WHITE & BLUE MINI TRIFLES (makes 16 trifles in 8 oz. mason jars)

INGREDIENTS

NOTE: If “blue” velvet cake mix is not available you can always purchase white cake mix and add blue food coloring or use red velvet and substitute blueberries for the strawberries to keep with the “red, white and blue” color scheme. 

  • 1 Box Blue Velvet Cake Mix (and required ingredients – eggs, oil/butter and water)
  • 2 Boxes Vanilla Instant Pudding (I used the “cook and serve” kind, but whatever works for you is fine) – don’t forget to pick up whole milk to prepare! 
  • 1 carton strawberries
  • 2 cups heavy whipping cream or 1 regular sized container whipped topping (I opted to make my own whipped cream but if you don’t feel like doing so simply use cool whip instead)
  • 4 Tbsp. sugar, divided (if using prepared whipped topping you will only need 2 Tbsp.)

DIRECTIONS

Step 1: Begin by preparing cake mix and pudding according to package directions.

Step 2: While cake is baking and pudding is chilling, slice your strawberries. I cut off the stems then halved, quartered and then thinly sliced the berries, however you want to cut them up is fine! Once your berries are all sliced, place in a bowl along with 2 Tbsp. of sugar and mix then allow to chill in fridge until you are ready to assemble the trifles. 

Step 3: While cake is cooling and pudding is chilling in fridge, begin preparing your whipped cream by combining the 2 Tbsp. sugar and cold whipping cream and whisking with an electric mixer or by hand until stiff peaks form. Place in the fridge until you are ready to assemble trifles. If you are going the whipped topping route just hang tight!

Step 3: Once you are ready to assemble your trifles, start by cutting the cake into small cubes (although it will probably just end up crumbling when you handle it, which is fine). Place about 2 Tbsp. of cake in the bottom of each jar, then top with about 1 Tbsp. of pudding followed by 2 Tbsp. of strawberries and a heaping Tbsp. of whipped cream. Repeat in this fashion for a second layer, ending with whipped cream.

They will look something like this :)

They will look something like this 🙂

Step 4 (optional): If you are not serving your little masterpieces right away, place the lid on the jar and use a ribbon to tie a plastic spoon to the jar (this is just a fun little “to-go” touch for your guests), then chill until ready to serve! *While these are still good the following day, I don’t suggest making them too far in advance as the whipped cream tends to “deflate”.   
trif