I don’t know about you but I’m currently in the final phases of what I like to call the holiday season “hangover” or the period immediately following the holidays when BAM – regular routine resumes. While you’re expected to just jump back into the swing of things it’s a little hard when you’re inevitably left with a house full of decorations in need of taking down (which you feel like you just put up), tons of cleaning that you’ve been putting off, a to-do list longer than Santa’s naughty list and if you’re anything like me, lets face it, probably an actual hangover haha. Needless to say the holidays are one heck of a whirlwind but after a weekend of cleaning and de-Christmas-ing my home I can finally say that the Schulze household is almost back to normal.
As I was sadly packing up the last of my holiday decor I realized that I was yet to share one of my favorite DIY holiday projects with you – my DIY advent calendar! I don’t know about you but my favorite projects tend to be the ones that save me the most coin, I mean we all love saving money but to me saving money and creating something great is the ultimate win-win. That is how I feel about this advent calendar, mostly because when that holiday edition of the PB catalogue comes to my door and I already know before opening it that I can’t justify buying a single thing in it, it is SO nice to once in a while use their over priced items as inspiration for something I can create for a fraction of the cost! The original cost of this advent calendar was $149.00 plus shipping – INSANE. That is almost two weeks worth of groceries for us lol. After all was said and done my total cost came in at around $25.00 and about an hour and a half of my time! Now bear in mind that your version need not be this big, I know it’s hard to find a place for a five foot seasonal wall hanging (haha) but I hope this project can inspire a little DIY advent calendar project of your own and get you looking forward to next holiday season as I always am! xoxo

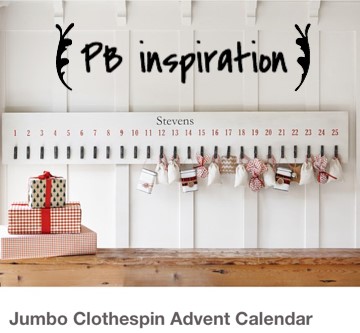
My inspiration for this project!
DIY Jumbo Advent Calendar
SUPPLIES
*Note: these are the supplies that I used to create this particular project, you can adapt your version as you see fit (smaller board, different font, colors, clothespin size etc.).
- 1 large wooden board – Mine measured 5′ X 10″ (I think the total length was 6′ at time of purchase but I had it cut down). I used a pine board because I wanted it to be a little more durable and less likely to warp should I ever have to store it in the garage or in a basement depending on where we live at the time. It was a little more expensive (only by a few dollars, but still). If I wanted to save some extra coin I would have used the same wood that I chose for my Jumbo Outdoor Holiday Signs, which runs about $8-ish for a 4 foot piece.
- 25 standard wooden clothespins – available pretty much anywhere, I believe even Dollar Tree carries them!
- 25 small canvas bags – here is the link to where I purchased them via Amazon.
- small letter/number stencils – available at any craft store but here is a link to a similar product on Amazon.
- painters tape
- x-acto knife
- measuring tape
- 2 large D-rings
- industrial strength wood glue or multi-purpose glue – I use E-6000 for most of my projects that require a heavy duty adhesive and it always works well for me.
- paint brushes
- latex paint – I used black, red and white
- red acrylic paint – for the canvas bags
- red spray paint – for the clothespins
INSTRUCTIONS
I began by sanding down my wooden board just to smooth it out a bid and then painting it with one coat of white latex paint. I wanted some of he wood grain to show through since I was going for the “rustic” look of my PB inspirational piece.
While the board was drying I spray painted my clothespins on all sides and left them to dry. I also used my stencils and red acrylic paint to paint the numbers 1-25 on each of my small canvas baggies.

finished product!
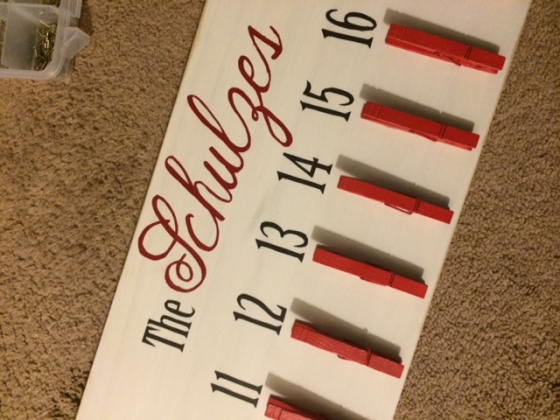
Once my large board had dried I distressed it a little using my electric sander (a hand sander would work also) then used my painters tape and x-acto knife method to paint “The Schulzes” and the numbers 1-25 onto the board. You can find a quick tutorial for this method here! Before painting the letters on I placed the clothespins on the board (without gluing them) just to get an idea of how I wanted everything spaced out. If you like the fonts I used for this project the script is “Austie Bost – rest of our lives” (available for free download via dafont.com) and I believe the standard font is just a variation of Times New Roman.

laying out the numbers

Gotta have SVU on while crafting! I wonder what episode it was! lol
After your paint has dried take a moment to screw the d-rings into the back of the board (this is easier to do prior to attaching the clothespins so that the board can still lay flat).
Finally, use the E-6000 glue to attach the clothespins below each of the numbers on the board. The glue dries clear and pretty fast so you should be ready to attach your little baggies in no time!

There you have it! One of my favorite holiday projects to date. I especially love that the bags are large enough to hold small toys and even little wooden trains so that we could fill them with surprises other than candy 🙂


