Coastal Chic Side Table Re-do – Blizzard Project #2

IMG_0556

Okay well I might be exaggerating about the “blizzard” part of this project a bit. The snow left just about as quickly as it came so “post-blizzard” project would probably be a more appropriate title :-p. However, since I had every intention of finishing this one up just as quickly as my first two-tone side table (an actual blizzard project that you can check out via the previous link), in the interest of not taking away from my sense of accomplishment I will still group it in with my other blizzard-inspired creations ;-).

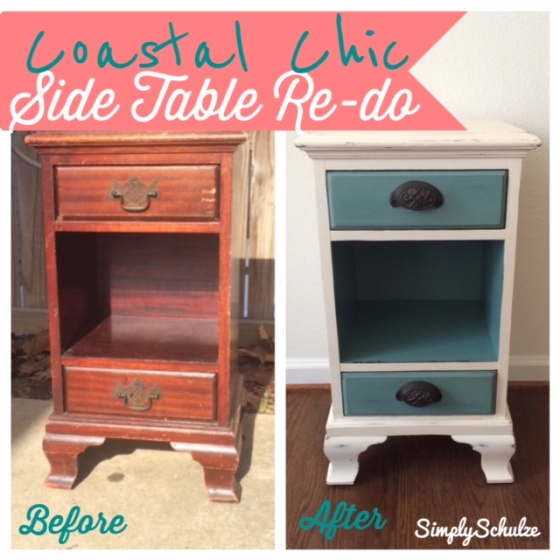
Before pictures – this old girl definitely needed some help!

I had mentioned in my previous post that I’m constantly browsing the local online yard sale sites in hopes of coming across some perfectly-priced furniture treasures in need of a face lift. I’m so thankful for this method of seeking out pieces to re-do because while P is quite the well behaved little boy, thrift store hopping with a toddler in tow can present a wide array of challenges, haha. Additionally, cruising the online buy/sell/trade pieces has also helped me find some great furniture re-sale and consignment stores I might not have easily found otherwise and that is exactly how I came across this particular piece. Through her posts on our local area B/S/T page I was able to become connected with the home-based business Willow Tree Restorations (I have linked her Facebook business page just in case you are checking in from the NOVA area or simply want some inspiration, her work is fantastic!) where the owner, a woman after my own heart, finds and refinishes beautiful vintage pieces. While I love her refinished pieces oh-so much I especially love that most of the pieces she finds she will also offer up as-is so that DIY enthusiasts such as myself can try their handy work at making them their own.

How cute is sweet P helping to sand?! My little DIY-er in training. NOTE: I know a lot of people don’t bother sanding when using chalk paint but I always just give it a quick run over by hand with a sanding block or with the small electric sander on the larger surface areas of a piece.

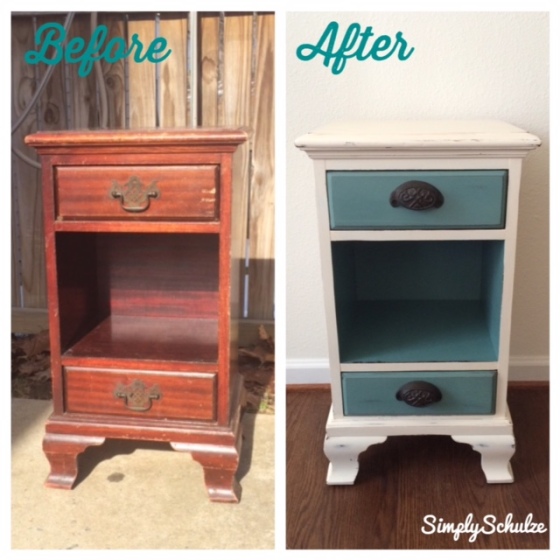
As for the re-furb story behind this particular piece, I have been obsessing over the two-tone look lately (I’ve posted a few of my inspirational pieces below) and after my success with the last piece I knew I wanted to try it out with some color, especially because I knew that I didn’t have a place for this particular piece in my home and would probably be re-homing it, I could really get creative with a color scheme other than what I’ve been working with. While the beachy and “coastal-chic” color pallets have never had a place in my personal décor I’m loving blues, whites and aquas more and more as of late! The particular colors I mixed for this particular project (see this post for information on how I mix my own chalk paint) are “Patina Blue” by Valspar and “Antique White” by Valspar (a great white somewhere between true white and ivory that I use for a lot of projects). I mentioned in my previous post that I’ve been trying out some new products in an effort to go a natural route with my top coats and waxes as opposed to harsher products like Minwax so for this particular project I tried out Chalk Mountain Wax available on Amazon – I was very happy with how great the wax turned out and the pack of two waxes also come with a wax brush all for under $30.00 so definitely great value there. After lightly distressing the edges of the table I waxed the entire piece first with the clear wax followed by a single light coat of the dark, just to add some warmth. In the interest of giving the piece a complete facelift I picked up some new pulls from Hobby Lobby while they were 50% off (normally $4.99 each), I love how new pulls or knobs can really transform a piece and you definitely see that in the before and afters here, I suppose it was unnecessary but I can always reuse the original pulls on another piece in the future!

My little apprentice in action again! lol Thankfully I switched to that all natural wax. This little munch came right over and took the brush out of my hand and said “I’ll do it! I’ll do it!”.
IMG_0555

Wow – that was a long post for such a little side table, lol. I hope it inspires a little coastal-chic project of your own … or maybe even inspires a trip somewhere warm (can you tell I’m longing for summer over here? haha). Speaking of inspiration, two of the pictures below are linked to the online shops of friends of mine, so please check out and “like” their pages – they are super talented and even if you are not local to their areas to shop with them they are certainly a wealth of inspiration!

Here are a few pieces that inspired this project. Secretary desk: Shabby Chic Boutique Desk: The Handcrafted Life Dresser (found via Pinterest): Homeroad

Two-tone Side Table Re-do: Blizzard Project #1

phonto1.jpg

Personally being stuck in the house drives me crazy. Whether it’s running errands or just being outside with friends, little P and I are gone most of the day and I love it that way! Needless to say as winter storm Jonas approached and everyone began clearing out their local grocery stores and waiting on ridiculously long gas lines, I was headed to Lowes to pick up some DIY essentials (with only hours to spare, haha!) to ensure my sanity for the duration of our snow-bound adventure. Now rewind about a week – I’m always keeping my eye on local online yard sale sites on the lookout for fixer-upper treasures and hit the jackpot the last few weeks! For under $100 I was able to score FIVE amazing new pieces of furniture to re-do (and unbeknownst to me at the time, this storm was about to give me a great opportunity to get to work, haha). Hopefully even after the snow melts I can keep crankin’ out the rest of these pieces at my current pace but we’ll see ;-).

frog

Our last minute trip to Lowes. P was in all his crazy-haired, pajama-clad glory!

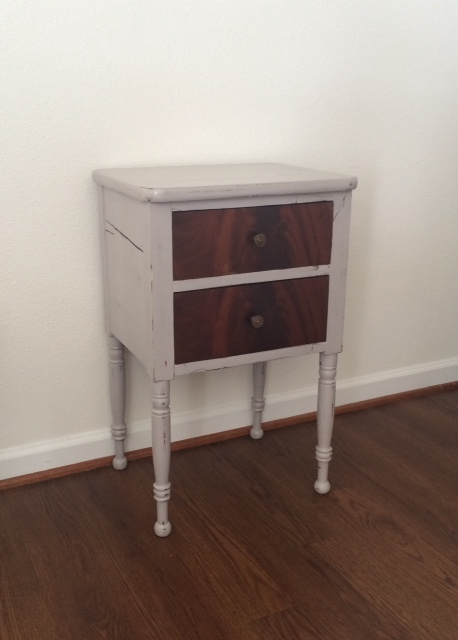
For now I’d like to share my first blizzard project – my two-tone side table. This piece was amazing and I couldn’t believe that the owner wanted to part with it (and for SO cheap), especially because it was so solid, it must weigh forty pounds if not more! Since I don’t have room for all of my creations I know that have to start selling things off here and there but I knew immediately that this is one that I would need to keep for myself. I loved the wood grain, which is why I chose to leave the drawers as is and loved the fact that the sides of the table actually had some noticeable splits in the wood which add to its character and vintage feel. I didn’t do anything special aside from try out a new wax which I plan to review in a separate post. I used my homemade chalk paint (see this post for the recipe and more information on mixing your own), distressed it a bit and then finished it using Dover’s Chalk Paint Wax – a new natural furniture wax I’m trying out in an attempt to get away from harsh chemical and VOC products like Minwax (although they have served me well to this point!). If you’re as in love with the color I used as I am, it’s “London Coach” by Valspar – doesn’t it just sound wintery and amazing!? I hope this project inspires a little snow day DIY on your end! xoxo

FullSizeRender

Finished product!


frogg

A little snippet of the fun that was had in all the snow!


Bathroom Vanity Makeover – Cabinet Painting Tutorial

master3

The master bathroom was the last major house project we tackled before baby P was born. We had been putting off this particular project because we anticipated that it would be the most expensive of our DIY projects as well as the most work. Well, it took us two other bathroom updates (the guest bathroom and the half bath downstairs) to realize that replacing the entire vanity was a stupid idea. While both of the other bathrooms came out great and our cute little modern vanities look amazing, replacing  the old vanities meant ripping out the cabinets and sinks, having to sand and repaint the walls, install new tiles in the empty space that was left on the floor and replace the floor molding before installing the new vanities – SO much work. We spent hours laying tile, grouting and cutting molding when we very well could have just updated the old cabinets and just purchased a new vanity top. Oh, well, lesson learned and we still got two cute bathrooms out of it so no harm done. Needless to say when it was time to tackle the master bath, I was determined to simply repaint the cabinets and replace only the vanity top. Having already repainted our kitchen cabinets (I will post about this soon!), this was not my first cabinet rodeo, lol. When ordering the new vanity top, we ended up choosing a cultured granite in a light gray because it went with our color scheme but was also neutral enough to compliment really any paint color, should the new owners decide to change the wall color. After purchasing our vanity top, I  got to work on the cabinets. These were a super easy project (all the more reason I wanted to kick myself in the head for not doing this in the other bathrooms as well), especially when compared to the kitchen cabinet process, this one paled in comparison!

Now, I will get to the tutorial, but first some advice. If you buy an older home take a good look at the existing cabinets and fixtures before you look to do a complete overhaul of the place. While some things may be physically damaged beyond repair and need to be replaced for non-cosmetic reasons, if it is just ugly but still functional try to look beyond the hideous 1982 stock cabinetry because chances are you can save a lot of time (and maybe some cash too) with just a quick paint job! In our case the cost of the projects were going to be about the same (the cost of the custom vanity top was comparable to the cost of a new full vanity and replacing the floor tiles) so we didn’t necessarily save a significant amount of money by going the repainting route BUT we sure did save a heck of a lot of time and aggravation! I am a HUGE advocate for making simple cosmetic changes, it is AMAZING what a little paint and DIY decor can do for a room and with little to no effort and cash you can bring an old, dingy space back to life (and more importantly, into the 21st century, lol)!

REPAINTING BATHROOM CABINETS

*NOTE: This can also be applied to kitchen cabinets as well! Basically all of the same principles can be applied to painting wooden furniture, check out my post on re-doing old furniture here.

YOU WILL NEED: 

  • Semi or High Gloss Kitchen/Bathroom Paint (the label will say “kitchen and bath” these paints are specifically designed to withstand the moisture caused by showering and cooking. If you don’t want to buy a bathroom or kitchen specific paint go with a semi or high gloss regular latex paint, I DO NOT recommend any finish below satin, as eggshell and flat paint don’t hold up to moisture well at all).
  • Sanding Blocks or regular sand paper
  • Foam Brushes or Small Rollers (they make rollers specifically for cabinets, they are good for the large surfaces but I found that I needed to use the smaller foam brushes on the edges anyway so I recommend skipping the rollers altogether, as they won’t really save you too much time).
  • Polyacrylic Top Coat (I suppose this could be optional because you are using a high or semi gloss paint, however, I wanted the extra protection on the cabinetry).
  • Drop Cloth
  • Bonding Primer (optional)
  • Caulk (optional)

INSTRUCTIONS:

  1. Begin by removing all of the drawers and doors, then remove all hardware. If you are planning on reusing the hardware you can let it soak for a few minutes in warm soapy water then clean them with a toothbrush or you can repaint them using a satin spray paint).
  2. Give the surfaces of your doors and drawers a quick sand, no need to go nuts, just about a minute on each surface will do, you are simply trying to remove a good amount of the original sheen or varnish. Once you are done sanding, wipe all surfaces down with a damp cloth to remove any sanding dust. Don’t forget to sand the exterior body of the vanity as well. Once you are finished sanding, vacuum or dust the insides of the drawers and around the vanity itself to ensure that no particles will get on your wet paint once you begin working. NOTE: Some tutorials and cabinet painting kits (such as Rustoleum) suggest using deglosser (aka liquid sandpaper) in place of sanding. I have done both and I now prefer to just sand, it takes about the same amount of time and you won’t have to deal with the greasy disgustingness of the deglosser.
  3. Another optional step is using white paintable caulk to fill in any cracks or holes in the wood, this is a great trick! Just squeeze it in and smooth it out using your finger. This will make your cabinets look even newer as you will be hiding any wear and tear or factory imperfections. Most caulk is paintable after just a half hour. Again, this step is optional but if you are a perfectionist I wouldn’t skip it, as once you paint your cabinets (especially if you are using a light color) imperfections in the wood will be more apparent.
  4. Set up a work area for painting the doors and drawers, since this is usually a few day project, I do not recommend doing it outside. The garage or spare bedroom will probably be best (since I didn’t have any tiny humans crawling around at the time, I simply moved our dining table to the side, laid a giant plastic drop cloth of the tile floor and set up shop there). Lay a drop cloth (I suggest plastic) and you are ready to paint!
  5. If you are using stark white paint as I did you might consider applying a coat of bonding primer or cover stain first, that way you won’t require as many coats of paint to hide the wood color beneath. This is optional, however, and if you are using a darker color paint this is definitely unnecessary. As far as the method for painting the drawers and doors, the drawers can usually prop up on their own, but for the doors I use the same method as I do when cooking a whole chicken in the crock pot (lol), I create a few balls out of tin foil then prop each door up flat so you can easily paint the sides and edges. Now, give all exterior surfaces an even coat of paint, using even strokes in the direction of the original wood grain. I don’t paint the insides or sides of the drawers, when I first tacked my kitchen cabinets I posed this question to the Google gods (haha) and it seems that even professionals don’t paint the insides or sides of cabinets when refinishing them, which worked for me – less work, woo-hoo!!! Once you have applied your first coat of paint to the drawers, doors and exterior body of the vanity or cabinet itself, allow about 12-24 hours of dry time. I know that sounds like a lot of dry time, however, good dry time is key in ensuring that your piece will hold up and it is extra important in the case of cabinets as they will be handled on a daily basis. This is a good nap-time or after work project as you can spend an hour or so each day over the course of a few days.
  6. Repeat the painting process until you have applied the desired amount of coats, for darker colors this may only be two but for stark white you may need up to four if you choose to forgo the cover stain. Once your final coat has dried you can go ahead and apply your first coat of polyacrylic top coat if you are using one. I chose to apply two coats of the clear polyacrylic just to be safe. Once your final coats have tried go ahead and reattach your hardware and you are finished!!!

master2

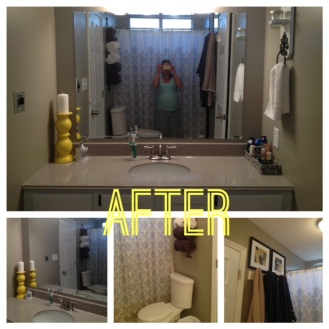
I hope that by looking at these before and afters you can see what a difference refinishing your cabinets can make. You would NEVER know that my vanity was originally a piece of crap 80’s builder-grade cabinet! I will be making another post soon on our entire master bathroom re-do and give you some more budget-friendly decor pointers, so be on the lookout for that. In the meantime, here is a sneak-peak of the before and afters just to give you an idea.

master

master1