Coastal Chic Side Table Re-do – Blizzard Project #2

IMG_0556

Okay well I might be exaggerating about the “blizzard” part of this project a bit. The snow left just about as quickly as it came so “post-blizzard” project would probably be a more appropriate title :-p. However, since I had every intention of finishing this one up just as quickly as my first two-tone side table (an actual blizzard project that you can check out via the previous link), in the interest of not taking away from my sense of accomplishment I will still group it in with my other blizzard-inspired creations ;-).

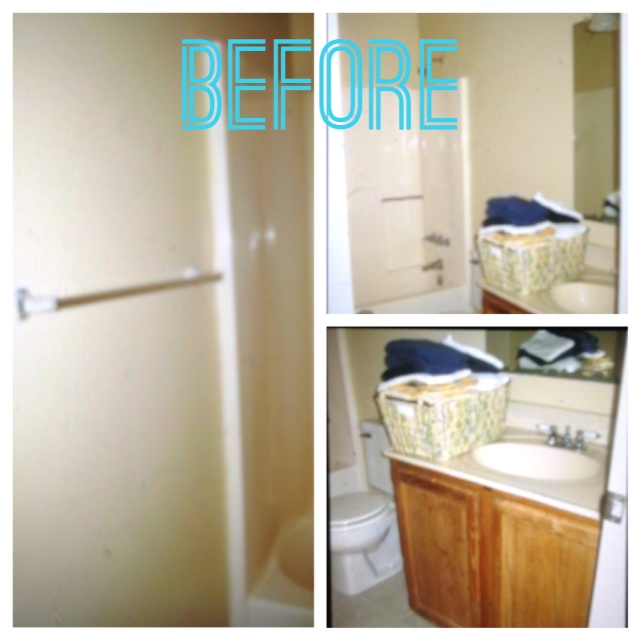
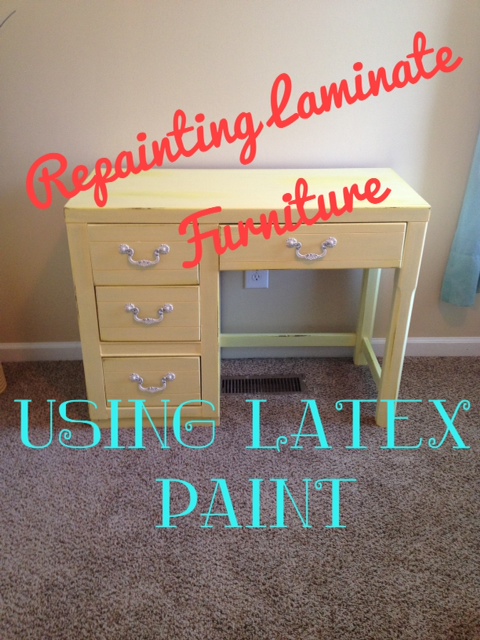
Before pictures – this old girl definitely needed some help!

I had mentioned in my previous post that I’m constantly browsing the local online yard sale sites in hopes of coming across some perfectly-priced furniture treasures in need of a face lift. I’m so thankful for this method of seeking out pieces to re-do because while P is quite the well behaved little boy, thrift store hopping with a toddler in tow can present a wide array of challenges, haha. Additionally, cruising the online buy/sell/trade pieces has also helped me find some great furniture re-sale and consignment stores I might not have easily found otherwise and that is exactly how I came across this particular piece. Through her posts on our local area B/S/T page I was able to become connected with the home-based business Willow Tree Restorations (I have linked her Facebook business page just in case you are checking in from the NOVA area or simply want some inspiration, her work is fantastic!) where the owner, a woman after my own heart, finds and refinishes beautiful vintage pieces. While I love her refinished pieces oh-so much I especially love that most of the pieces she finds she will also offer up as-is so that DIY enthusiasts such as myself can try their handy work at making them their own.

How cute is sweet P helping to sand?! My little DIY-er in training. NOTE: I know a lot of people don’t bother sanding when using chalk paint but I always just give it a quick run over by hand with a sanding block or with the small electric sander on the larger surface areas of a piece.

As for the re-furb story behind this particular piece, I have been obsessing over the two-tone look lately (I’ve posted a few of my inspirational pieces below) and after my success with the last piece I knew I wanted to try it out with some color, especially because I knew that I didn’t have a place for this particular piece in my home and would probably be re-homing it, I could really get creative with a color scheme other than what I’ve been working with. While the beachy and “coastal-chic” color pallets have never had a place in my personal décor I’m loving blues, whites and aquas more and more as of late! The particular colors I mixed for this particular project (see this post for information on how I mix my own chalk paint) are “Patina Blue” by Valspar and “Antique White” by Valspar (a great white somewhere between true white and ivory that I use for a lot of projects). I mentioned in my previous post that I’ve been trying out some new products in an effort to go a natural route with my top coats and waxes as opposed to harsher products like Minwax so for this particular project I tried out Chalk Mountain Wax available on Amazon – I was very happy with how great the wax turned out and the pack of two waxes also come with a wax brush all for under $30.00 so definitely great value there. After lightly distressing the edges of the table I waxed the entire piece first with the clear wax followed by a single light coat of the dark, just to add some warmth. In the interest of giving the piece a complete facelift I picked up some new pulls from Hobby Lobby while they were 50% off (normally $4.99 each), I love how new pulls or knobs can really transform a piece and you definitely see that in the before and afters here, I suppose it was unnecessary but I can always reuse the original pulls on another piece in the future!

My little apprentice in action again! lol Thankfully I switched to that all natural wax. This little munch came right over and took the brush out of my hand and said “I’ll do it! I’ll do it!”.

IMG_0555

Wow – that was a long post for such a little side table, lol. I hope it inspires a little coastal-chic project of your own … or maybe even inspires a trip somewhere warm (can you tell I’m longing for summer over here? haha). Speaking of inspiration, two of the pictures below are linked to the online shops of friends of mine, so please check out and “like” their pages – they are super talented and even if you are not local to their areas to shop with them they are certainly a wealth of inspiration!

Here are a few pieces that inspired this project. Secretary desk: Shabby Chic Boutique Desk: The Handcrafted Life Dresser (found via Pinterest): Homeroad

Two-tone Side Table Re-do: Blizzard Project #1

phonto1.jpg

Personally being stuck in the house drives me crazy. Whether it’s running errands or just being outside with friends, little P and I are gone most of the day and I love it that way! Needless to say as winter storm Jonas approached and everyone began clearing out their local grocery stores and waiting on ridiculously long gas lines, I was headed to Lowes to pick up some DIY essentials (with only hours to spare, haha!) to ensure my sanity for the duration of our snow-bound adventure. Now rewind about a week – I’m always keeping my eye on local online yard sale sites on the lookout for fixer-upper treasures and hit the jackpot the last few weeks! For under $100 I was able to score FIVE amazing new pieces of furniture to re-do (and unbeknownst to me at the time, this storm was about to give me a great opportunity to get to work, haha). Hopefully even after the snow melts I can keep crankin’ out the rest of these pieces at my current pace but we’ll see ;-).

frog

Our last minute trip to Lowes. P was in all his crazy-haired, pajama-clad glory!

For now I’d like to share my first blizzard project – my two-tone side table. This piece was amazing and I couldn’t believe that the owner wanted to part with it (and for SO cheap), especially because it was so solid, it must weigh forty pounds if not more! Since I don’t have room for all of my creations I know that have to start selling things off here and there but I knew immediately that this is one that I would need to keep for myself. I loved the wood grain, which is why I chose to leave the drawers as is and loved the fact that the sides of the table actually had some noticeable splits in the wood which add to its character and vintage feel. I didn’t do anything special aside from try out a new wax which I plan to review in a separate post. I used my homemade chalk paint (see this post for the recipe and more information on mixing your own), distressed it a bit and then finished it using Dover’s Chalk Paint Wax – a new natural furniture wax I’m trying out in an attempt to get away from harsh chemical and VOC products like Minwax (although they have served me well to this point!). If you’re as in love with the color I used as I am, it’s “London Coach” by Valspar – doesn’t it just sound wintery and amazing!? I hope this project inspires a little snow day DIY on your end! xoxo

FullSizeRender

Finished product!


frogg

A little snippet of the fun that was had in all the snow!


DIY Shutter Shelf

shuttershelf7

As I’ve mentioned in my last few crafting posts, I’ve been scrambling to get our new house set up. After all, we’re only going to be here for under a year and I want at least a little time to relax and enjoy our time here before we pack up and move on again. This particular project has been a long time coming, as I purchased these shutters quite some time ago when we were still living at our Honey Tree house and still unaware that we would be moving in the next few months. My friend Lisa and I hit up “The Red Barn” which is, well, you guessed it – a red barn, lol but it’s also an antique/used furniture shop as well. Every now and then they’ll post items on our local Craigslist page and at the time Lisa was looking for small shutters to make shelves. It just so happened that the Red Barn owner did have the exact type of small shutters she was searching for but since he had three sets and she only needed two I decided to take the other ones, because for $5.00 a set why not! Since I didn’t have any purpose for them in our Honey Tree house they just sat in the garage with the rest of my back-burner project supplies and of course J kept trying to throw them out, convinced that I would never find a use for them, lol. As usual he was wrong (haha, just kidding .. or am I?) and when we moved into our new home on base I knew just the thing that was going to spruce up our ugly, empty kitchen wall – a DIY shutter shelf!

Now let me rewind a bit. Although I had seen shutters repurposed as shelves on Pinterest I wasn’t convinced that it was a project that I actually wanted to attempt until I saw how awesome my friend Lisa’s bathroom shutter shelf came out. I think what I love most about DIY and crafting is sharing ideas and inspiration for projects with friends and these repurposed shutter shelves are a perfect example of that :). After checking out Lisa’s shelf, I found that all I needed to do to create my own shutter shelf was purchase some brackets and mounting hardware, since I already had the paint and knobs (left over from my DIY Microwave Stand) on hand from other projects. The grand total for this project came in right around $18.00 which is amazing because if my memory serves me correctly the ugly, flimsy floating shelves that can  be purchased at most homeware stores go for much more than that! Furthermore, after doing a little research I found that shutter shelves purchased via Etsy are going for anywhere between $45.00 and $100.00! So even if you don’t necessarily need a shutter shelf but have found some cheap shutters like I did, you could probably make a pretty penny by taking the time (not very much time, mind you) to do this project and sell it on Craigslist or Ebay – just a thought!

If you don’t have a lot of used furniture stores in your area shutters may be hard to come by, but if you do, I hope you give this project a try. It’s a super easy and fun way to jazz up any space in your home, and even if you don’t need a functional shelf they’re still fun to hold décor or pictures. Additionally, although these are inherently “shabby-chic”, with different paint or bracket choices you can adapt them to fit your décor style. Personally, my style is a combination of vintage pieces and modern finishes so the shabby finish on the shutters combined with the smooth modern brackets fit my décor perfectly! Here is my tutorial along with the products that I used to achieve this look, you’ll never believe how easy it was!

DIY SHUTTER SHELF

WHAT I USED:

  • 1 pair of shutters (see picture below) – I found mine at a used furniture/antique store for $5.00! Mine were fairly small about 26″ long and 9″ wide (you can also use larger or smaller shutters just purchase brackets accordingly).
  • 2 metal brackets – purchased via Amazon here for $12.58.
  • 2 knobs – purchased as part of a set at Target (available 4 to a pack here for $12.99), I had two left over from my DIY Microwave Stand.
  • 2 Keyhole Mountings – for hanging shelf (like these).
  • Chalk Paint – see this post to see how I made my own chalk paint. I used a sample size of Stone Mason Grey by Valspar, read more about my love for sample sized latex paints for crafting in this post.
  • Minwax Finishing Paste Wax in “Special Dark”
  • Foam Brush (or regular paint brush) – I found that a 1″ brush could most easily work between the slats of the shutters while painting.
  • Wood Filler – available at your local home improvement store, you can also substitute paintable caulk.
  • Sanding Block or Sand Paper
  • Clean Rag or cheese cloth
  • Drill
  • Screw Driver

WHAT I DID:

Step 1: I began by cleaning my shutters with a damp rag (mine were filthy!). Next I began separating my shutters by removing all existing hardware. I then used wood filler to fill any of the holes that were left from the old hardware.

Before

Before

Before - gahhh cob webs eek!

Before – gahhh cob webs eek!

Before

Before

Step 2: Once the wood filler had dried, I returned to the piece and sanded those areas smooth and wiped the piece down with a clean cloth to remove any residue from sanding. Then I began painting my shutters. This was a bit tedious as you have to paint in between all of the slats. I painted one side then returned about a half an hour later to paint the other side, then repeated for a second coat (mine required two, depending on the original color of your shutters and the color of the paint you are using you may only need one).

After holes had been filled.

After holes had been filled.

My favorite - little Valspar sample paints! Note, my very special paint stirring tool lol

My favorite – little Valspar sample paints! Note, my very special paint stirring tool lol

Step 3: When your paint has dried, using a rag or cloth, apply an even coat of

Step 4: Once your shutters are painted and waxed decide how you want them to line up. Once you have decided, take your shutter that will be against the wall (the one that will be mounted on the wall, not the one that will be the functional part of the shelf) and using a drill, attach a keyhole mounting piece to each corner of the back of the shelf (mine were about one inch down and one inch in).

Keyhole mounting brackets.

Keyhole mounting brackets.

J in action drilling holes for the knobs! Ignore his claw feet, eek! :-P

J in action drilling holes for the knobs! Ignore his claw feet, eek! 😛

Step 5: Next, working with the same shutter, turn it over so that the part that will be facing out is facing you and measure equal distances for your knob placement, then drill a hole for each of the knobs and then screw them in.

Step 6: Now you are ready to attach your brackets! Using your brackets as a guide, mark where each screw is to be placed, then attach your brackets. That’s it! All you’ll need to do is mount your shelf on the wall using two screws that will fit your keyhole mounting hardware, see my finished product below!

I'll update it once I decorate it but for now the shelf itself is decoration enough, I LOVE it! :)

I’ll update it once I decorate it but for now the shelf itself is decoration enough, I LOVE it! 🙂

DIY Rustic Burlap Pennant Banners

pennantbur

As usual last night I was up way too late crafting, but I was excited to get these done and off of my to-do list. I have a few parties coming up and I knew these burlap pennant banners would add a little extra something to the table displays and make for a great piece of decor to have on hand for future events. There is nothing too special about these and as I’m sure you’ve seen on Pinterest they are extremely popular, lol. However, since I used cheap store bought stencils for my project, I thought my tutorial would be worth sharing as I noticed that a lot of tutorials as that you create your own stencils which is just way too time consuming for my lazy butt. I would say more but there isn’t much else to say, just easy breezy party decor at it’s finest! Hope this tutorial comes in handy for your next shindig, I will be posting pics of how I use them at each event at a later date! Happy Memorial Day everyone, thank you to those who have served, past and present and of course, to those who made the ultimate sacrifice for our freedom.

Squishy baby says thank you to our troops!

Squishy baby says thank you to our troops!


DIY RUSTIC BURLAP PENNANT BANNERS

NOTE: If you’re interested in making these with a different fabric check out my post on DIY fabric pennant banners, great for parties or photo backdrops!

YOU WILL NEED:

pennantbur1

  • Burlap Fabric (the amount you need will depend on how many letters are in your words, I was able to get over 30 large squares out of 2.5 yards)
  • White Acrylic Paint
  • Paint Brush
  • Large Alphabet Reusable Stencils (available at Staples for about $7.00, I will be using these for several projects so it was a good investment, alternatively you could print your letters out on paper and use an X-acto knife to cut them out and create your own stencil)
  • Glue Gun
  • Twine or Ribbon

DIRECTIONS:

Step 1: Create a template for your pennants in whatever shape you would like, I chose a rectangle with an inverted point at the bottom. The measurements will depend on the size of your stencils but if you are using the large 5″ ones as I did, I found a good measurement to be 7.5X7.5 inches.

pennantbur2

Step 2: Using your pattern as a guide, cut out as many pieces of burlap as you need. NOTE: I did not care about fraying as I though it added to the rustic look, however, to keep your piece from fraying you can spray it with a bit of fabric stiffener or brush the edges with mod podge and allow to dry before going on to the next step.

pennantbur3

Step 3: Using your stencils, holding each steadily in place paint your letters onto the burlap and set aside to dry.

pennantbur6

soooo many letters! lol

pennantbur4 pennantbur5

Step 4: Once letters are dry (I allowed mine to sit overnight), lay out a piece of twine long enough to accommodate the letters with slack on either end for tying the banner up for display.

Step 5: Apply a line of hot glue to the top of each burlap square and fold it onto itself, pressing down to create a firm seal. The spacing of the letters is up to you, I did not measure it out, just eyeballed it. Once you are finished your banner is ready for display!!! Check back to see how I display mine 🙂

Fun idea: If you want your letters to be interchangeable simply do not glue them to the twine but rather use a small hole punch to punch two holes along the top of each pennant and weave the twine through or use mini clothes pins to hold them to the twine!


Easy DIY Nautical Frame – Made For Under $1!!!

frame8

So with J gone for fleet week (*sigh* it has only been seven days and it feels like foreverrrr already), I have been keeping myself busy with baby P but also, of course, with TONS of crafts, haha. Earlier this week I found an adorable beachy frame on clearance at our local craft store and picked it up for J’s Mom (with all the running around for my niece’s b-day I wasn’t able to get my MIL a Mother’s Day gift, just a card), who loves beach themed decor so my plan was to put a picture of baby P from one of our recent beach trips in the frame. However, when I printed the picture I wanted to use, the store cropped it wrong and I ended up having to use another, but being the weirdo that I am, I couldn’t bring myself to throw out a picture of baby P even though it was basically useless (wow, I am a FREAK lol). In an ah-ha! moment I had the idea to use it in our guest bathroom, which is beach themed and a little gallery wall where baby P’s beach photo would fit perfectly (check out our guest bathroom update saga here). In my mind the project was going to involve rope, a picture frame and some of those baby clothes pins I had picked up for a party craft I am making in the near future, but to save myself the running around looking for rope (especially when I probably wouldn’t use it again, defeating the purpose of this craft being essentially free), I decided to just use twine I already had at home and instead of a frame I purchased a dowel for $0.59 to create my own “frame”. So, yesterday during P’s nap I whipped up this little picture frame in about 15 minutes, but the ease of this craft isn’t even the best part. The best part would be that when broken down, this craft costs about $0.75!!! Baby P looked on in delight as I hung it as part of our little bathroom gallery wall this morning and I just know our guests will love seeing it too :).

The original picture that prompted this idea, isn't my squishy baby sweet?

The original picture that prompted this idea, isn’t my squishy baby sweet?

YOU WILL NEED:

NOTE: If you find a cheap thrift store picture frame you could use that in place of the dowel, simply remove the glass and begin the instructions at step 3. Also, this does not need to be beach themed, you can wrap the frame in whatever material you would like and then embellish with something that suits your style!

frame1

  • A dowel (round or square, whatever your preference)
  • Hack Saw (or any saw, if you are desperate you can use scissors if you dowel is skinny enough)
  • Sand Paper (optional)
  • Rope or twine
  • Glue Gun
  • Mini Clothes pin (available at most craft stores, if you are making a larger version of the frame you could use a regular sized clothes pin)
  • Ribbon (optional, you could just use more rope or twine in it’s place if you’d like)
  • Sea Shells or Beach Glass (optional)

INSTRUCTIONS:

Step 1: Take your dowel and measure and mark the lengths of your frame size. I chose to do a 7″X7″ square frame since I only had a small amount of space available on my wall. Then use your hack saw to cut the four pieces and then sand off any remaining wood pieces or roughness on the edges (no need to make it perfect, you will be covering this anyway). NOTE: If you are desperate, just hack at your dowel using scissors until you weaken it enough to snap it with your hands, it will be uneven on the edges but you can sand them. Ghetto option I know, but I know some peeps don’t have saws and I like to be an equal opportunity crafter, lol!

Step 2: Arrange your four sides in a square as if they are lincoln logs (two on the bottom and two on the top overlapping). You can also do one under the other or glue the corners so that the frame will lay completely flat, it is up to you but personally I liked the way it looked using the lincoln log method. Use a dot of hot glue to attach each of your four corners.

frame2

Step 3: Now, beginning at a corner, use a dot of hot glue to attach the end of your rope or twine to the frame. Then apply a small line of glue to the frame and working a few inches at a time, begin wrapping the rope or twine tightly around the frame. Work quickly so the glue does not dry before you press the rope to it. Continue this process around the body of the frame until it is completely covered.

frame3 frame4 frame5

Step 4: Once you have finished the frame, decide where you want your picture to fall within it, then cut a piece of twine long enough to reach across the back width of the frame, securing it at either end with a dot of hot glue.

Step 5: Now, cut two pieces of ribbon, twine or rope of equal length (you will use these to hang the frame), the length depends on your personal preference. To attach each piece, place a dot of glue at each of the two top corners of the frame and secure an end of each piece. Tie them at the top in a bow or knot and it is ready to hang!

frame7

Step 6: The last step is optional, but if you wish you can embellish your frame. I used a single seashell attached with hot glue at one of the lower corners. Hang your frame, high-five yourself and if you’re a Mom decided what you’d like to do with the other 45 minutes of naptime! 🙂

frame6

Don’t forget to check out my post on our guest bathroom update, where you can view before and after pictures of our bathroom and all of our decor 🙂

Updating Our Guest Bathroom

upbath13

I’d like to share our guest bathroom update, which was one of the first projects I tackled upon moving into our home. I know I’ve mentioned in my other house posts that I like to stretch our budget by simply updating our rooms with DIY decor and fresh paint, as opposed to doing a complete reno. The upstairs bathroom was in decent shape, the tub surround, toilet and light fixtures were good, and although we decided to replace it, the cabinet portion of the vanity was acceptable as well, so I regret not simply replacing it and purchasing a new vanity top (don’t make the same mistake we did, read my tutorial on repainting cabinets and get to it!). I decided to go with a beachy-chic feel for the bathroom decor, normally I’m into a little more monochromatic design with pops of color because I feel it is a little more modern, but I figured for the guest bathroom it wouldn’t hurt to have a little fun with it, after all we had just moved to the coastal Carolinas! The majority of the bathroom update was simply adding decor, with the only hard part being the replacing of the bathroom vanity (don’t get me wrong, I love the way it looks but it was a major pain in the arse).

Before I get to the specifics of the bathroom update, let me help you to hopefully avoid one of our giant missteps in the project by giving you a much simpler DIY solution. If you are considering replacing a vanity completely, before you tear out the existing one I urge you to first take a lay of the land and ask yourself – is there physical damage, missing or rotten pieces of wood? If so, replacing the piece may be your only option, however, if you are just dealing with something that is ugly but functional read my post on refinishing cabinets, mine were as ugly as they come, a real 1980s builder-grade gem lol. If you are still not convinced, let me tell you this – replacing a vanity, especially one that is original to the home, will involve replacing parts of the floor beneath it before installing your new vanity, and I can assume that since you are reading DIY posts on home updates you are not in fact a professional builder, haha. Once you rip that old vanity out there’s no going back, you’ll be stuck as we were, having to sand and paint the walls (which will be damaged by your removal of the vanity), install new subfloor (oh, and the fact that we owned only a hack saw and drill as far as power tools went made it even more fun – NOT lol), then lay new tiles and grout before you can even THINK about putting in that cute new vanity that has been sitting in your garage for the weeks it took you to prepare the space for it. Still sound like a good idea? If you are up for a challenge, by all means, go nuts but if you are like me and would rather spend your weekends at the beach instead of on your hands and knees grouting a bathroom floor when all you wanted was a new vanity, then I plead with you to go the repainting route haha. That being said, our bathroom did come out super cute and if you do decide to replace your vanity you can still DIY it (if you have any questions about replacing the floor tiles leave a comment, we had no idea what we were doing and it still came out great). Now for the specifics, since this isn’t a tutorial I’ll just explain the update and give sources for all of my decor finds.

upbath9upbath12

WHAT WE DID: 

  • Removed the vanity, replaced the floor tiles around it and installed a new sink/vanity combination. As I mentioned above, I do wish we had simply repainted the vanity in retrospect, however, the smaller vanity open up the bathroom a great deal and made the space seem bigger.
  • Painted the walls.
  • Removed the vanity mirror and replaced it with a hanging mirror.
  • Installed two floating shelves above the toilet.
  • Replaced the towel bar.
  • Installed a hand towel ring.
  • Installed  a three-hook rack for hanging towels.
  • DIYed a free-standing small linen storage unit.
  • Hung pictures.

SOURCES:

  • Vanity  // Purchased at Lowes, available here for $269.00. NOTE: If you don’t care about having extra drawers they have another similar option for $189.00.
  • Floating Shelves // Purchased at Home Depot, available here for $28.80 each. They are also available at Target, but I believe H.D. is still cheaper.
  • Free-Standing Storage Unit // Thrift Store find. After project costs, the item comes in at around $29.00. See my post here on painting laminate furniture to see more about this particular piece.
  • Wall Paint // Color is “Woodlawn Bedroom” by Valspar.
  • Vanity Mirror // Thrift Store find. Purchased for $10.00 and hit it with a coat of gray spray paint.
  • Towel Bar // Purchased at Lowes, Moen Brand Spot Resistant Brushed Nickel 24″ Towel Bar, available here for $19.98. We had a Lowes credit or else we would have hit up Walmart for this item to save a few bucks.
  • Three Hook Towel Rack // Purchased from “TheShabbyShak” via Etsy for $23.00. This shop has lots of great shabby chic decor in a huge variety of colors and finishes. I chose the aqua in keeping with my beach theme.
  • Towel Ring // Purchased from “VeritasInspired” via Etsy for $22.99.
  • Damask Shower Curtain // Purchased from Amazon for $36.00. Available here.
  • Towels // Lime Green Bath Towels – Target, Target brand $4.99 each. Navy Blue Hand Towels – Bed Bath & Beyond, Wamsuetta Brand (these were wedding gifts or else we would have gone for the Walmart or Target option on these, expensive hand towels? Ain’t nobody got time fo dat).
  • Baskets // All three baskets in my bathroom (as well as those hidden under the sink), were purchased from Michael’s. I LOVE baskets. I once saw a Hoarders episode featuring a woman who had over three thousand baskets or something like that and I’m not saying that’s me but I’m well on my way, lol. NOTE: I only purchase baskets from Michael’s with a 40% off coupon or when they are on sale for over 40% off or else they are a total rip off. I would say these three cost somewhere in the neighborhood of $5.00 each for the small ones and $8.00 for the large one.
  • Wall Art // Each item on this wall was virtually free. The beach picture was a picture I had taken myself right on our own Onslow Beach here on Camp Lejeune, I just blew it up at our local drugstore for around $1.00, the frame was the second half of a buy-one-get-one deal they were running at Michael’s so we had it sitting around anyway. The “catch me by the sea” print was one I found on Pinterest, saved as a JPG and printed at our local drug store in size 8X10 (this may or may not be legal, but there was no watermark so I assume it was a free print, if not I’m sorry copyright gods!). If you want to do the same just Google “free whatever-you’re-looking-for images/quotes” and you should find some, the quality may not be so fab but it’s just for looks. The frame for my print was one of the old ones we used in our condo so I just hit it with the same gray spray paint as the mirror. The tiny mirror was a thrift store find for $3.00. Not pictured here is my DIY nautical rope frame, which you can make for under $1.00 read the post to find out how!


BEFORE

upbath6upbath7upbath8

AFTER

upbathupbath1upbath2

upbath3upbath5

We estimate the total cost of the project at around $500.00, and for the transformation we achieved I think this is a GREAT price, keeping in mind a full bathroom reno by professionals can cost you around 5K on the low end, which even if we had the cash (which we definitely don’t, lol), I don’t think I would be able to stomach. Say it with me people, “D-I-Y” it’s a beautiful word!!! 

NOTE: This transformation occurred over about 5-6 months, we only bought things as we could afford them which really made that $500.00 project price tag a little more bearable, because I don’t know about you but even though it’s not a 5K reno, $500.00 is still a lot of money, especially when taking on multiple house projects at a time.

There you have it, our beachy-chic guest bathroom re-do! This would not have been possible without my wonderful hubby J who helped my 7-9-month pregnant self hang and place various items when I couldn’t physically bend that way, lol. Hope this inspires you! XOXO

Painting Laminate Furniture Using Latex Paint

securedownload (1)2

Ah good ‘ol laminate furniture. If you don’t own a piece yourself, surely you’ve heard of IKEA (hello particle board wonderland lol), the stuff is everywhere. It’s primarily loved because it is cheap. To put it into perspective, when we were stationed in Pensacola for a hot second before I discovered the wonder of re-doing furniture, we purchased a new wood bedroom set that cost us over $1,200.00 (I kick myself for this now, but whatever ya live, ya learn), meanwhile we were able to furnish an entire condo for less than that when we did so using particle board/laminate furniture. Problems is, the stuff tends not to last and when it does it starts to look even cheaper than it did when it was originally purchased (if that’s even possible lol). If you’re lucky enough to come across a piece that’s in relatively good shape, you MAY be able to save it with a quick re-do (unfortunately I cannot guarantee it will survive your next move, haha). Lucky for us thrifters out there, since particle board or laminate furniture retails cheap, it’s resale value is next to nothing, and for under $100.00 you can probably snatch up quite a few pieces in one shot. Another benefit to redoing super cheap pieces is that it’s a great opportunity to try out funky colors or unique designs, chances are if you mess up or totally hate the item, you’ll only be out a few bucks and a little time 🙂 Check out the before and after pictures of my laminate redos below to get some ideas. Again, I am sorry to say that I do not have step-by-step pictures for this tutorial but I will try my best to explain in detail.

YOU WILL NEED:

  • Latex Paint (I use 8oz sample paints available at the paint counter of your local home improvement stores, I talk about them here)
  • Bonding Primer (read my post on favorite products for brand recommendations)
  • Black Foam Brushes
  • Drop Cloth
  • Clear Top Coat (polyacrylic or gel work great)


HOW I DO IT:

  1. First wipe your piece down with a damp cloth and a little dish soap (it is important that your piece is extremely clean, any residue with make it harder for paint to adhere to the piece), then wipe down again with just a damp cloth. Then remove any hardware, to include pulls or other metal pieces. Once piece is clean you are ready to prime.
  2. Bonding primer is some heavy stuff, make sure you open the windows because any oil based paint is going to be rough on the senses lol. Make sure you’re wearing a mask, just those little disposable doctor looking ones will do. Start by painting an even coat onto your piece, it is going to go on super thick and it will look awful, full of brush strokes and uneven, this is fine, this primer is just to help the paint adhere to the piece as well as cover any existing imperfections, you will not see it once the paint goes on. After the piece has been covered in a coat of bonding primer allow it to dry for several hours (generally my rule is to wait 12-24 but for the primer you need not wait so long).
  3. Now you are ready to begin painting. Use a foam brush to carefully apply a coat of paint to your piece. After the first coat is complete allow 12-24 hours before applying the next coat. Aside from a good top coat the key to keeping your piece from chipping is lots of dry time! The amount of coats you will need depends on the color paint you are using, for instance when using black you may only need two, but when using a light color you may need up to four. Since the paint you are using is not oil based, feel free to wash the brush in between coats and reuse it!
  4. After the last coat has dried, using a foam brush apply your first layer of top coat, making sure not to leave too many streaks or bubbles behind. To ensure a good protective coating on your piece, I would do three top coats, allowing 12-24 hours dry time in between. If you are using a water based top coat you can wash the brush in between coats and reuse it,, but the brushes are cheap enough that if you feel like using a different one for each coat the whole project will probably only cost you $3.00 in brushes anyway.
  5. Once your piece is finished replace all hardware, either with new pulls or use spray paint to update the old ones. I like to use Rustoleum brand spray paint in a satin finish.
  6. Bask in your cheap-furniture glory! You are finished and are a money-saving, crafty S.O.B :)!!!


BEFORE & AFTERS:

lrba

I sought out this piece because I was looking for a small table to act as a sort of entryway table for some dead space in my living room. The piece cost $40.00 and was pretty sturdy, but as you can see was missing some pulls so I purchased new ones from http://www.pullsdirect.com (a great resource for new pulls, just make sure they are the correct size). I used Valspar “Borough” and General Finishes Urethane top coat (also available on Amazon). The piece has held up well, we are constantly bumping into it and placing our keys and other items on it as we walk in the door and it has only gotten maybe a tiny scratch here or there that are not visible. TOTAL COST: ~$55.00

deskba

I had wanted a small desk to go in our “shabby chic” style guest room and this seemed like it would be perfect. I purchased it off of Craigslist for $25.00 (while I was there the guy also tried to sell me his house – weird lol). This piece was pretty strange as it is half real wood and half fiber board, so I did end up doing some sanding on this one. Since it was so cheap and wasn’t going in my main living space I decided to try my hand at distressing this one and it came out pretty good, after painting I simply sanded along the various edges and corners. Good thing I distressed this because this piece did not hold up so well, it has a few chips here and there mostly on the top but you would never notice that it wasn’t part of the distressed look. If you notice, I reused the pulls I removed from the project pictured above so that was a big money saver. The color is Valspar “Hazy Dawn” and the top coat is Minwax Polyacrylic.  COST: ~$28.00

brba

Our guest bathroom is a double dose of suck since it has no nearby linen closet and no storage lol. When I came across this weird Aladdin-looking thing for $15.00 at a local thrift store I knew it would be perfect for the bathroom. I simply removed the front piece and added baskets (purchased on sale at Michaels for $6.99 each). Since our bathroom is beach themed I went with “Sea Air” by Valspar for the color and gave it a Minwax Polyacrylic top coat. This piece has held up great, although being that it is in the guest bathroom it does not see too much action so this is not a very good measure of my painting methods, haha. COST: ~$29.00

bookcaseba

After my girls threw me the best baby shower in the history of ever, I wound up with TONS of books for my tiny unborn P. I had actually bought this bookcase for $5.00 with the intentions of using it for a different project which didn’t work out, so it had been sitting in the garage for months despite my husbands weekly attempts to let him take it to the dump lol. This thing is flimsy as hell and was pretty gross, but I didn’t care because it was $5.00 lol. For the record, I don’t necessarily expect this to survive our next move, but for now it looks super cute in the nursery and you would never know it was such a piece of junk to begin with. I kind of rushed through this one since I was 8 months pregnant and SUPER excited to get it into the nursery lol, however, it has actually held up pretty well, maybe a scratch here or there but nothing on the exterior that can be seen. I matched the blue in P’s bedding using “Angel Eyes” by Olympic (available at Lowes) for the exterior and to switch it up I used my left over “Borough” by Valspar for the interior. COST: ~$8.00