

As I’ve mentioned in my last few crafting posts, I’ve been scrambling to get our new house set up. After all, we’re only going to be here for under a year and I want at least a little time to relax and enjoy our time here before we pack up and move on again. This particular project has been a long time coming, as I purchased these shutters quite some time ago when we were still living at our Honey Tree house and still unaware that we would be moving in the next few months. My friend Lisa and I hit up “The Red Barn” which is, well, you guessed it – a red barn, lol but it’s also an antique/used furniture shop as well. Every now and then they’ll post items on our local Craigslist page and at the time Lisa was looking for small shutters to make shelves. It just so happened that the Red Barn owner did have the exact type of small shutters she was searching for but since he had three sets and she only needed two I decided to take the other ones, because for $5.00 a set why not! Since I didn’t have any purpose for them in our Honey Tree house they just sat in the garage with the rest of my back-burner project supplies and of course J kept trying to throw them out, convinced that I would never find a use for them, lol. As usual he was wrong (haha, just kidding .. or am I?) and when we moved into our new home on base I knew just the thing that was going to spruce up our ugly, empty kitchen wall – a DIY shutter shelf!
Now let me rewind a bit. Although I had seen shutters repurposed as shelves on Pinterest I wasn’t convinced that it was a project that I actually wanted to attempt until I saw how awesome my friend Lisa’s bathroom shutter shelf came out. I think what I love most about DIY and crafting is sharing ideas and inspiration for projects with friends and these repurposed shutter shelves are a perfect example of that :). After checking out Lisa’s shelf, I found that all I needed to do to create my own shutter shelf was purchase some brackets and mounting hardware, since I already had the paint and knobs (left over from my DIY Microwave Stand) on hand from other projects. The grand total for this project came in right around $18.00 which is amazing because if my memory serves me correctly the ugly, flimsy floating shelves that can be purchased at most homeware stores go for much more than that! Furthermore, after doing a little research I found that shutter shelves purchased via Etsy are going for anywhere between $45.00 and $100.00! So even if you don’t necessarily need a shutter shelf but have found some cheap shutters like I did, you could probably make a pretty penny by taking the time (not very much time, mind you) to do this project and sell it on Craigslist or Ebay – just a thought!
If you don’t have a lot of used furniture stores in your area shutters may be hard to come by, but if you do, I hope you give this project a try. It’s a super easy and fun way to jazz up any space in your home, and even if you don’t need a functional shelf they’re still fun to hold décor or pictures. Additionally, although these are inherently “shabby-chic”, with different paint or bracket choices you can adapt them to fit your décor style. Personally, my style is a combination of vintage pieces and modern finishes so the shabby finish on the shutters combined with the smooth modern brackets fit my décor perfectly! Here is my tutorial along with the products that I used to achieve this look, you’ll never believe how easy it was!
DIY SHUTTER SHELF
WHAT I USED:
- 1 pair of shutters (see picture below) – I found mine at a used furniture/antique store for $5.00! Mine were fairly small about 26″ long and 9″ wide (you can also use larger or smaller shutters just purchase brackets accordingly).
- 2 metal brackets – purchased via Amazon here for $12.58.
- 2 knobs – purchased as part of a set at Target (available 4 to a pack here for $12.99), I had two left over from my DIY Microwave Stand.
- 2 Keyhole Mountings – for hanging shelf (like these).
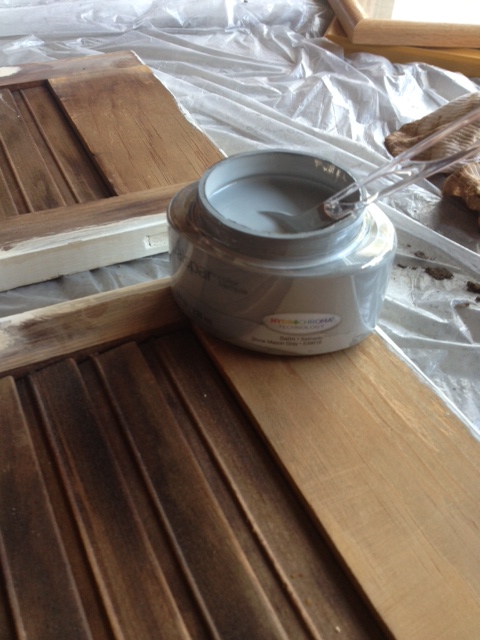
- Chalk Paint – see this post to see how I made my own chalk paint. I used a sample size of Stone Mason Grey by Valspar, read more about my love for sample sized latex paints for crafting in this post.
- Minwax Finishing Paste Wax in “Special Dark”
- Foam Brush (or regular paint brush) – I found that a 1″ brush could most easily work between the slats of the shutters while painting.
- Wood Filler – available at your local home improvement store, you can also substitute paintable caulk.
- Sanding Block or Sand Paper
- Clean Rag or cheese cloth
- Drill
- Screw Driver
WHAT I DID:
Step 1: I began by cleaning my shutters with a damp rag (mine were filthy!). Next I began separating my shutters by removing all existing hardware. I then used wood filler to fill any of the holes that were left from the old hardware.

Before

Before – gahhh cob webs eek!

Before
Step 2: Once the wood filler had dried, I returned to the piece and sanded those areas smooth and wiped the piece down with a clean cloth to remove any residue from sanding. Then I began painting my shutters. This was a bit tedious as you have to paint in between all of the slats. I painted one side then returned about a half an hour later to paint the other side, then repeated for a second coat (mine required two, depending on the original color of your shutters and the color of the paint you are using you may only need one).

After holes had been filled.
My favorite – little Valspar sample paints! Note, my very special paint stirring tool lol
Step 3: When your paint has dried, using a rag or cloth, apply an even coat of
Step 4: Once your shutters are painted and waxed decide how you want them to line up. Once you have decided, take your shutter that will be against the wall (the one that will be mounted on the wall, not the one that will be the functional part of the shelf) and using a drill, attach a keyhole mounting piece to each corner of the back of the shelf (mine were about one inch down and one inch in).

Keyhole mounting brackets.

J in action drilling holes for the knobs! Ignore his claw feet, eek! 😛
Step 5: Next, working with the same shutter, turn it over so that the part that will be facing out is facing you and measure equal distances for your knob placement, then drill a hole for each of the knobs and then screw them in.
Step 6: Now you are ready to attach your brackets! Using your brackets as a guide, mark where each screw is to be placed, then attach your brackets. That’s it! All you’ll need to do is mount your shelf on the wall using two screws that will fit your keyhole mounting hardware, see my finished product below!

I’ll update it once I decorate it but for now the shelf itself is decoration enough, I LOVE it! 🙂

Pingback: DIY Mason Jar Bathroom Organizer | simplyschulze
Pingback: Baby Rocking Chair Re-Do – My first re-upholstery project! | simplyschulze