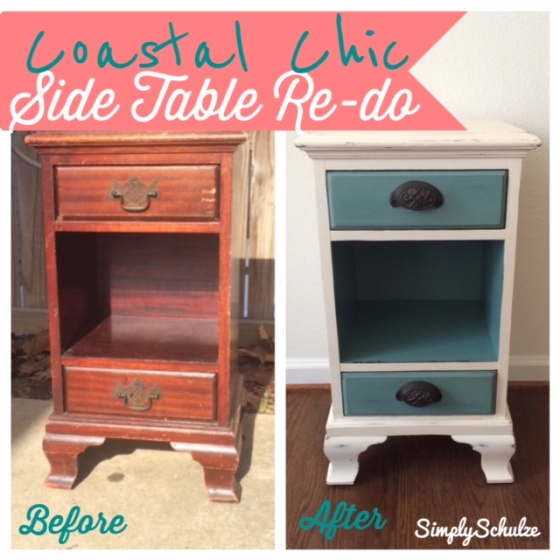
Coastal Chic Side Table Re-do – Blizzard Project #2

IMG_0556

Okay well I might be exaggerating about the “blizzard” part of this project a bit. The snow left just about as quickly as it came so “post-blizzard” project would probably be a more appropriate title :-p. However, since I had every intention of finishing this one up just as quickly as my first two-tone side table (an actual blizzard project that you can check out via the previous link), in the interest of not taking away from my sense of accomplishment I will still group it in with my other blizzard-inspired creations ;-).

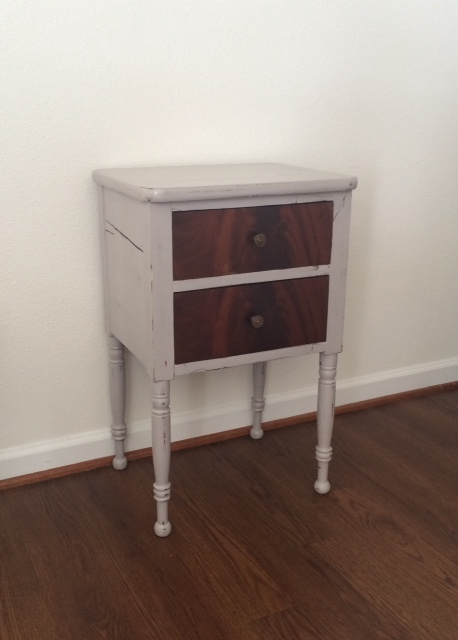
Before pictures – this old girl definitely needed some help!

I had mentioned in my previous post that I’m constantly browsing the local online yard sale sites in hopes of coming across some perfectly-priced furniture treasures in need of a face lift. I’m so thankful for this method of seeking out pieces to re-do because while P is quite the well behaved little boy, thrift store hopping with a toddler in tow can present a wide array of challenges, haha. Additionally, cruising the online buy/sell/trade pieces has also helped me find some great furniture re-sale and consignment stores I might not have easily found otherwise and that is exactly how I came across this particular piece. Through her posts on our local area B/S/T page I was able to become connected with the home-based business Willow Tree Restorations (I have linked her Facebook business page just in case you are checking in from the NOVA area or simply want some inspiration, her work is fantastic!) where the owner, a woman after my own heart, finds and refinishes beautiful vintage pieces. While I love her refinished pieces oh-so much I especially love that most of the pieces she finds she will also offer up as-is so that DIY enthusiasts such as myself can try their handy work at making them their own.

How cute is sweet P helping to sand?! My little DIY-er in training. NOTE: I know a lot of people don’t bother sanding when using chalk paint but I always just give it a quick run over by hand with a sanding block or with the small electric sander on the larger surface areas of a piece.

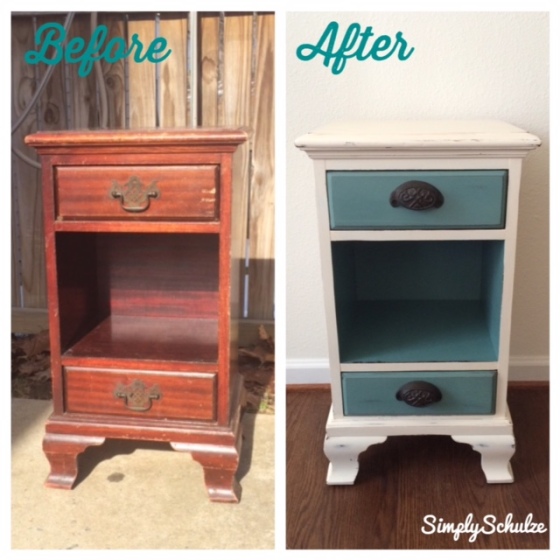
As for the re-furb story behind this particular piece, I have been obsessing over the two-tone look lately (I’ve posted a few of my inspirational pieces below) and after my success with the last piece I knew I wanted to try it out with some color, especially because I knew that I didn’t have a place for this particular piece in my home and would probably be re-homing it, I could really get creative with a color scheme other than what I’ve been working with. While the beachy and “coastal-chic” color pallets have never had a place in my personal décor I’m loving blues, whites and aquas more and more as of late! The particular colors I mixed for this particular project (see this post for information on how I mix my own chalk paint) are “Patina Blue” by Valspar and “Antique White” by Valspar (a great white somewhere between true white and ivory that I use for a lot of projects). I mentioned in my previous post that I’ve been trying out some new products in an effort to go a natural route with my top coats and waxes as opposed to harsher products like Minwax so for this particular project I tried out Chalk Mountain Wax available on Amazon – I was very happy with how great the wax turned out and the pack of two waxes also come with a wax brush all for under $30.00 so definitely great value there. After lightly distressing the edges of the table I waxed the entire piece first with the clear wax followed by a single light coat of the dark, just to add some warmth. In the interest of giving the piece a complete facelift I picked up some new pulls from Hobby Lobby while they were 50% off (normally $4.99 each), I love how new pulls or knobs can really transform a piece and you definitely see that in the before and afters here, I suppose it was unnecessary but I can always reuse the original pulls on another piece in the future!

My little apprentice in action again! lol Thankfully I switched to that all natural wax. This little munch came right over and took the brush out of my hand and said “I’ll do it! I’ll do it!”.
IMG_0555

Wow – that was a long post for such a little side table, lol. I hope it inspires a little coastal-chic project of your own … or maybe even inspires a trip somewhere warm (can you tell I’m longing for summer over here? haha). Speaking of inspiration, two of the pictures below are linked to the online shops of friends of mine, so please check out and “like” their pages – they are super talented and even if you are not local to their areas to shop with them they are certainly a wealth of inspiration!

Here are a few pieces that inspired this project. Secretary desk: Shabby Chic Boutique Desk: The Handcrafted Life Dresser (found via Pinterest): Homeroad

Two-tone Side Table Re-do: Blizzard Project #1

phonto1.jpg

Personally being stuck in the house drives me crazy. Whether it’s running errands or just being outside with friends, little P and I are gone most of the day and I love it that way! Needless to say as winter storm Jonas approached and everyone began clearing out their local grocery stores and waiting on ridiculously long gas lines, I was headed to Lowes to pick up some DIY essentials (with only hours to spare, haha!) to ensure my sanity for the duration of our snow-bound adventure. Now rewind about a week – I’m always keeping my eye on local online yard sale sites on the lookout for fixer-upper treasures and hit the jackpot the last few weeks! For under $100 I was able to score FIVE amazing new pieces of furniture to re-do (and unbeknownst to me at the time, this storm was about to give me a great opportunity to get to work, haha). Hopefully even after the snow melts I can keep crankin’ out the rest of these pieces at my current pace but we’ll see ;-).

frog

Our last minute trip to Lowes. P was in all his crazy-haired, pajama-clad glory!

For now I’d like to share my first blizzard project – my two-tone side table. This piece was amazing and I couldn’t believe that the owner wanted to part with it (and for SO cheap), especially because it was so solid, it must weigh forty pounds if not more! Since I don’t have room for all of my creations I know that have to start selling things off here and there but I knew immediately that this is one that I would need to keep for myself. I loved the wood grain, which is why I chose to leave the drawers as is and loved the fact that the sides of the table actually had some noticeable splits in the wood which add to its character and vintage feel. I didn’t do anything special aside from try out a new wax which I plan to review in a separate post. I used my homemade chalk paint (see this post for the recipe and more information on mixing your own), distressed it a bit and then finished it using Dover’s Chalk Paint Wax – a new natural furniture wax I’m trying out in an attempt to get away from harsh chemical and VOC products like Minwax (although they have served me well to this point!). If you’re as in love with the color I used as I am, it’s “London Coach” by Valspar – doesn’t it just sound wintery and amazing!? I hope this project inspires a little snow day DIY on your end! xoxo

FullSizeRender

Finished product!


frogg

A little snippet of the fun that was had in all the snow!


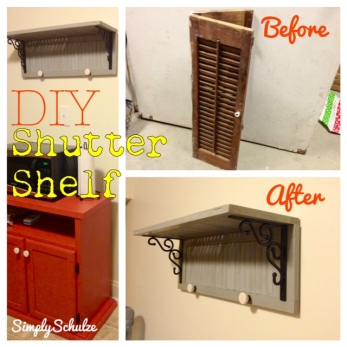
DIY Shutter Shelf

shuttershelf7

As I’ve mentioned in my last few crafting posts, I’ve been scrambling to get our new house set up. After all, we’re only going to be here for under a year and I want at least a little time to relax and enjoy our time here before we pack up and move on again. This particular project has been a long time coming, as I purchased these shutters quite some time ago when we were still living at our Honey Tree house and still unaware that we would be moving in the next few months. My friend Lisa and I hit up “The Red Barn” which is, well, you guessed it – a red barn, lol but it’s also an antique/used furniture shop as well. Every now and then they’ll post items on our local Craigslist page and at the time Lisa was looking for small shutters to make shelves. It just so happened that the Red Barn owner did have the exact type of small shutters she was searching for but since he had three sets and she only needed two I decided to take the other ones, because for $5.00 a set why not! Since I didn’t have any purpose for them in our Honey Tree house they just sat in the garage with the rest of my back-burner project supplies and of course J kept trying to throw them out, convinced that I would never find a use for them, lol. As usual he was wrong (haha, just kidding .. or am I?) and when we moved into our new home on base I knew just the thing that was going to spruce up our ugly, empty kitchen wall – a DIY shutter shelf!

Now let me rewind a bit. Although I had seen shutters repurposed as shelves on Pinterest I wasn’t convinced that it was a project that I actually wanted to attempt until I saw how awesome my friend Lisa’s bathroom shutter shelf came out. I think what I love most about DIY and crafting is sharing ideas and inspiration for projects with friends and these repurposed shutter shelves are a perfect example of that :). After checking out Lisa’s shelf, I found that all I needed to do to create my own shutter shelf was purchase some brackets and mounting hardware, since I already had the paint and knobs (left over from my DIY Microwave Stand) on hand from other projects. The grand total for this project came in right around $18.00 which is amazing because if my memory serves me correctly the ugly, flimsy floating shelves that can  be purchased at most homeware stores go for much more than that! Furthermore, after doing a little research I found that shutter shelves purchased via Etsy are going for anywhere between $45.00 and $100.00! So even if you don’t necessarily need a shutter shelf but have found some cheap shutters like I did, you could probably make a pretty penny by taking the time (not very much time, mind you) to do this project and sell it on Craigslist or Ebay – just a thought!

If you don’t have a lot of used furniture stores in your area shutters may be hard to come by, but if you do, I hope you give this project a try. It’s a super easy and fun way to jazz up any space in your home, and even if you don’t need a functional shelf they’re still fun to hold décor or pictures. Additionally, although these are inherently “shabby-chic”, with different paint or bracket choices you can adapt them to fit your décor style. Personally, my style is a combination of vintage pieces and modern finishes so the shabby finish on the shutters combined with the smooth modern brackets fit my décor perfectly! Here is my tutorial along with the products that I used to achieve this look, you’ll never believe how easy it was!

DIY SHUTTER SHELF

WHAT I USED:

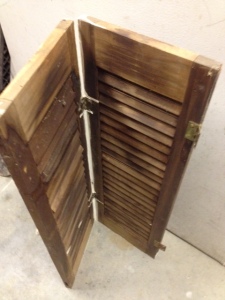
  • 1 pair of shutters (see picture below) – I found mine at a used furniture/antique store for $5.00! Mine were fairly small about 26″ long and 9″ wide (you can also use larger or smaller shutters just purchase brackets accordingly).
  • 2 metal brackets – purchased via Amazon here for $12.58.
  • 2 knobs – purchased as part of a set at Target (available 4 to a pack here for $12.99), I had two left over from my DIY Microwave Stand.
  • 2 Keyhole Mountings – for hanging shelf (like these).
  • Chalk Paint – see this post to see how I made my own chalk paint. I used a sample size of Stone Mason Grey by Valspar, read more about my love for sample sized latex paints for crafting in this post.
  • Minwax Finishing Paste Wax in “Special Dark”
  • Foam Brush (or regular paint brush) – I found that a 1″ brush could most easily work between the slats of the shutters while painting.
  • Wood Filler – available at your local home improvement store, you can also substitute paintable caulk.
  • Sanding Block or Sand Paper
  • Clean Rag or cheese cloth
  • Drill
  • Screw Driver

WHAT I DID:

Step 1: I began by cleaning my shutters with a damp rag (mine were filthy!). Next I began separating my shutters by removing all existing hardware. I then used wood filler to fill any of the holes that were left from the old hardware.

Before

Before

Before - gahhh cob webs eek!

Before – gahhh cob webs eek!

Before

Before

Step 2: Once the wood filler had dried, I returned to the piece and sanded those areas smooth and wiped the piece down with a clean cloth to remove any residue from sanding. Then I began painting my shutters. This was a bit tedious as you have to paint in between all of the slats. I painted one side then returned about a half an hour later to paint the other side, then repeated for a second coat (mine required two, depending on the original color of your shutters and the color of the paint you are using you may only need one).

After holes had been filled.

After holes had been filled.

My favorite - little Valspar sample paints! Note, my very special paint stirring tool lol

My favorite – little Valspar sample paints! Note, my very special paint stirring tool lol

Step 3: When your paint has dried, using a rag or cloth, apply an even coat of

Step 4: Once your shutters are painted and waxed decide how you want them to line up. Once you have decided, take your shutter that will be against the wall (the one that will be mounted on the wall, not the one that will be the functional part of the shelf) and using a drill, attach a keyhole mounting piece to each corner of the back of the shelf (mine were about one inch down and one inch in).

Keyhole mounting brackets.

Keyhole mounting brackets.

J in action drilling holes for the knobs! Ignore his claw feet, eek! :-P

J in action drilling holes for the knobs! Ignore his claw feet, eek! 😛

Step 5: Next, working with the same shutter, turn it over so that the part that will be facing out is facing you and measure equal distances for your knob placement, then drill a hole for each of the knobs and then screw them in.

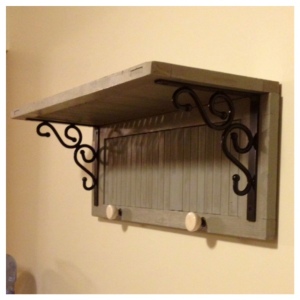
Step 6: Now you are ready to attach your brackets! Using your brackets as a guide, mark where each screw is to be placed, then attach your brackets. That’s it! All you’ll need to do is mount your shelf on the wall using two screws that will fit your keyhole mounting hardware, see my finished product below!

I'll update it once I decorate it but for now the shelf itself is decoration enough, I LOVE it! :)

I’ll update it once I decorate it but for now the shelf itself is decoration enough, I LOVE it! 🙂