DIY “Little Lady” Hair Bows

hairbow

I feel like with all of the “little man” projects I’m churning out I need to give a nod to my girls, don’t worry ladies I didn’t forget about you! Here is a quick tutorial for my “little lady” hair bows, which are so easy to make and are just the cutest little gifts for that special baby girl in your life. Also, this would make a great baby shower activity, I will explain below. Anyone who knows me will attest to the fact that I am obsessed with bows, and even on the 30 side of 20, I still think wearing hair bows is acceptable. Since I couldn’t let J steal all the glory with the matching bow tie set I made for him and baby P, when I tested out this little hair bow, I made mine to match one of P’s little man onsies as well – so cute. As for the tutorial itself, it is basically identical to the “little man” bow ties with slight variation depending on what size hair bow you would like, but lucky for you, the hair bow making process is much easier than bow tie as all you will be doing is gluing it to a clip, barrette or hair band. That being said, if you are planning on making these as a gift an adorable idea would be to make a bunch and display them on a personalized hair bow holder (yes, this actually exists, lol, check one out here.I will definitely be DIYing my own version of one of these if my friends ever stop having boys, so be on the lookout for that!). Hope you have as much fun making these as I have wearing them, you’re only as old as you feel (eight, I feel eight lol)!!! 🙂

YOU WILL NEED:

  • Fabric  (this is a good way to use up fabric scraps or hit up your fabric store’s remnants bin since you need so little.)
  • Glue Gun
  • Scissors
  • Small Plain Hair Clip, Barrette or Headband (all of which are available at the dollar store, Walmart for right around $1.00, so if you’re going the clip route, your cost will be a few cents per clip!)
hairbow1

I chose to use these clips since I was making them for myself. If you are making them for a “little” lady, purchase the fabric covered version.


DIRECTIONS:

Step 1:   Use this bow tie tutorial to create as many bows as you want. I used the hot glue method and wherever it said to iron I didn’t (I’m lazy, lol) and my project still came out great. Quick note about sizing, the bow in the tutorial will be about 3.5″ across (give or take), so for an infant this would be fine on a headband but way too big on a clip. If you are looking to make a smaller bow I would change the measurements to 5X3 and 1.5X1.5 for the two fabric squares. Once I play around with this a little more I will give exact measurements and pictures but as I’ve mentioned, all my friends are having boys!

Step 2: Once your bow is complete use hot glue to secure it to your clip or hairband and there you have it! It took me under 5 minutes to complete a bow so you could definitely churn out about ten in a half hour’s time and have a great gift! NOTE: If you want to attach the bow to a hair tie just stop at the step before you glue the smaller piece of fabric (center) or the bow and instead, glue it so that the underneath of the bow wraps around the hair tie (hair tie is inside of the bow).

hairbow2

Fun Idea: Remember when I said this would make a great baby shower activity? Precut the squares of fabric for your guests and set them up along with a glue gun and several different options for barrettes, clips, hair bands and hair ties and embellishments. Give a quick tutorial to your guests and then allow them to make their own hair bow creations at their leisure throughout the course of the party. SO much fun and super cute, you could even present them to the mama-to-be on a hair bow holder.  


check out my post on DIY hair bows to see how I made my matching bow!

check out my post on DIY “Little Man” Tie Applique Onsies to see how I made baby P’s matching onsie!

DIY Little Man Onsie – Part II Tie Applique

tie5

With several new squishy babies coming into my life in the near future, courtesy of my sweet friends, I am in full baby shower planning/gifting mode. I recently posted my tutorial for DIY Little Man bow tie onsies and am delighted to report that I’ve successfully completed another version of a no-sew “little man” onsie, featuring a fabric neck tie in the form of a fabric applique. This onsie was even easier to create than the first and only requires four items (one of which is an iron, so it doesn’t count lol), no gluing, no sewing, just cut, iron and DONE. If I haven’t already captured your attention with the appeal of a three step process let me tell you this – I spent about $6.00 on supplies for this project (not including the onsies themselves, as I used a pack I already had) and that $6.00 investment has the potential to yield up to twenty onsies (if not more)!!! I will reiterate what I said in my bow tie post, and that is, for a few bucks you have a grand slam of a baby shower gift for any “little man” that may come in to your life, not to mention they make ADORABLE decorations in the form of a onsie clothesline that mama-to-be can keep after the shower (see below). If you are looking to give a meaningful gift that is easy and cost effective, look no further! Of course I adapted this tutorial from the hundreds on Pinterest, and will the include the link to one below in the event that you do want to do a bit of sewing.

tie8

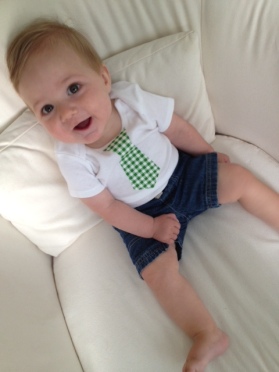
here is squishy baby P sporting the onsie!


DIY “LITTLE MAN” TIE APPLIQUE ONSIES

YOU WILL NEED: 

tie

  • White onsie or t-shirt
  • Fabric of any choice (this is a great opportunity to use up scrap fabric or hit up your local store’s remnants bin, as I do. The green gingham fabric featured below I purchased for $0.79 and it is a little less than a yard in length and 12 inches in width, enough for MANY onsies or bow-ties).
  • Heat ‘n’ Bond Iron-On Fabric Adhesive (any brand will do, if it says it is suitable for patches or appliques you are good to go, I purchased mine at Walmart for about $3.00 and it is enough for tons of future projects so you are getting your money’s worth for sure!)
  • Tie Pattern (the pattern is printable and available in two sizes, use the smaller for onsies and the larger for toddler boy t-shirts. If you don’t have access to a printer feel free to make your own pattern).
  • Scissors
  • Iron

INSTRUCTIONS:

Step 1: Take your fabric and cut a piece just large enough for your tie, then do the same with the Heat ‘n’ bond adhesive (this way you can maximize the amount of supplies remaining for future projects).

Step 2: Turn fabric upside down (so back is facing up) and place fabric adhesive side down on fabric so that the paper liner is facing up. Place your iron over the paper backing and hold down for about two seconds, repeating over entire area until adhesive is fused to fabric.

tie1

Step 3: Now, trace your tie pattern onto the paper backing and cut out. It is optional to cut the top of the tie pattern in a circular fashion to fit the neck of the onsie, I did so but it looks fine either way!

tie2

Step 4: Peel off the paper back from your tie and place it adhesive-side down on your onsie. Hold the iron over the fabric for about 8 seconds, working in sections until the entire tie is fused to the fabric. That’s it, little man onsie complete!

tie3

Step 5: A fifth, and optional step, would be to stitch around the onsie as shown in this tutorial (and in most tutorials). As I’ve mentioned before, while I am planning to learn how to use my sewing  machine, I currently only sew by hand and to stitch the tie by hand would totally defeat the purpose of this being a quick project, haha. Don’t worry, it looks fab without the stitching as well!

NOTE: Turn inside out when washing, when possible hand wash and hang dry. 

tie6

Completed onsies!

tie4

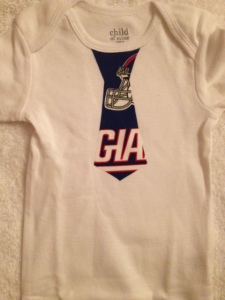
they had some NY Giants fabric on clearance! Little P will be look fab come football season! Go Giants!

tie9 tie7

check out my post on DIY hair bows to see how I made my matching bow!

check out my post on DIY hair bows to see how I made my matching bow!

Updating Our Master Bathroom

mastbath13

Crazy thing happened this week … we accepted an offer on the house!!! So exciting and sad at the same time, because although putting the house on the market was a good decision and I’m excited to move on base, I’m getting graduation goggles about selling it given all of the memories our little family has made here so far. That being said as long as nothing falls through on the buyer’s end we will be peacin’ out of this bad boy by the end of June, so I better get all of my house transformation posts up before I’m categorized as creepy if I’m technically posting pictures of somebody else’s home, haha.

In my post on refinishing cabinets I spoke a little about my our master bathroom update but would now like share the whole project in detail! Again, most of our updates were cosmetic as we wanted to create the most change for the least cash. This was our final major house project and we were in a race to get it finished given our very important deadline – the arrival of baby P! Now, I’ve spoken before about how I’m a true believer that with a little paint and the right decor you can create a transformation that is budget friendly but will still rival that which would be made by an actual renovation. We applied that idea here as well as in the guest bathroom where a few small changes resulted in a complete revival of an old dingy space. Since this was our last major project, our vision for the space changed many times between the date we purchased the house and the time that we actually got to the project. Originally we came in guns blazing prepared to paint, rip out the vanity, install a new tub surround, basically change everything until we realized that with limited knowledge on how to do the aforementioned and seriously limited cash preventing us from hiring professionals to do it for us, our vision was going to have to change drastically. We decided to ax the idea of installing a tub surround and simply give the old tiles a real good scrub down instead. Still stuck on the idea of replacing the vanity, we held off because that was going to cost us a pretty penny and with paying as we went along (no credit cards) and other house projects in the works, the master bath remained on the back burner. As P’s due date drew closer, we wrapped up a few  other projects and finally decided to tackle the bathroom, going with plan c if you will, our third and final game plan – replace the toilet, repaint the vanity, replace the vanity top, paint the walls, decorate, DONE. We were super motivated to get this done, especially since we had been showering in the guest bathroom for months given the sorry state of our on-suite bath, my big pregnant self even did all of the painting and decorating while J was at a job school in Norfolk because I was too antsy to wait to get it done, haha. Hope this inspires some DIY in your life, remember say no to renos and difficult transformations, chances are you can fake it with some paint and great decor!

master

master1

it is purely coincidental that I am wearing the same shirt in the two pictures taken over 6 months apart haha


WHAT WE DID:

  • Replaced the vanity top.
  • Repainted the vanity cabinets. We decided to repaint the vanity given our frustration over having replaced the other two and wishing we had just gone this route in the first place.
  • Removed old mirror and replaced it with a new beveled edge mirror.
  • Replaced the toilet.
  • Painted the walls.
  • Hung a wine rack that we repurposed as a towel rack.
  • Hung a 5-hook rack for hanging towels.
  • Hung a shabby-chic towel ring.
  • Hung two DIY “paintings”.
mastbath12

me picking up the 5 foot vanity in my Kia Soul haha

SOURCES:

  • Vanity Top // Purchased at Lowes, available through special order (since we were replacing a custom size we needed to order a custom sized top). It cost us in the neighborhood of $500.00, which was a little less than it would have cost us to replace the whole vanity and floor tiling (but a WHOLE LOT less work).
  • Beveled Edge Mirror // Purchased at Lowes, available here for $41.97.
  • Toilet // Purchased at Lowes, available here, for $139.00. Since it is a dual-flush it is supposed to conserve water.
  • Paint // Color is “Montpelier Ashlar Gray” by Valspar.
  • Wine/Towel Rack // Purchased via Amazon for $34.50, available here.
  • Five-Hook Rack // Purchased at Target, available here for $23.79.
  • Towel Ring // Purchased via Etsy from “midwesterntreasures” for $26.50.
  • Shower Curtain // Purchased from Overstock, available here for $24.49.
  • Square Grey/Yellow “Paintings” // DIY project, I simply inserted a piece of fabric into a $4.99 frame from Michael’s (I will write a post about this soon!).


Since the bathroom is attached to the master bedroom which has a grey and yellow color scheme we carried that into the bathroom as well. Sorry I only have one set of before pictures but you’ll still get an idea of how awful it was, don’t worry haha.

 BEFORE

mastbath6mastermastbath10

AFTER

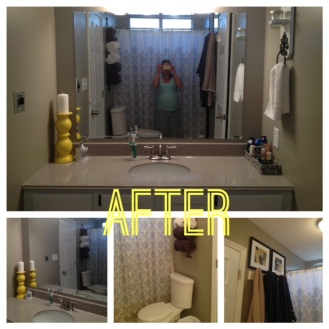
master1mastbath11mastbath1mastbath2mastbath3mastbath4mastbath5mastbath

We estimated this project to have cost us around $850.00 when all was said and done. Although it seems pricey it sure beats a remodel and since we did everything over the course of several months and only purchased items as we had the money to do so, this helped a lot. 

DIY Rustic Burlap Pennant Banners

pennantbur

As usual last night I was up way too late crafting, but I was excited to get these done and off of my to-do list. I have a few parties coming up and I knew these burlap pennant banners would add a little extra something to the table displays and make for a great piece of decor to have on hand for future events. There is nothing too special about these and as I’m sure you’ve seen on Pinterest they are extremely popular, lol. However, since I used cheap store bought stencils for my project, I thought my tutorial would be worth sharing as I noticed that a lot of tutorials as that you create your own stencils which is just way too time consuming for my lazy butt. I would say more but there isn’t much else to say, just easy breezy party decor at it’s finest! Hope this tutorial comes in handy for your next shindig, I will be posting pics of how I use them at each event at a later date! Happy Memorial Day everyone, thank you to those who have served, past and present and of course, to those who made the ultimate sacrifice for our freedom.

Squishy baby says thank you to our troops!

Squishy baby says thank you to our troops!


DIY RUSTIC BURLAP PENNANT BANNERS

NOTE: If you’re interested in making these with a different fabric check out my post on DIY fabric pennant banners, great for parties or photo backdrops!

YOU WILL NEED:

pennantbur1

  • Burlap Fabric (the amount you need will depend on how many letters are in your words, I was able to get over 30 large squares out of 2.5 yards)
  • White Acrylic Paint
  • Paint Brush
  • Large Alphabet Reusable Stencils (available at Staples for about $7.00, I will be using these for several projects so it was a good investment, alternatively you could print your letters out on paper and use an X-acto knife to cut them out and create your own stencil)
  • Glue Gun
  • Twine or Ribbon

DIRECTIONS:

Step 1: Create a template for your pennants in whatever shape you would like, I chose a rectangle with an inverted point at the bottom. The measurements will depend on the size of your stencils but if you are using the large 5″ ones as I did, I found a good measurement to be 7.5X7.5 inches.

pennantbur2

Step 2: Using your pattern as a guide, cut out as many pieces of burlap as you need. NOTE: I did not care about fraying as I though it added to the rustic look, however, to keep your piece from fraying you can spray it with a bit of fabric stiffener or brush the edges with mod podge and allow to dry before going on to the next step.

pennantbur3

Step 3: Using your stencils, holding each steadily in place paint your letters onto the burlap and set aside to dry.

pennantbur6

soooo many letters! lol

pennantbur4 pennantbur5

Step 4: Once letters are dry (I allowed mine to sit overnight), lay out a piece of twine long enough to accommodate the letters with slack on either end for tying the banner up for display.

Step 5: Apply a line of hot glue to the top of each burlap square and fold it onto itself, pressing down to create a firm seal. The spacing of the letters is up to you, I did not measure it out, just eyeballed it. Once you are finished your banner is ready for display!!! Check back to see how I display mine 🙂

Fun idea: If you want your letters to be interchangeable simply do not glue them to the twine but rather use a small hole punch to punch two holes along the top of each pennant and weave the twine through or use mini clothes pins to hold them to the twine!


DIY No-Sew Bow Tie

bow16

So the bow tie saga continues, haha. As promised, the other night I got down to it and created an adult sized bow-tie for J. You guys, IT CAME OUT AWESOME! I could not believe the side-by-side comparisons with his store-bought bow tie. Another reason I am so excited about this is because I was extremely skeptical about this project. A bow tie for baby P is one thing, he’s a baby and would look cute if you ripped up a paper bag and glued it to his pajamas (lol), J on the other hand, is a working professional who would need to be seen in public wearing this creation, and no man of mine is gonna walk around wearing the bow-tie equivalent of a first grader’s pasta necklace, haha. That being said, I did have a little hope, since before I had decided to take on this project I was sure to carefully inspect our store-bought bow tie to see if it was even worth attempting and if I could get away with a no-sew option of course. So the other night I put Nashville on Hulu (still not sold on this show, I don’t know why I keep watching it lol) and got to work! This bow-tie took me about 45 minutes to create, mostly because I was making it up as I went along, so don’t worry, if you decide to attempt this it will probably take you about a half hour, which I consider a super quick project, especially considering you’re getting an actual wearable accessory out of it!

Now let me talk a little about cost and being “fashionably frugal”, if you will. My original idea for this bow tie goes all the way back to last Father’s Day, when at six months pregnant and over the moon about our sweet little boy on the way (we had just found out we were expecting a boy), I purchased a matching father/son bow tie set via Etsy as a gift for J. Now, don’t get me wrong, I love the Etsy bow ties, the workmanship is perfection as is the quality of the fabric, however, I am embarrassed to admit what I paid ($53.00 .. gahhhhh, insert wahh face and money with wings emojii). I don’t mind that I splurged since I blame it mostly on pregnancy hormones lol, and since it was the kind of bow tie that you have to tie yourself that means it was sewn and we all know I’m no seamstress. Well, as luck would have it, a few months ago I found J a great pre-tied tie on Groupon for $4.99 (with free shipping, say whaaaaaat?!). The kicker is J actually prefers this cheap-o tie to the one that you have to tie yourself, and I can’t say I blame him since it always looks perfect, no need to scroll through YouTube videos trying to remember how to tie a bow tie, haha. This Groupon tie gave me the idea for a DIY version, the idea being, I had already made one for baby P, how hard could it be to recreate an adult version of the same thing? Back to the cost of the tie, if you think $4.99 was cheap, try $0.96!!! Yup, ninety-six cents people, now bare in mind that I was using fabric that I already had since I was matching it to baby P’s bow tie, so all that I needed to purchase was the tie clip, but if you’re frugal with your fabric choice the most this project will cost you is in the neighborhood of $3.00, sounds fab right?

bow1

Cheap-o inspirational Groupon bow tie, super cute! This is the one J wore in our family pics!

bow18

Side by side comparison in case you don’t believe me, lol.

Now for the tutorial, and pictures aka important proof that I’m not lying to you about this no-sew bow-tie that your man can actually wear in public and still be considered an acceptable part of society lol. I promise I will post pictures of J and P wearing their matching bow-ties, but since I’m going to include this as a gift in J’s Father’s Day package the pics will have to wait until then, I just had to post this pronto because I was so excited about it!

bow14

Father/Son Matching Bow Ties .. awwwww!

YOU WILL NEED: 

  • Fabric of your choice (you will not need much so like I always say, this is a great opportunity to hit up the remnants bin at your local fabric store or reuse some fabric that you already have).
  • Iron-on hem (heat ‘n’ bond, stitch witchery etc. Whatever brand you use is fine)
  • Bow Tie Set (this can be found by the buttons at your local fabric store, if you cannot find it as a set the employees should be able to direct you to each piece individually or you can purchase it online)
  • Glue Gun
  • Scissors
  • Iron

DIRECTIONS:

NOTE: Explaining the step-by-step directions is a little difficult as there are many small steps, but if you follow the pictures the wording will make a lot more sense, feel free to ask questions. 🙂

Step 1: Begin by measuring out and cutting your fabric. You will need the following:

  • 1 piece measuring 2.5X2.5 inches
  • 2 pieces measuring 9X5 inches
  • 1 piece measuring 24X1 inches
bow

2nd piece of large fabric not shown, oops.

Step 2: Use the following tutorial to begin to create your bow ties by following steps 1-5 only and repeating steps 1-4 twice as you will need to “bodies” for your bow ties (I will explain in the following steps). I used hot glue for all parts, no sewing.

Step 3: Take the two identical rectangles that will act as the body of the bow tie, and use a dot of hot glue in the center to glue them together, seam side down on both. Now, pinch the rectangles together at the center to form a “bow” once you have achieved a good bend to the fabric, use a few dots of glue to secure it at the center (as shown). Do not attach the middle piece yet, you will need to complete the strap first. bow5
Step 4: Now, begin work on your neck strap by taking your 24X1 inch long piece of fabric and lay it out flat with your print side facing down. Carefully fold in each edge (longways) so that they meet in the middle (as you did with the other pieces), and iron over the folds (this will help to hold it in place evenly when you insert the iron in adhesive). Once you have ironed the length of the strap it should be about 1/2-3/4 of an inch in thickness, however, the thickness doesn’t really matter so long as it is straight/even as possible. Now, cut a piece of iron-on hem the same length and about the same thickness (a little thinner is fine, it just needs to fit within the strap), place it inside the strap, refold the sides so they are covering the adhesive and iron the fabric until the adhesive sets (just about 5-8 seconds per section). Once this is complete your strap is ready for clips! bow2 bow4
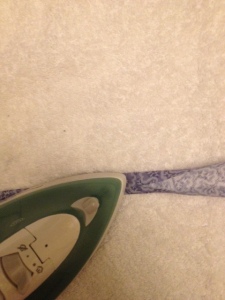
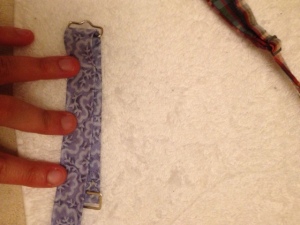
Step 5: Begin with the rectangular three bar clip (I don’t know the technical term for it lol), feed one end of the strap through about half an inch, upside down (hem side facing up) and loop it over securing it with a dot of glue. Now in the same direction feed the rectangular attachment (the one that the hook will attach to), over the long end. Then feed the length of the strap through the three bar weaving it under, over, under so it overs the part where you looped the first end. Now your strap is adjustable!

bow6

The girl at the counter loved my squishy baby so much that she gave me a 40% military discount instead of the usual 20% 🙂

bow10

once you are finished adding the first two metal pieces, the end of your strap will look like this.

bow7

bow9

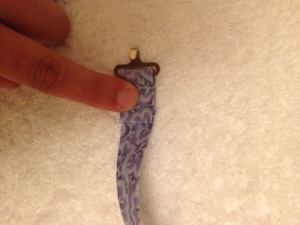
Step 6: Now, to the remaining end of the strap attach your hook by looping it through about a half inch and securing the end to the body of the strap with a dot of glue (make sure the hook is facing the hemmed side and test it out to make sure it will hook into the opposing piece).
bow11
Step 7: You are almost finished! Now return to your bow tie. Remember that 2.5X2.5 piece that you did a little work on and forgot about? Grab that. Take your bow tie, hem side facing up and glue one end of your little 2.5″ piece to it (be sure the piece is facing down so that when you wrap it around the body of the tie the correct side of the fabric will be showing). Now that you have one side attached, before wrapping it around take the hook-side of your strap (front side down, hook facing up) and use a dot of glue to attach it to the back of the bow tie so that just the hook will stick out once you wrap the rest of your fabric piece around. Once your strap is securely fastened, wrap the remaining piece of the fabric to create the center of the bow around and secure it using a dot of glue atop the strap. There you have it, all done!!! For kicks tell people it’s from H&M lol.    bow12 bow13
bow18
bow17

Disclaimer: This is something you are making yourself using just a glue gun and some fabrics, I can’t promise you name brand quality,  nor can I promise that it will turn out perfectly. If you are a brand snob sorry if I’ve offended you with my DIY clothing attempts, although I’m not sure what you’d be doing on the section of a blog entitled “Fashionably Frugal” lol.

Patriotic Tie-Dye Cupcakes

pat

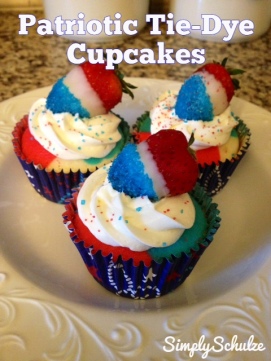
Since J has been gone (wow, I’m really acting like he has been gone for years, it’s two weeks Natasha, grow up! lol) I have been crafting so much I haven’t really taken the time to cook much of anything. Tonight baby P and I attended a BBQ at our friend’s house and in keeping with the Memorial Day holiday I wanted to whip up something cute and patriotic. Now I have previously written about my love affair with boxed cake mix but I will tell you again – I don’t bake. Meaning, if the words “baking soda”, “baking powder”, “yeast”, “stand mixer”, “rise” or any other baking lingo appear in a recipe I’m likely to pass, lol. That being said, when I do decide to bake something (usually cupcakes) I generally take the semi-homemade route by allowing my girl Betty Crocker or my homie Duncan Hines do the heavy lifting, while I take care of the decorating. This recipe was no different, so while P went down for a three hour nap (LOVE when that happens) I got down to it and ended up with the cutest little patriotic cupcakes! Keep this one in mind for the 4th, it’s as simple as making some chocolate covered strawberries and adding some food coloring to your cake mix, it only looks fancy, which is the best part! If you’re reading this while those patriotic holidays are still far out, go ahead and adapt this to any holiday – green, white and red for Christmas, orange, black and white for Halloween etc. Tie-dye cupcakes are so fun and you need not buy the special “tie-dye cupcake” boxed mix, you can easily make your own. Wishing everyone a happy and safe Memorial Day weekend, thank you to all who have served and are currently serving (especially my very own US Marine, J!).

PATRIOTIC TIE-DYE CUPCAKES (makes 24)

INGREDIENTS

pat14

the frosting and red sprinkles are not pictured, oops!

  • 1 Box White Cake Mix (WHITE not yellow)
  • Food Coloring
  • Blue and Red Crystal Sugar Sprinkles
  • 1-2 Cartons Strawberries (enough to have 24 strawberries, try to go for smaller strawberries, they sit atop the cupcake much easier)
  • 6 oz. White Chocolate
  • 1 can Vanilla Frosting (any white frosting will do)

DIRECTIONS

  1. Begin by melting your chocolate over a double boiler or in the microwave. If using a double boiler place chocolate in a glass bowl set atop a pot of simmering water, stirring until melted. For the microwave, place chocolate in a microwave safe dish, microwaving 30 seconds at a time, stirring after each interval until completely melted.
  2. Place your blue sugar sprinkles in a small container, then working one by one dip each strawberry in the white chocolate, allowing any excess chocolate to drip off before dipping in the sprinkles then place on a sheet pan or plate lined with parchment or wax paper. When you have finished, place the strawberries in the fridge for at least 15 minutes to allow the chocolate to really harden, I just left mine in there until I was done making the cupcakes.pat1
  3. Prepare your cake mix according to package directions, once the batter is prepared divide the batter equally among three separate bowls. One bowl will be left as is (that will be your white portion), into the second, squeeze a few drops of red food coloring and into the third a few drops of blue. The amount of coloring you add depends on how vibrant you want your color to be. NOTE: I am usually all about dollar store everything but I learned the hard way, there is a BIG difference between name brand and dollar store brand food coloring. The tie-dye cupcakes I made for Easter were sub-par in the color department lol. Go for the good stuff, it’s worth it. pat2
  4. Place your cupcake liners in your tin and beginning with your first color (doesn’t matter which) gently place a dollop of each color into your cupcake liner, aiming for off to the side (see pics). Work your portions so that you will have enough for 24 dollops, just eyeball it. Do the same with the second and third colors, the idea is to have each color showing on the top of the cupcake once they are baked. pat3 pat4

    yikes, I need to clean my oven lol

    yikes, I need to clean my oven lol

  5. Bake your cupcakes for the minimum suggested time, just until the toothpick comes out clean and they are springy. If you allow them to overcook your white will become tan or brown. Once baking has finished allow the cupcakes to cool. pat7 pat9
  6. Frost your cupcakes however you please, I use a large Wilton star tip and a plastic bag to pipe a small amount of icing onto the middle of each cupcake so that the red, white and blue will still  be seen on top. Dash some red and blue sprinkles on top then set a strawberry on top of each cupcake. Ta-da, you’re finished, God bless America … and easy cupcake recipes!!!

 pat11 pat10 pat12

Look who woke up just in time to watch the finishing touches!

Look who woke up just in time to watch the finishing touches!

Hard to believe I will be making this guy a smash cake in under 5 months!

Hard to believe I will be making this guy a smash cake in under 5 months!

So as I put it on Insta - If you've got the time and your squishy baby don't mind ... get yo patriotic cupcake on!!!

So as I put it on Insta – If you’ve got the time and your squishy baby don’t mind … get yo patriotic cupcake on!!!

Easy DIY Nautical Frame – Made For Under $1!!!

frame8

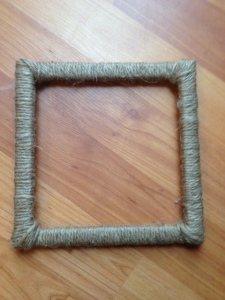
So with J gone for fleet week (*sigh* it has only been seven days and it feels like foreverrrr already), I have been keeping myself busy with baby P but also, of course, with TONS of crafts, haha. Earlier this week I found an adorable beachy frame on clearance at our local craft store and picked it up for J’s Mom (with all the running around for my niece’s b-day I wasn’t able to get my MIL a Mother’s Day gift, just a card), who loves beach themed decor so my plan was to put a picture of baby P from one of our recent beach trips in the frame. However, when I printed the picture I wanted to use, the store cropped it wrong and I ended up having to use another, but being the weirdo that I am, I couldn’t bring myself to throw out a picture of baby P even though it was basically useless (wow, I am a FREAK lol). In an ah-ha! moment I had the idea to use it in our guest bathroom, which is beach themed and a little gallery wall where baby P’s beach photo would fit perfectly (check out our guest bathroom update saga here). In my mind the project was going to involve rope, a picture frame and some of those baby clothes pins I had picked up for a party craft I am making in the near future, but to save myself the running around looking for rope (especially when I probably wouldn’t use it again, defeating the purpose of this craft being essentially free), I decided to just use twine I already had at home and instead of a frame I purchased a dowel for $0.59 to create my own “frame”. So, yesterday during P’s nap I whipped up this little picture frame in about 15 minutes, but the ease of this craft isn’t even the best part. The best part would be that when broken down, this craft costs about $0.75!!! Baby P looked on in delight as I hung it as part of our little bathroom gallery wall this morning and I just know our guests will love seeing it too :).

The original picture that prompted this idea, isn't my squishy baby sweet?

The original picture that prompted this idea, isn’t my squishy baby sweet?

YOU WILL NEED:

NOTE: If you find a cheap thrift store picture frame you could use that in place of the dowel, simply remove the glass and begin the instructions at step 3. Also, this does not need to be beach themed, you can wrap the frame in whatever material you would like and then embellish with something that suits your style!

frame1

  • A dowel (round or square, whatever your preference)
  • Hack Saw (or any saw, if you are desperate you can use scissors if you dowel is skinny enough)
  • Sand Paper (optional)
  • Rope or twine
  • Glue Gun
  • Mini Clothes pin (available at most craft stores, if you are making a larger version of the frame you could use a regular sized clothes pin)
  • Ribbon (optional, you could just use more rope or twine in it’s place if you’d like)
  • Sea Shells or Beach Glass (optional)

INSTRUCTIONS:

Step 1: Take your dowel and measure and mark the lengths of your frame size. I chose to do a 7″X7″ square frame since I only had a small amount of space available on my wall. Then use your hack saw to cut the four pieces and then sand off any remaining wood pieces or roughness on the edges (no need to make it perfect, you will be covering this anyway). NOTE: If you are desperate, just hack at your dowel using scissors until you weaken it enough to snap it with your hands, it will be uneven on the edges but you can sand them. Ghetto option I know, but I know some peeps don’t have saws and I like to be an equal opportunity crafter, lol!

Step 2: Arrange your four sides in a square as if they are lincoln logs (two on the bottom and two on the top overlapping). You can also do one under the other or glue the corners so that the frame will lay completely flat, it is up to you but personally I liked the way it looked using the lincoln log method. Use a dot of hot glue to attach each of your four corners.

frame2

Step 3: Now, beginning at a corner, use a dot of hot glue to attach the end of your rope or twine to the frame. Then apply a small line of glue to the frame and working a few inches at a time, begin wrapping the rope or twine tightly around the frame. Work quickly so the glue does not dry before you press the rope to it. Continue this process around the body of the frame until it is completely covered.

frame3 frame4 frame5

Step 4: Once you have finished the frame, decide where you want your picture to fall within it, then cut a piece of twine long enough to reach across the back width of the frame, securing it at either end with a dot of hot glue.

Step 5: Now, cut two pieces of ribbon, twine or rope of equal length (you will use these to hang the frame), the length depends on your personal preference. To attach each piece, place a dot of glue at each of the two top corners of the frame and secure an end of each piece. Tie them at the top in a bow or knot and it is ready to hang!

frame7

Step 6: The last step is optional, but if you wish you can embellish your frame. I used a single seashell attached with hot glue at one of the lower corners. Hang your frame, high-five yourself and if you’re a Mom decided what you’d like to do with the other 45 minutes of naptime! 🙂

frame6

Don’t forget to check out my post on our guest bathroom update, where you can view before and after pictures of our bathroom and all of our decor 🙂

Updating Our Guest Bathroom

upbath13

I’d like to share our guest bathroom update, which was one of the first projects I tackled upon moving into our home. I know I’ve mentioned in my other house posts that I like to stretch our budget by simply updating our rooms with DIY decor and fresh paint, as opposed to doing a complete reno. The upstairs bathroom was in decent shape, the tub surround, toilet and light fixtures were good, and although we decided to replace it, the cabinet portion of the vanity was acceptable as well, so I regret not simply replacing it and purchasing a new vanity top (don’t make the same mistake we did, read my tutorial on repainting cabinets and get to it!). I decided to go with a beachy-chic feel for the bathroom decor, normally I’m into a little more monochromatic design with pops of color because I feel it is a little more modern, but I figured for the guest bathroom it wouldn’t hurt to have a little fun with it, after all we had just moved to the coastal Carolinas! The majority of the bathroom update was simply adding decor, with the only hard part being the replacing of the bathroom vanity (don’t get me wrong, I love the way it looks but it was a major pain in the arse).

Before I get to the specifics of the bathroom update, let me help you to hopefully avoid one of our giant missteps in the project by giving you a much simpler DIY solution. If you are considering replacing a vanity completely, before you tear out the existing one I urge you to first take a lay of the land and ask yourself – is there physical damage, missing or rotten pieces of wood? If so, replacing the piece may be your only option, however, if you are just dealing with something that is ugly but functional read my post on refinishing cabinets, mine were as ugly as they come, a real 1980s builder-grade gem lol. If you are still not convinced, let me tell you this – replacing a vanity, especially one that is original to the home, will involve replacing parts of the floor beneath it before installing your new vanity, and I can assume that since you are reading DIY posts on home updates you are not in fact a professional builder, haha. Once you rip that old vanity out there’s no going back, you’ll be stuck as we were, having to sand and paint the walls (which will be damaged by your removal of the vanity), install new subfloor (oh, and the fact that we owned only a hack saw and drill as far as power tools went made it even more fun – NOT lol), then lay new tiles and grout before you can even THINK about putting in that cute new vanity that has been sitting in your garage for the weeks it took you to prepare the space for it. Still sound like a good idea? If you are up for a challenge, by all means, go nuts but if you are like me and would rather spend your weekends at the beach instead of on your hands and knees grouting a bathroom floor when all you wanted was a new vanity, then I plead with you to go the repainting route haha. That being said, our bathroom did come out super cute and if you do decide to replace your vanity you can still DIY it (if you have any questions about replacing the floor tiles leave a comment, we had no idea what we were doing and it still came out great). Now for the specifics, since this isn’t a tutorial I’ll just explain the update and give sources for all of my decor finds.
upbath9upbath12

WHAT WE DID: 

  • Removed the vanity, replaced the floor tiles around it and installed a new sink/vanity combination. As I mentioned above, I do wish we had simply repainted the vanity in retrospect, however, the smaller vanity open up the bathroom a great deal and made the space seem bigger.
  • Painted the walls.
  • Removed the vanity mirror and replaced it with a hanging mirror.
  • Installed two floating shelves above the toilet.
  • Replaced the towel bar.
  • Installed a hand towel ring.
  • Installed  a three-hook rack for hanging towels.
  • DIYed a free-standing small linen storage unit.
  • Hung pictures.

SOURCES:

  • Vanity  // Purchased at Lowes, available here for $269.00. NOTE: If you don’t care about having extra drawers they have another similar option for $189.00.
  • Floating Shelves // Purchased at Home Depot, available here for $28.80 each. They are also available at Target, but I believe H.D. is still cheaper.
  • Free-Standing Storage Unit // Thrift Store find. After project costs, the item comes in at around $29.00. See my post here on painting laminate furniture to see more about this particular piece.
  • Wall Paint // Color is “Woodlawn Bedroom” by Valspar.
  • Vanity Mirror // Thrift Store find. Purchased for $10.00 and hit it with a coat of gray spray paint.
  • Towel Bar // Purchased at Lowes, Moen Brand Spot Resistant Brushed Nickel 24″ Towel Bar, available here for $19.98. We had a Lowes credit or else we would have hit up Walmart for this item to save a few bucks.
  • Three Hook Towel Rack // Purchased from “TheShabbyShak” via Etsy for $23.00. This shop has lots of great shabby chic decor in a huge variety of colors and finishes. I chose the aqua in keeping with my beach theme.
  • Towel Ring // Purchased from “VeritasInspired” via Etsy for $22.99.
  • Damask Shower Curtain // Purchased from Amazon for $36.00. Available here.
  • Towels // Lime Green Bath Towels – Target, Target brand $4.99 each. Navy Blue Hand Towels – Bed Bath & Beyond, Wamsuetta Brand (these were wedding gifts or else we would have gone for the Walmart or Target option on these, expensive hand towels? Ain’t nobody got time fo dat).
  • Baskets // All three baskets in my bathroom (as well as those hidden under the sink), were purchased from Michael’s. I LOVE baskets. I once saw a Hoarders episode featuring a woman who had over three thousand baskets or something like that and I’m not saying that’s me but I’m well on my way, lol. NOTE: I only purchase baskets from Michael’s with a 40% off coupon or when they are on sale for over 40% off or else they are a total rip off. I would say these three cost somewhere in the neighborhood of $5.00 each for the small ones and $8.00 for the large one.
  • Wall Art // Each item on this wall was virtually free. The beach picture was a picture I had taken myself right on our own Onslow Beach here on Camp Lejeune, I just blew it up at our local drugstore for around $1.00, the frame was the second half of a buy-one-get-one deal they were running at Michael’s so we had it sitting around anyway. The “catch me by the sea” print was one I found on Pinterest, saved as a JPG and printed at our local drug store in size 8X10 (this may or may not be legal, but there was no watermark so I assume it was a free print, if not I’m sorry copyright gods!). If you want to do the same just Google “free whatever-you’re-looking-for images/quotes” and you should find some, the quality may not be so fab but it’s just for looks. The frame for my print was one of the old ones we used in our condo so I just hit it with the same gray spray paint as the mirror. The tiny mirror was a thrift store find for $3.00. Not pictured here is my DIY nautical rope frame, which you can make for under $1.00 read the post to find out how!


BEFORE

upbath6upbath7upbath8

AFTER

upbathupbath1upbath2

upbath3upbath5

We estimate the total cost of the project at around $500.00, and for the transformation we achieved I think this is a GREAT price, keeping in mind a full bathroom reno by professionals can cost you around 5K on the low end, which even if we had the cash (which we definitely don’t, lol), I don’t think I would be able to stomach. Say it with me people, “D-I-Y” it’s a beautiful word!!! 

NOTE: This transformation occurred over about 5-6 months, we only bought things as we could afford them which really made that $500.00 project price tag a little more bearable, because I don’t know about you but even though it’s not a 5K reno, $500.00 is still a lot of money, especially when taking on multiple house projects at a time.

There you have it, our beachy-chic guest bathroom re-do! This would not have been possible without my wonderful hubby J who helped my 7-9-month pregnant self hang and place various items when I couldn’t physically bend that way, lol. Hope this inspires you! XOXO
Bathroom Vanity Makeover – Cabinet Painting Tutorial

master3

The master bathroom was the last major house project we tackled before baby P was born. We had been putting off this particular project because we anticipated that it would be the most expensive of our DIY projects as well as the most work. Well, it took us two other bathroom updates (the guest bathroom and the half bath downstairs) to realize that replacing the entire vanity was a stupid idea. While both of the other bathrooms came out great and our cute little modern vanities look amazing, replacing  the old vanities meant ripping out the cabinets and sinks, having to sand and repaint the walls, install new tiles in the empty space that was left on the floor and replace the floor molding before installing the new vanities – SO much work. We spent hours laying tile, grouting and cutting molding when we very well could have just updated the old cabinets and just purchased a new vanity top. Oh, well, lesson learned and we still got two cute bathrooms out of it so no harm done. Needless to say when it was time to tackle the master bath, I was determined to simply repaint the cabinets and replace only the vanity top. Having already repainted our kitchen cabinets (I will post about this soon!), this was not my first cabinet rodeo, lol. When ordering the new vanity top, we ended up choosing a cultured granite in a light gray because it went with our color scheme but was also neutral enough to compliment really any paint color, should the new owners decide to change the wall color. After purchasing our vanity top, I  got to work on the cabinets. These were a super easy project (all the more reason I wanted to kick myself in the head for not doing this in the other bathrooms as well), especially when compared to the kitchen cabinet process, this one paled in comparison!
Now, I will get to the tutorial, but first some advice. If you buy an older home take a good look at the existing cabinets and fixtures before you look to do a complete overhaul of the place. While some things may be physically damaged beyond repair and need to be replaced for non-cosmetic reasons, if it is just ugly but still functional try to look beyond the hideous 1982 stock cabinetry because chances are you can save a lot of time (and maybe some cash too) with just a quick paint job! In our case the cost of the projects were going to be about the same (the cost of the custom vanity top was comparable to the cost of a new full vanity and replacing the floor tiles) so we didn’t necessarily save a significant amount of money by going the repainting route BUT we sure did save a heck of a lot of time and aggravation! I am a HUGE advocate for making simple cosmetic changes, it is AMAZING what a little paint and DIY decor can do for a room and with little to no effort and cash you can bring an old, dingy space back to life (and more importantly, into the 21st century, lol)!

REPAINTING BATHROOM CABINETS

*NOTE: This can also be applied to kitchen cabinets as well! Basically all of the same principles can be applied to painting wooden furniture, check out my post on re-doing old furniture here.

YOU WILL NEED: 

  • Semi or High Gloss Kitchen/Bathroom Paint (the label will say “kitchen and bath” these paints are specifically designed to withstand the moisture caused by showering and cooking. If you don’t want to buy a bathroom or kitchen specific paint go with a semi or high gloss regular latex paint, I DO NOT recommend any finish below satin, as eggshell and flat paint don’t hold up to moisture well at all).
  • Sanding Blocks or regular sand paper
  • Foam Brushes or Small Rollers (they make rollers specifically for cabinets, they are good for the large surfaces but I found that I needed to use the smaller foam brushes on the edges anyway so I recommend skipping the rollers altogether, as they won’t really save you too much time).
  • Polyacrylic Top Coat (I suppose this could be optional because you are using a high or semi gloss paint, however, I wanted the extra protection on the cabinetry).
  • Drop Cloth
  • Bonding Primer (optional)
  • Caulk (optional)

INSTRUCTIONS:

  1. Begin by removing all of the drawers and doors, then remove all hardware. If you are planning on reusing the hardware you can let it soak for a few minutes in warm soapy water then clean them with a toothbrush or you can repaint them using a satin spray paint).
  2. Give the surfaces of your doors and drawers a quick sand, no need to go nuts, just about a minute on each surface will do, you are simply trying to remove a good amount of the original sheen or varnish. Once you are done sanding, wipe all surfaces down with a damp cloth to remove any sanding dust. Don’t forget to sand the exterior body of the vanity as well. Once you are finished sanding, vacuum or dust the insides of the drawers and around the vanity itself to ensure that no particles will get on your wet paint once you begin working. NOTE: Some tutorials and cabinet painting kits (such as Rustoleum) suggest using deglosser (aka liquid sandpaper) in place of sanding. I have done both and I now prefer to just sand, it takes about the same amount of time and you won’t have to deal with the greasy disgustingness of the deglosser.
  3. Another optional step is using white paintable caulk to fill in any cracks or holes in the wood, this is a great trick! Just squeeze it in and smooth it out using your finger. This will make your cabinets look even newer as you will be hiding any wear and tear or factory imperfections. Most caulk is paintable after just a half hour. Again, this step is optional but if you are a perfectionist I wouldn’t skip it, as once you paint your cabinets (especially if you are using a light color) imperfections in the wood will be more apparent.
  4. Set up a work area for painting the doors and drawers, since this is usually a few day project, I do not recommend doing it outside. The garage or spare bedroom will probably be best (since I didn’t have any tiny humans crawling around at the time, I simply moved our dining table to the side, laid a giant plastic drop cloth of the tile floor and set up shop there). Lay a drop cloth (I suggest plastic) and you are ready to paint!
  5. If you are using stark white paint as I did you might consider applying a coat of bonding primer or cover stain first, that way you won’t require as many coats of paint to hide the wood color beneath. This is optional, however, and if you are using a darker color paint this is definitely unnecessary. As far as the method for painting the drawers and doors, the drawers can usually prop up on their own, but for the doors I use the same method as I do when cooking a whole chicken in the crock pot (lol), I create a few balls out of tin foil then prop each door up flat so you can easily paint the sides and edges. Now, give all exterior surfaces an even coat of paint, using even strokes in the direction of the original wood grain. I don’t paint the insides or sides of the drawers, when I first tacked my kitchen cabinets I posed this question to the Google gods (haha) and it seems that even professionals don’t paint the insides or sides of cabinets when refinishing them, which worked for me – less work, woo-hoo!!! Once you have applied your first coat of paint to the drawers, doors and exterior body of the vanity or cabinet itself, allow about 12-24 hours of dry time. I know that sounds like a lot of dry time, however, good dry time is key in ensuring that your piece will hold up and it is extra important in the case of cabinets as they will be handled on a daily basis. This is a good nap-time or after work project as you can spend an hour or so each day over the course of a few days.
  6. Repeat the painting process until you have applied the desired amount of coats, for darker colors this may only be two but for stark white you may need up to four if you choose to forgo the cover stain. Once your final coat has dried you can go ahead and apply your first coat of polyacrylic top coat if you are using one. I chose to apply two coats of the clear polyacrylic just to be safe. Once your final coats have tried go ahead and reattach your hardware and you are finished!!!

master2

I hope that by looking at these before and afters you can see what a difference refinishing your cabinets can make. You would NEVER know that my vanity was originally a piece of crap 80’s builder-grade cabinet! I will be making another post soon on our entire master bathroom re-do and give you some more budget-friendly decor pointers, so be on the lookout for that. In the meantime, here is a sneak-peak of the before and afters just to give you an idea.

master

master1

Baby P’s DIY Father’s Day Photo Gifts

fath5fath

Father’s Day is just a few short weeks away and baby P and I both agree that J is just about the best daddy there is and deserves nothing but the best for his special day! Thing is, the gift that my frugal hubby would love the most is for me not to spend money, haha, lucky for him I had been planning two budget friendly, DIY, grand slam Father’s Day gifts for months now (well actually since baby P was born lol). Since J is up in NY for fleet week for two weeks, I knew this would be the perfect opportunity to get my Father’s Day pics out of the way, printed and wrapped before his return. Additionally, I like to share my holiday crafts with my Mommy friends, so I always like to test out my projects before hand, to ensure it comes out as planned and make it easier for me to host a craft play date without having to wrangle baby P at the same time.

Okay so back to the photos, can I tell you that I literally cried after I saw how amazing these pictures turned out? Baby P is just the squishiest, happiest little thing and I know J is going to DIE when he opens this gift on Father’s Day (if I can wait that long to give it to him lol jk I will)! Don’t worry I made him promise not to read the blog for a few weeks and since he loves surprises so much I know for a fact he won’t peek ;-). Since the pics are self explanatory I’ll just go into a bit more detail with each picture below. Hope this inspires you to have some fun with your little and give their Daddy something fun and meaningful for Father’s Day!

*For more examples of DIY holiday photos check out this post!

“DAD” PHOTO

fath2fath4fath3

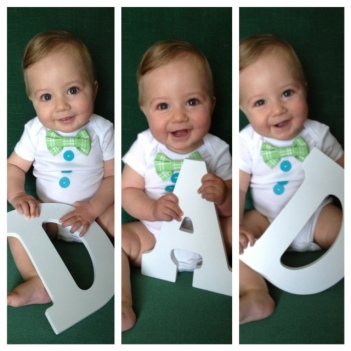
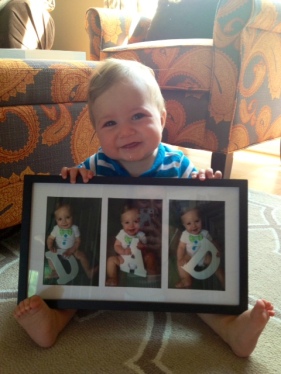
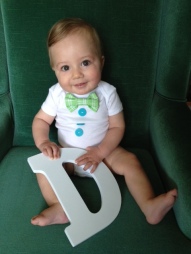
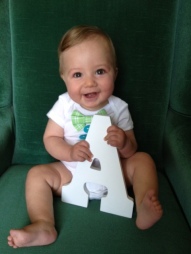
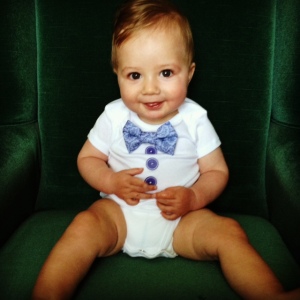
Okay, obviously you’ve seen this one all over Pinterest, so needless to say this isn’t an original idea but sooo stinkin cute nonetheless! I purchased a “D” and an “A” from Michael’s at $3.99 a piece and used a 30% off-entire-purchase coupon, I also returned the following day to purchase the frame (originally priced at $12.99) using a 40% off coupon. Confession: in my super stingy mind I did for a moment consider returning the letters after I was done (I know, terrible)  but I decided it would be best to keep them to repeat this Father’s Day craft  for my crafting play date and with any future children I may have. The onsie is another one of my DIY projects that I came up with specifically for this picture, check out the tutorial for DIY Little Man onsies here, they are super cheap and mostly no-sew! For the picture itself I just sat him on our vintage wing back chair (which actually made for the perfect backdrop!) and snapped his pictures with my smart phone. When I was done, I used the Walgreen’s photo app to upload my pics and picked them up the next time I was out, three 4X6 pictures cost me about $0.40 after coupons!!! Quick plug for the Walgreen’s photo app – I LOVE it, it’s so convenient since it’s all done from your phone, just make sure you Google “Walgreen’s photo coupons” before completing your order since there are always coupon codes for photo prints (this time it was 40% off!). Including all components this project cost me right around $14.00. TIP: If you want to save on framing costs simply purchase an 11X14 frame from a thrift store and arrange the photos side by side over a colored piece of paper or cardstock, as opposed to buying a three hole frame or simply use the app “picstitch” or another photo app/kiosk to turn your three images into a three frame single photo.

fath8

Baby P testing out the chair and modeling his onsie before the pics!

fath5

fath9

so proud of the finished product! lol Look at those curled little toes 🙂

“DADDY’S SHOES” PHOTO

fath

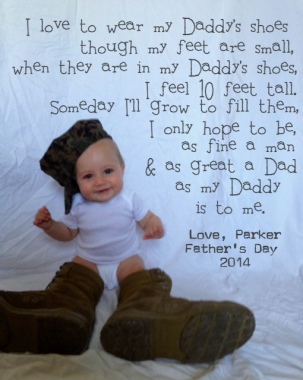
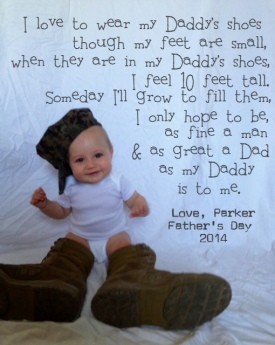
This photo was a copycat of a professional Father’s Day photo I found here on Pinterest, which I then adapted to include my hubby’s military gear. I figured since I was going to be recreating this idea with all of my Mommy friends, who are all military mamas as well, including the military boots and cover would be an extra special touch. To set up the picture I followed my usual steps for a DIY photo backdrop and then added the words using the free photo app “Phonto” (see this post for detailed instructions for use of the app) after taking the picture. This photo I printed in size 8X10 via Shutterfly for $1.79, the frame I will be using is one that we already have so that part will be free, which means … this gift cost me $1.79, say whaaaaaaat??! NOTE: When doing the picture with a little girl I plan to change the end of the poem to “… as great a person and as true a friend, as my Daddy is to me”, since the original poem is specifically for another male.

fd1

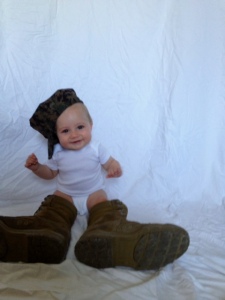
the original image before I added the text. I made sure to take the photo off center so that there would be a good amount of empty space for the poem.

There you have it – two ADORABLE Father’s Day gifts coming in right at around $15.00!!! My hubby will LOVE these gifts, and love their price tag as well!

fath1

We’ll be celebrating this wonderful man come Father’s Day! He does it all and then some, we love him so much! I caption this photo “look, here’s my Dad!” lol