Skinny Berry Sangria

IMG_0606

This is a GREAT drink! So good in fact, that I had to wait for the after effects (and the memory of the after effects, lol) to wear off enough for me to stomach writing up the recipe for you guys, haha. The good news is as long as you don’t let these go down like water (as we did on our girl’s night) they shouldn’t give you any trouble but I will warn you it’s difficult because MAN are they delicious! This drink was my effort to create a fruity and fun “girl’s night” cocktail while keeping the calories at bay (the sugar content is still a factor but at least it’s from fruit and fruit juice, we do what we can right? haha). I love getting together with my girls for drinks but especially during the winter those extra calories hiding in your cocktails can definitely do some damage to the waistline. While it’s no secret that the best way to keep healthy and fit is to eliminate alcohol altogether, you’ll feel a little bit better about your decision to have a drink or two knowing that you were able to lighten them up even just a little bit! This is a great big-batch drink to make for a crowd and would be super fun for a bridal shower or summer event. That being said, cheers to warmer weather hopefully being on the horizon for us NOVA folks (but if not I can always warm up with this cocktail).

IMG_0596

Like my champagne glasses? They’re available here on Amazon in sets of four (“toast”, “sparkle”, “cheers” and “celebrate”) – so cute!

INGREDIENTS

IMG_0593

  • 1 bottle Sparkling Brut Rose (if you prefer a sweeter drink try a sparkling moscato or regular sparkling rose but I felt plenty of sweetness came from the fruit and cranberry juice)
  • 1/2-1 cup Berry Vodka (depending on how strong you want your sangria)
  • 1 cup berry or raspberry seltzer
  • 2 cups light or diet cran-raspberry juice
  • 1/2 cup each strawberries (sliced), raspberries and blueberries
  • frozen mixed berries for serving (optional)

INSTRUCTIONS

  1. Combine the fresh berries, vodka and cran-raspberry juice in a pitcher and allow to refrigerate for at least an hour.
  2. When ready to serve pour in seltzer and brut rose and stir. I served mine in champagne glasses with frozen mixed berries in lieu of ice cubes!

Sweet Potato Curry Lentil Soup

sweetpotatocurry

When I first started this blog (a year ago this month! Wow, time flies!) I maintained a pretty good balance of posting both recipes and crafts. Lately I’m realizing that as my squishy baby becomes less squishy and more of little marathon runner/mountain climber in-training, I’ve defaulted to a lot of my go-to recipes – things that are tried and true and can be prepared either with one hand as Baby P “helps” or that I can prepare in the time it takes him to finish his own dinner while he is confined to his high chair, lol. The other night when I was meal planning for this week and scanning through my “tried and true” Pinterest board, I kept coming across my own original recipes and became determined to test out one of the many recipes that I’ve been cooking up in my head recently but haven’t had the time to actually try out. So that is how I came to whip up this delicious Indian-inspired soup, perfect for a chilly fall or winter day! Aside from the fact that I love a jazzed-up spin on an old classic like lentil soup, I also love that this could totally be a “pantry-meal” a.k.a. something you could make using items that you already have on hand which makes it SUPER easy and super cheap as well. Two final and super important benefits of this recipe is that it is both super healthy and freezable! I made a big batch so that I was able to freeze the half we didn’t eat and simply heat it up for a quick meal another night.

SWEET POTATO CURRY LENTIL SOUP

INGREDIENTS

  • 2 Tbsp. olive oil
  • 3 cloves garlic, minced
  • 1 medium onion, diced
  • 2 carrots, chopped
  • 2 stalks celery, chopped
  • 2 large sweet potatoes, peeled and diced into 1 inch cubes
  • 1 large tomato diced (or substitute 1/2 cup canned diced tomatoes)
  • 8-10 cups chicken or vegetable broth OR 8-10 cups water and 2 Tbsp. bullion or chicken/vegetable base
  • 1 1/2 cups lentils, rinsed
  • 2 Tbsp. curry powder
  • 1/2 tsp. coriander
  • 1/2 tsp. cumin
  • salt and pepper to taste

DIRECTIONS

Step 1: In a dutch oven or large pot heat the olive oil and add in garlic, onions, carrots and celery and cook until just soft.

Step 2: Add in diced tomatoes and spices, season with salt and pepper and allow to cook for about 2 minutes then stir in lentils and sweet potatoes. Bring to a boil then reduce to simmer for about 35-45 minutes until lentils are cooked and sweet potatoes are soft.

Step 3: If you like your soups really chunky you can omit this step but I use an immersion blender to blend the soup up a bit, leaving some chunks but so that the smoothness of the portion of blended potatoes and lentils give the illusion of a heavier soup even though this is a light recipe. NOTE: If you don’t have an immersion blender simply ladle about 2-4 cups of soup into a regular blender or food processor, blend and then return that to the pot with the rest of the soup.

Skinny Italian Wedding Soup

photo (11)

Could it be!? After a brutal summer of 90+ temps daily, we are finally experiencing our first bits of fall here on the NC coast, woo-hoo! Yesterday was cool and rainy, just the kind of day that calls for a good bowl of soup. I am a huge soup fan and although the hot summer didn’t have me bringing out my soup pot very often, now that fall has arrived I will be on a mission to try out a new soup each week. This week I decided to come up with my own version of Italian Wedding Soup, which I’ve never really been a fan of because mystery meatballs out of a Progresso can kind of creep me out (lol) and the canned version is really the only version I’ve known of this soup until I spotted a Pinterest recipe for it that sparked my interest. While the recipe I found looked delicious I wanted to create my own lightened up version using lean turkey instead of sausage to form the little meatballs, both because J and I try our hardest to maintain a clean diet during the week and because now that baby P is pretty much eating what we eat I try to be more mindful of the sodium content and level of process to our foods. Another reason I love my new original recipe (and soups in general, for that matter) is that it is a great way to sneak in some leafy greens and veggies and lets be honest, who doesn’t love the clean-up (or lack-there-of) that comes along with a one pot meal!? Give this a try on your next rainy day or freeze up some mini-meatballs for a quick-fix meal down the road, either way – happy soup weather to you! 🙂

INGREDIENTS:

  • 1 lb. lean ground turkey
  • 1/3 cup bread crumbs
  • 2 cloves garlic, minced
  • 1 Tbsp. fresh Italian parsley, chopped
  • 1/4 cup parmeasan cheese
  • 1 large egg, beaten
  • 4 oz. frozen chopped spinach, prepared
  • 1/2 tsp. fennel seeds (optional, this will just give it a more “sausage-like” taste without using the sausage)
  • 1/8-1/4 tsp. red pepper flakes
  • salt and pepper to taste
  • 2 Tbsp. olive oil
  • 2 carrots, diced
  • 1 medium onion, diced
  • 8 cups chicken stock + 1 cup water
  • 1 cup dried orzo pasta
  • 1 can (15 oz.) cannellini or great white northern beans
  • 1 large bunch kale (or other dark leafy green, swiss chard would be great in this too!), stems removed and chopped (about 4 cups)

INSTRUCTIONS:

Step 1: Start by making your meatballs. Combine first 10 ingredients (turkey-salt and pepper) and mix by hand until just combined (don’t over mix!). Roll into small 1-inch meatballs (makes about 50!) and place on a tray or sheet pan and refrigerate until ready for use. SHORTCUT ALERT: You can prep these tiny meatballs ahead of time and freeze individually on a baking sheet lined with wax paper then transfer to a zip-lock bag once they are frozen and store for whenever you’d like to make this (or any!) soup!

Step 2: In a LARGE (emphasis on large because you will need it to fit 50 mini meatballs without overflowing, lol) dutch oven or pot, heat olive oil and add diced carrots and onion, season with salt and pepper and saute until just soft. Add the chicken stock and water to the pot and bring to a boil.

Step 3: Once soup is boiling add your mini meatballs one at a time, allow liquid to return to a boil the reduce to a simmer. Allow to simmer for about 5 minutes then add your orzo pasta to the pot. Cook until pasta is done (about 5-10 more minutes) and meatballs are cooked through, then check for seasoning and add your beans and chopped kale to the pot, cook for about 5 additional minutes until the kale has wilted. Serve with extra parmesan cheese and enjoy!

IMG_0192

I’ve finally been playing around with my new DSLR camera! Super excited to get more practice on yummy recipes 🙂

Our Favorite Meatloaf Recipe

photo (7)

When it comes to comfort food I’m a huge fan. Lucky for my waistline my hubby doesn’t share my love for comfort food so we don’t really indulge in it too often, however, the one thing I do require that we eat on occasion in order to satisfy my comfort food fix is meatloaf. I love a good meatloaf, partly because I love anything that you can put ketchup on (lol) but also because it’s kind of an all-in-one type meal (since I include lots of veggies in mine). That being said I have tried out a lot of recipes for “the loaf” (as my hubby refers to it, ha) trying to find one that would magically convert J to a meatloaf lover like me. While I am still yet to have him go ga-ga over a plate of meatloaf this recipe below is the one that I’ve had the most success with. I am a huge fan of this recipe because I was successfully able to use beef with a lower fat content and still achieve a nice moist meatloaf! Additionally I include lots of veggies and top it a special glaze (that is also great on chicken!) that yields a yummy caramelized crust. I am also happy to report that this recipe was baby P approved 🙂

Baby P enjoying some meatloaf for lunch! Did I mention it makes great leftovers? :)

Baby P enjoying some meatloaf for lunch! Did I mention it makes great leftovers? 🙂


INGREDIENTS

FOR MEATLOAF:

  • 1.5 lbs. lean ground beef (I used 93% lean)
  • 1/2 lb. ground pork
  • 1 zucchini, diced
  • 1 red bell pepper, diced
  • 1 yellow pepper, diced
  • 1/2 yellow or white onion, diced
  • 5 cloves garlic
  • 1/4 cup parsley
  • 2 large eggs
  • 1 cup panko bread crumbs
  • 1/2 cup Parmesan cheese
  • 1/2 tbsp. dried thyme
  • 1/2 cup ketchup
  • olive oil
  • salt and pepper, to taste

FOR GLAZE:

  • 3/4 cup ketchup
  • 1 tbsp. oregano
  • juice of half of a lemon
  • 3 Tbsp. honey
  • 3 tbsp. olive oil
  • salt and pepper, to taste

DIRECTIONS

Step 1: Begin by dicing your veggies, then heat about 2 tbsp. of olive oil in a pan and add onion, garlic, peppers, zucchini, thyme and a bit of salt and pepper. Cook until just soft, stirring constantly. Set aside to cool.

Step 2: In  a bowl combine beef, pork, parsley, eggs, panko, parmesan cheese, ketchup, salt, pepper and cooked veggies. Mix by hand until just combined, don’t over mix.

Step 3: To make glaze combine all ingredients and mix together, set aside.

Preheat oven to 425 degrees. On a sheet pan covered with parchment paper form meatloaf into a log (mine was about 10″ long), baste with some of the glaze and bake for about 1 hour, basting again halfway through cook time. Once meatloaf has finished cooking, allow to rest for 5 minutes before slicing. Enjoy!

photo 2 (2)

I serve mine with mashed potatoes, yumm!!!


Adapted from Food Network

Meal Planning – Week of Aug. 31st

Eeeek! So as I predicted I am way behind on posting our weekly meal plans as the last two weeks have been kind of crazy! Unfortunately when choosing to cook or craft it’s either feast or famine at the Schulze home – I’m either crafting up a storm and relying on our favorite no-fuss meals to get us through the week or I put my crafts on hold and take the time to try out new recipes. If you’ve been following my last few posts you’ll see that the past two weeks have undoubtedly been crafting weeks. I did however, get the opportunity to participate in two meal trains for new mamas last week so I plan to make a post on meal trains soon! This week the pace has slowed down a bit and although I’ve still got lots of projects in the works, I did take some time to try out a few new recipes so I’m happy to share this week’s meals with you!

SUNDAY // Ordered In  – Since Monday was a holiday I was eager to keep my crafting buzz going and not be bothered with cooking on Sunday evening, so Chinese deliver it was! 🙂

MONDAY // Tacos – Just plain old tacos! I make my taco meat by browning the meat with canned green chilies, onions and homemade taco seasoning (paprika, chili powder, garlic powder, onion powder, pepper, salt and cumin).

TUESDAY // Grilled Chicken Wraps – I love turning salads into wraps. It’s a great way to work a carb into the meal and make the salad more of a whole meal. One of my favorite salads is one that I make using grilled chicken, spring mix salad, craisins, Gorgonzola cheese crumbles, bacon bits and pecans with a raspberry vinaigrette. For this night’s dinner I simply turned this salad into a wrap.

WEDNESDAY // Pasta e Fagiole Soup – I am SO happy I found and tried this recipe! It is so simple to make and absolutely delicious! Even though it has been ten thousand degrees outside this week I still couldn’t resist whipping up this soup for dinner and boy am I glad I did 🙂 I subbed turkey sausage for regular Italian sausage. NOTE: If you want to make it super healthy just brown up some ground turkey sausage then add some salt, pepper, red pepper flakes and fennel – this way you omit the fat of the sausage (even turkey sausage is pretty fatty) but still achieve those sausage flavors.

THURSDAY // Slow Cooker Beef & Broccoli – This is one of my favorites. It’s super simple and great to cook up when you’re craving take out. It only requires a few ingredients and can be prepped the night before.

FRIDAY // Miso Glazed Salmon – Help! I’ve created a monster! lol. Ever since I made this recipe for my hubby a few weeks ago, he requests it anytime I suggest we have fish! However,  I hardly mind – t’s hard to argue with a recipe that is so healthful and delicious!

SATURDAY // Inside-Out Jalapeno Popper Burgers – Finally a new original recipe! As I mentioned I have been seriously slacking when it comes to my creativity in the kitchen but I like to think that this recipe helped me to redeem myself a bit. It is super delicious and the perfect lightened-up gourmet style burger just in time for football season. If you’re like me and are always torn on whether or not you should order an appetizer and a meal, now you can have both! 🙂

To see more of my favorite recipes check out my “Tried and True Recipes” board on Pinterest!

Inside-Out Jalapeno Popper Burgers

jalabur

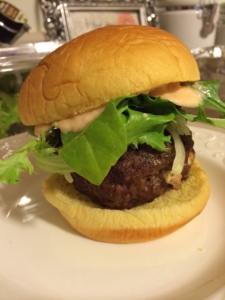
So you’re probably reading this post and thinking “wait, she cooks?”, lol. On account of my crafting spree the past few weeks I haven’t tried out many new recipes but luckily I have an arsenal of easy favorites that I can rely on during the weeks that I lack creativity in the kitchen. Last night I came up with this amazing new burger recipe that I am so excited to share with you! I like to think of this recipe as rolling two bar favorites, a burger and a jalapeno popper, into one delicious bite. In the interest of full disclosure I will tell you that the motivation for this burger was actually to get rid of some lingering cheese, sour cream and scallions in the fridge (throwing out food drives me nuts!) which reminded me of typical dip ingredients and then somehow my mind wound up at jalapeno popper, lol. No idea how that happened but I’m glad it did because I love a good burger and I’m so happy to add this one to my list of favorites (I’ll have to write a burger collective post soon!). I wouldn’t classify any recipe containing cream cheese and sour cream as “skinny” (lol) but for what it’s worth I did lighten it up by using reduced fat ingredients and lean beef feel free to adapt it to your liking whether that be dialing back the amount of cheese or using full fat ingredients! With football season officially upon us I hope you can feature these at your next game day get together, served up with lots of cold ones 🙂

Even though baby P wasn't awake for burger deliciousness he still thought our weekend was fab! :)

Even though baby P wasn’t awake for burger deliciousness he still thought our weekend was fab! 🙂


INSIDE-OUT JALAPENO POPPER BURGERS

INGREDIENTS (makes 8 regular burgers)

  • 2 lbs. lean ground beef
  • 4 oz. reduced fat cream cheese
  • 1/4 cup light sour cream
  •  1 medium jalapeno, diced (I removed the ribs and seeds to reduce the heat a bit, but prepare to your liking)
  • 1/3 cup crumbled bacon or bacon bits
  • 1 cup mild shredded cheddar cheese (pepper jack or mozzarella cheese would also work)
  • 1 scallion, sliced
  • 1/2 tsp. garlic powder
  • salt and pepper, to taste
  • olive oil

INSTRUCTIONS

Step 1: Combine cream cheese, sour cream, diced jalapeno, bacon, cheese, scallions, garlic powder, salt and pepper, stir to combine.

jalabur2

Step 2: Separate your ground beef into eight equal portions. Working one at a time, separate each section of beef and form two equal patties. Take about 1-2 Tbsp. of the cream cheese mixture and place it in the center of one of your patties, then take the other patty and place it on top of the filling using your fingers to pinch the edges of the two patties together around the filling and reform the burger. Continue until you have eight equal sized burgers.

jalabur1

Step 3: Brush your burgers on both sides with a bit of olive oil and sprinkle with a generous amount of salt and pepper. Grill on conventional grill or grill pan to your liking! These would be delicious served with homemade onion strings but if you’re lazy like I am just throw your onions on the grill while your burgers are cooking 🙂

jalabur5

ignore my weird choice of lettuce, yet another fridge item I was trying to burn lol

jalabur6

For two other great burger recipes check out my recipe for Kitty’s Mediterannean Turkey Burgers and Greek Sliders!

Meal Planning – Week of August 10th

This week was pretty easy as far as our meals went. Since the weather finally dealt us some non-stormy cards we were excited to get back outside and grill! As usual I tried to plan my meals so that the components of the first few meals could work easily into the meals later in the week, after all less prep work for Mama means a happier squishy baby :).

SUNDAY // Chicken Sushi Rolls with Bacon and Red Pepper Aioli – this is one of my original recipes and one of our new favorites. Since it takes a bit longer to prepare than our weeknight meals we prefer to make this one on a weekend day so that we can spend a little extra time preparing it together.

MONDAY // Shredded Beef Fajita Quesadillas – These were just a quick little something I whipped up using the left over beef from my Beef Barbacoa Tacos that we made on Friday. I simply used burrito sized tortillas, shredded cheddar cheese, sauteed onions and peppers, black beans and corn. Not only did using the left over beef help me stretch a buck, I saved some time by sauteing a large batch of peppers and onions so that I could use the extra in our Skinny Cheese Steak Sammies on Wednesday!

TUESDAY // BBQ Bacon and Chicken Kabobs – I used 4 cubed chicken breasts, two red peppers, 6 strips of bacon sliced into 2″ pieces, two onions cut into quarters and separated, threaded them onto metal skewers sprinkled with salt and pepper and basted with barbecue sauce before grilling. I grilled them until the chicken was cooked through and the bacon was crispy, basting a few extra times during the cooking process. Not only are these delicious but they are easy to prepare and a fun twist on regular chicken kabobs.

WEDNESDAY // Skinny Cheese Steak Sammies – This is my personal take on the traditional Philly Cheese Steak. I use sliced grilled skirt steak to keep the meal low cost, sauteed peppers and onions (the ones that were left over from my quesadillas), thin sliced provalone cheese (in place of cheese sauce to keep it light), broiled on a hoagie roll with some homemade chipotle mayo.

THURSDAY // Greek Salad Wraps – I grilled a few chicken breasts using my Quick Greek Marinade then cubed them and served all of the components of a Greek salad in a wrap – red onions, yellow peppers, sliced kalmata olives, sliced grape tomatoes, spring mix lettuce and feta cheese with Greek style dressing. This is my simple way of making a meal out of a simple Greek salad!

FRIDAY // Grilled Shrimp Tacos – This was an easy fix that I kind of made up by using ingredients I already had on hand. Since I always keep a bag of frozen shrimp in my freezer it’s easy to pull some out as needed. I marinated the shrimp in a bit of lemon juice, salt, pepper and chili powder then grilled them on skewers. I then served them in 6″ tortillas with a bit of chipotle mayo and spring mix lettuce (both left over from meals earlier in the week).

SATURDAY // Ordered In 🙂 – Since Saturday was our DIY day we ordered a pizza so we continued to craft the night away 🙂

Check out all of my favorite recipes on my “Tried and True” Pinterest board!

Skinny Cheese Steak Sammies

This recipe is my “skinny” take on the traditional Philly Cheese Steak Sandwich, but I won’t refer to them as “Philly” Cheese Steak Sammies for fear of ridicule from the hardcore Philly Cheese Steak enthusiasts out there, haha. I LOVE a good Philly Cheese Steak but I try to keep my intake of cheese sauce to a minimum so I came up with my own healthier version of the sandwich so that my hubby and I can enjoy it at home. If you’ve checked out any of my other recipes you’ll see that I’m a big fan of skirt steak, mostly because it’s super cheap and in my opinion underrated because when prepared right it can be a great alternative to more expensive beef cuts like sirloin. I love these sandwiches because they’re great at any time of year and since they’re not as heavy as the traditional Philly Cheese Steak Sandwich, they can even be enjoyed on super hot summer days (like we did this past week!) and with the addition of a little chipotle mayo they certainly aren’t lacking in flavor. Additionally, they can be prepared entirely on the grill or indoors on the stove top so you have different options in terms of preparation as well. I hope you enjoy these as much as we do, I promise you won’t miss the cheese sauce 🙂

SKINNY CHEESE STEAK SAMMIES (MAKES 4)

*For some reason I only took three pictures and then got too excited to eat the final product and forgot to snap a photo of that as well, lol. Will update soon!

INGREDIENTS 

  • 2 lbs. Skirt Steak
  • 2 green peppers, thinly sliced
  • 1 medium to large onion, thinly sliced
  • 8 thin slices of Provolone cheese
  • 4 Hoagie or Sub Rolls
  • Olive Oil
  • Salt & Pepper to taste
  • 3/4 cup lite mayo
  •  1 Chipotle Pepper in Adobo (after removing one from the can you can freeze the rest in a small ziplock bag for later use)
  • Juice of 1/2 a Lemon

INSTRUCTIONS

Step 1: Begin by placing your skirt steak in a dish with a generous amount of olive oil and salt with a bit of pepper and toss to coat. Allow it to marinate for a few minutes while you prepare the chipotle mayo and pepper and onions.

philch

Step 2: To prepare the mayo place the mayo, lemon juice and chipotle pepper in adobo in a blender or food processor and blend until combined (I use my nutribullet). If you don’t have a blender or food processor you can chop the pepper as fine as you are able to manually and then combine all ingredients by stirring by hand.

There will be lots left over! It is super yummy on just about anything :)

There will be lots left over! It is super yummy on just about anything 🙂

Step 3:  To prepare the peppers and onions you can sautee them for a few minutes on the stove top with a tablespoon or so of olive oil and a dash of salt and pepper until tender. If you plan to prepare them on the grill you can combine the peppers with olive oil, salt and pepper within a foil packet and place on the grill along with your steak when you grill it. If you want preparation to be super easy you can prepare your peppers and onions ahead of time as I did by setting some of my peppers and onions aside when I prepared my Fajita Quesadillas a few days prior.

My left over peppers and onions

My left over peppers and onions

Step 4: Now you are ready to grill your steak. Preheat your grill and then grill your steak to your desired level of doneness. Allow the steak to rest for a few minutes before slicing against the grain (to make it easier to chew). I slice it in half, then into strips against the grain and cube it.

sliceste


Step 5: Once your ingredients are prepped, slice your rolls and spread your desired amount of chipotle mayo in each then assemble your sandwiches by placing steak, peppers and onions in side of the open roll and finally topping the ingredients with two slices of provolone cheese.

Step 6: At this point you can either place your sandwiches back on the top rack of the grill for a few minutes until the cheese has melted and the bread begins to crisp or you can place them under the broiler for a minute or two just to melt the cheese. Enjoy!

Chicken Sushi Rolls with Bacon & Red Pepper Aioli

sushch2 

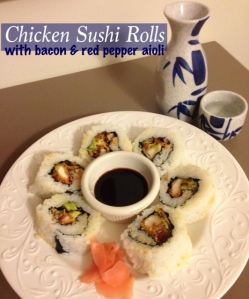
Okay, I know I’ve been really heavy on the recipes these past few days (or is it weeks? I don’t even know how to measure time anymore it’s going so fast, haha) but I promise I’ve been crafting like crazy I just need to get around to writing the posts! This particular recipe was born out of our recent sushi making kick because once our first go at it produced fab results we decided to keep coming up with new sushi recipes and have been on a roll ever since (get it? Roll, lol). Now I’ve been a sushi enthusiast for as long as I can remember and even whipped up some basic homemade sushi with my Dad as a kid, but nothing could have prepared me for the deliciousness that is the roll that I’m about to share with you. First let me warn you there isn’t much about this roll that is “skinny” and it definitely deviates from my normal style of healthy cooking, but if you’re looking for a good homemade cheat meal or a specialty sushi roll that won’t cost you $15, this may be it!

Now about this magic roll – since the first one we made was a pretty basic California Roll, I wanted the next one to be whacky and different from what you’d normally come across on a specialty sushi menu. I recalled my friend telling me that she’d once tried a roll with chicken and bacon and thought that this would be perfect, especially because jazzing up simple ingredients is my favorite (you won’t find this gal traipsing to any specialty food stores to find a pickled ostrich foot or whatever the foodies are into nowadays, haha)! Basically this roll is comprised of fried chicken, bacon, avocado, onions (sauteed in the bacon fat! I told you it wasn’t healthy, lol) and an easy to prepare red pepper aioli. It’s kind of like a California BLT in sushi form and is mindblowingly delicious and really fun to make! Since it takes a little extra time in the kitch we usually prepare this on weekends when J and I can enjoy a night of sushi making and sake drinking 🙂 Give this one a try, I promise you won’t be disappointed!

Sake Selfie :)

Sake Selfie 🙂

CHICKEN SUSHI ROLLS WITH BACON & RED PEPPER AIOLI

*You will need a bamboo sushi roller for this recipe, these are available on Amazon and in most major grocery stores.

INGREDIENTS (Makes 3 Rolls, 6 pieces each)

  • 3 cups sushi rice, prepared
  • 3 Dried Seaweed Sheets
  • Sesame seeds
  • 2 boneless, skinless chicken breasts
  • 2 cups Panko bread crumbs
  • 1/2 cup flour
  • 2 eggs
  • 1/2 onion, thinly sliced
  • 3 slices of bacon
  • 1/2 avocado, sliced into thin strips
  • canola or vegetable oil for frying
  • salt & pepper
  • 1/2 cup mayo
  • Juice of half a lemon
  • 2 roasted red peppers (I used jarred)
  • 1 tsp. siracha 

DIRECTIONS

Step 1: Prepare your aioli by combining mayo, lemon juice, red peppers and siracha in a blender or food processor and blend until smooth (I use my nutri-bullet). 

Step 2: Next pan fry your bacon. While bacon is cooking, pound your chicken breasts to tenderize, then slice them into very thin (1/2-inch to 1 inch strips). Once bacon has finished cooking remove from pan and set aside, reserving bacon fat in pan.

Step 3: Add sliced onions to pan with reserved bacon fat and saute until they just begin to crisp. Remove and set aside.

Step 4: Okay, here is where it gets tricky (not the method but rather my explaining of the method, lol). If at any point my description of how to assemble this roll is lost on you, simply YouTube “how to make an inside out sushi roll” and I promise you will be able to do it in no time flat no matter what your ingredients. Take your bamboo sushi mat and wrap it in one layer of plastic wrap then lay it flat. Place a dried seaweed sheet atop and flick a little water on it to moisten it, then wet your fingers and spread about a cup of prepared sushi rice onto the seaweed sheet coming just about to the very edge (wetting your hands helps the sticky rice not to stick to your fingers, it helps to keep a bowl of water near by while preparing your rolls). Once your rice is spread into a thin layer, sprinkle it with about 1 tsp. of sesame seeds.

Step 5: Very carefully turn your seaweed sheet which is now topped with rice upside down so that the rice side is laying on the plastic wrapped bamboo mat and the seaweed side is facing up. Now, at the top of your seaweed sheet, place one strip of fried chicken, 1 strip of bacon (I crumble mine), 2-3 pieces of avocado and about 1 Tbsp. of sauteed onions, finally drizzle on about a tablespoon of the red pepper aioli. Now you are ready to roll (literally, lol)!

Step 6: Starting at the edge where you have placed your ingredients, use your bamboo mat to fold that side of the roll onto itself, squeezing tight to ensure that the filling will be tightly encased in the roll. Next roll your roll up the rest of the way (using your bamboo mat to guide it) and once it has been fully rolled use your bamboo mat to squeeze it firmly along the length of the roll.

Step 7: Lay your roll on a cutting board, wet a sharp knife and gently cut the roll into six equal pieces. Ta-da! Beautiful chicken-y goodness ready to be devoured! Even though this roll’s ingredients are not traditional, I still serve mine up with soy sauce, wasabi, ginger and of course sake 🙂

NOTE: I am more than aware that my description of the rolling process is vague at best, so next time I create one of these delicious rolls I will be sure to document the process step by step with photographs and update the post. 

Meal Planning – Week of August 3rd

Unfortunately this post will only include five meals instead of six. We had our usual dine-out/order-in day on Sunday and then the following Saturday one of J’s co-workers ended up inviting us over for dinner so we got out of cooking on that day as well :). All in all it was a good week of recipes despite cheating out of an extra day, I was able to whip up some of our favorites in addition to stretching a dollar by using our left overs as components of other meals!

SUNDAY // Take-Out

MONDAY // Spinach & Feta Chicken Roll-Ups – This was a super cheap and simple meal I made using the left over filling from the Spanikopita Bites I made for Friday’s baby shower (for some reason I always wind up with more filling than phyllo cups!). I sliced my large chicken breasts into thirds and pounded them thin (much cheaper than purchasing thin cut breasts!), spread about 2 Tbsp. of filling onto each breast, rolled them up and secured them with a toothpick. Next, I simply pan seared them to brown on each side then baked them in 375 degree pre-heated oven for an additional 25-30 mins. I highly suggest trying out the Spanikopita Bites as an appetizer for your next party, to make it super easy I buy the pre-made phyllo cups as opposed to making them myself. 

TUESDAY // Greek Sliders – This is a recipe I came up with to satisfy our burger fix and to use up the endless supply of feta cheese I always keep on hand, it’s healthy and super easy. Check out the link to hear more about it! 

WEDNESDAY // Chicken Satay – I am obsessed with satay. Since we cook it on the grill the hardest part of the preparation (which isn’t hard at all) is the peanut dipping sauce, so when I found a peanut sauce recipe that I enjoyed I made a huge batch and froze it in a few small plastic zip locks so that whenever we have satay I’ll always have it on hand. I am yet to come across a satay recipe that I didn’t enjoy, but I give this one bonus points because I already had all of the ingredients on hand. I subbed chicken thighs for breasts to make it extra cheap! 

THURSDAY // Miso-Glazed Salmon – New-favorite-alert! This recipe was awesome! Last time I was in Trader Joe’s I happened to come across some miso paste (which apparently only costs like a dollar, who knew?), and knew that I needed to whip up one of the miso-glazed salmon recipes I always happen across. Since J agrees to eat salmon “if it’s prepared right” (whatever that means, lol), I knew that this asian-inspired recipe would most likely be hubby friendly. This super easy and healthy recipe only requires about three ingredients and is SO good. I garnished with green onions instead of chives since I always keep some scallions on hand.  

FRIDAY // Slow-Cooker Beef Barbacoa Tacos – I really enjoyed this one. I’m a fan of anything with a chipotle flavor as well as anything that’s prepared using the slow cooker so this recipe checked off two boxes on my list. One of my favorite parts of this recipe is that it made a lot so the left overs can be used to make nachos, burritos or quesadillas (see next week’s meal planning menu!). 

SATURDAY // Dinner with Friends 🙂

Check out all of my favorite recipes on my “Tried and True” Pinterest board!