DIY No-Sew Curtain Panels

curt7

So since it’s too hot outside to work on any of my DIY projects in the garage, I’ll take this time to share one of my recent DIY decor projects – no-sew curtain panels! Now, if you are a sewing expert or enthusiast avert your eyes because this project will probably make you cringe and break out in hives, lol, but if you’re like me and sewing isn’t particularly (or at all) your thing, then this may definitely be of interest to you!

I’m a big fan of this project and this wasn’t my first time attempting it, in fact, at our old house after my first successful attempt on our no-sew bedroom curtains prompted the creation of two other curtain projects (I will post about these soon as well!). When designing our bedroom (a grey and yellow theme with black accents), I couldn’t for the life of me find any curtains that I liked (those I did fancy either didn’t work with my color scheme or were way out of my price range). Now let me just say that my original plan was to finally learn to use the ol’ sewing machine and actually sew the curtains. However, after finding an affordable decorating fabric option in a print that I liked, and a little Pinterest research and found (and became obsessed with) a non-sewer’s dream – iron-on hem! Iron-on hem has become my substitute for sewing in almost all of my projects that would otherwise require a needle and thread (check out my no-sew bow-ties!). Granted in some situations there is no way to duplicate a stitch, but I am always willing to try :). 

These particular curtains were born out of my love for Pottery Barn’s “Kendra Trellis Drape” which came in at $99 per panel … seriously?! Since I didn’t (and probably won’t ever) have that kind of coin lying around to spend on curtains but nonetheless desperately needed a window covering in a fun print to distract from these hospital-white base housing walls, I came back to my trusty DIY curtain project once more. For these particular curtains I chose a grey and white trellis pattern (similar to the one on the overpriced PB curtains), to compliment our grey and orange furniture (see below for details and pricing). It took me about 20 minutes per panel to create these pocket curtain panels, so I would just work on them at night while my hubby and I caught up on our shows, this way I could be certain that any tiny fingers would keep out of the way :). Now that the curtains are hung I am thrilled with the outcome, and while I know I could have very easily gotten some cheap Walmart or Target brand panels for a comparable price I like that I was able to pick from literally thousands of fabric patterns to find exactly what worked for me … and of course that I was able to make a project out of them :). As I do, when you see an interior decorating or design piece in a store that is either outside of your budget or just not quite what you’re looking for always try to get creative and think of a way you can DIY it, chances are you’ll pleasantly surprise yourself!

DIY NO-SEW CURTAIN PANELS

WHAT I USED:

  • Decorator Fabric – purchased from Fabric.com, I used Premier Prints “Fynn” Slub in Ash Grey (no longer available, but there are plenty of the “Fynn” trellis print options available in a variety of other colors). The amount you will need will depend on how many panels you are making and the height of your walls, I simply measure the length in inches and convert it to yards. There are all sorts of complicated methods for taking into account bunching at the top, fabric print repeat etc. Personally this just confused me, I was fine with the width of the fabric so I just paid attention to the necessary length.
curt

It will get delivered in a giant box like this, your UPS man will not be pleased lol

  • Iron-On Hem – available at any major fabric retailer (or super Walmart). I purchased the “Stitch Witchery” brand in heavy-weight, 1″ wide. Again, the amount you need will depend on how many panels you are making and the length of your panels.

curt3

  • Iron
  • Hand Towel
  • Measuring Tape

WHAT I DID:

Step 1: Anytime you order a large quantity of decorator fabric it will usually come rolled on a giant cardboard cylinder (kind of like a giant toilet paper roll, lol). So I began by rolling out my fabric and measuring out the necessary length, which for me was 91″ with three additional inches added to accommodate a one inch hem at the bottom and a two inch fold-over at the top to create a pocket for the curtain rod (the size of your pocket will depend on the girth of your curtain rod, make sure you measure accordingly), for a total of 94″ per panel. After measuring my 94″ length I cut five 94″ pieces, as I was going to be making five panels.

curt1 curt2

Step 2: Starting with my first panel, I began by laying the piece of fabric upside down on a towel. I was too lazy to dig the ironing board out of the garage so I just did this project on the floor, using the towel to protect my carpet. Now, when doing a pocket curtain it is very important that you hem the sides FIRST I made the mistake of reversing this project on one of my panels in our old house and while you couldn’t really tell, I always knew it was wrong and it bothered me to no end.

Step 3: Heat your iron. Starting with one of your sides, lay a long piece of iron-on hem (I find it is easier to work in sections so you can ensure a straight hem) parallel to your fabric edge about an inch in. NOTE: Follow the directions on the iron-on hem package for the actual ironing process, as the method can differ by brand. Mine required that you dampen a towel (where the hand towel comes in), fold the fabric over the iron-on medium then place the wet towel over the hem and iron over that, apparently the steam will activate the “bonding” process. I have, however, used brands that just require you iron directly on the fabric so be sure to read the directions.

curt4

Step 4: After you have completed one side, move onto the other side. Once your sides are complete you are ready to hem the bottom and the top, the order you do this in doesn’t matter. For the bottom simply repeat what you did on the sides, simply fold over about an inch worth of fabric and fuse.

Step 5: For the top of the panel, fold over enough fabric to create your pocket. Be sure your pocket is big enough to fit your curtain rod, I was using a pretty skinny rod so folding over just about two inches of fabric was fine for me. Then simply continue with the same process you used to fuse the bottom and sides, the only difference is you will  have created a pocket at the top.

Voila! You are done! Now, they may not all be 100% even but I’m telling you nobody (probably not even you) will notice, I have gotten so many compliments on my curtains and even though they aren’t perfect they work perfect for me. 🙂        

curt6 curt5  

A FEW TIPS:

  • Try to stick to heavier decorator fabric. I know it may be tempting to use the $2.00/yard cotton options but unless you are using them solely for decor, you’re going to want a heavier fabric to achieve any level of functionality, as you are not lining them.
  • Try to measure as accurately as possible. Once you cut the fabric you cannot return it. I somehow wound up with about three extra yards but plan to use it on other DIY projects.
  • When working on the sides and bottom make your hem as small as the strip of iron-on hem will allow, as you do not want to create an unwanted pocket. 
  • If you find that your second folds (top and bottom) are having a hard time bonding at the corners just use a little dot of hot glue and that will do the trick.

SOURCES:

  • Fabric // Fabric.com Premier Prints “Fynn” Slub in Ash Grey (no longer available, but there are plenty of the “Fynn” trellis print options available in a variety of other colors such as this “Cool Grey“). It cost me $7.18/yard so in purchasing a total of 15 yards the total cost was about $108.00 (so for what one curtain panel would have cost me at PB I got FIVE!). Don’t forget to Google those free shipping coupons!
  • Curtain Rods // “Kenny Ball Deco Curtain Rod” in champagne silver, available here via Amazon for $12.00/piece. They are kind of cheap looking up close but they look just fine up on our walls, nice and simple! 
  • Curtain Tie-Backs // “Urbanest Colette Decor Drapery Tie Back” in Pewter. Available here via Amazon for $6.99/piece. I knew I wanted the “knob” looking tie-backs and was obsessed with one design that I found at Anthropologie but knew that at $32.99 per knob those ones just weren’t going to happen for me, lol. Although these ones are not actually metal they don’t look cheap at all even though they were the cheapest ones I found price-wise!  

Documenting Baby P’s First Year – Month 9

9mo

I can’t believe I forgot to post Baby P’s 9 month board! I probably forgot because I’ve been too busy chasing him around the house 🙂 He is full on crawling (he has been crawling since six months but can now move fast enough to follow us from room to room and run away, lol) and can pull himself up and stand unassisted! I cannot believe how much he is growing and definitely think that from month eight to month nine he has changed the most, especially his little personality, he is just so much fun to be around. We especially love how much he is enjoying the outdoors and how much he loves animals, he loves to point (a new thing he started doing) at the birds as they eat from his bird feeder (we got him one of those see-through bird feeders that suction cups to the window, he is obsessed with it!). We can’t wait to see what this next month brings, as we are loving every second with our adorable little frog baby! Here is his nine month board (don’t forget to check out his birth-sixseven and eight month boards as well as my pregnancy), I like to theme the boards with the holidays when possible so this one was for 4th of July and boy is he ever a little firecracker 🙂 Sorry for the bad photo quality, as if my lack of photography skills don’t pose enough of a challenge, an increasingly mobile Baby P and the bad lighting in our new home are making these monthly boards that much harder to accomplish, haha.

9mo9

9mo49mo5 his little personality in action!

9mo6 9mo3 9mo2 9mo1 9mo 9mo7   9mo8

DIY Menu Chalkboard

chalk

Since I’ve been posting so many recipes I wanted you all to still believe that I am actually still crafting in my very limited free time :). As our new home slowly comes together, we have finally been getting some things up on the walls, one of which is my DIY menu chalkboard which was basically free to make (read all about how I created it using a free mirror here). Even though we had a ton of wall space in our old home, my pride and joy of a chalkboard project has had to spend all of it’s time in our garage since it’s creation because I could never find a good spot for it. When we moved to our new house I knew that I wanted to display it and figured that a menu board (which is what I originally intended it to be) would be the perfect use for it!

Between documenting my pregnancy and baby P’s growth via chalkboards for over a year now, I have gotten pretty handy with my chalkboard lettering so all I did was use the chalk hand lettering shaded font as a guide and hand lettered my “menu” title as well as the abbreviated seven days of the week. I decided to use chalk pens as I do for my monthly chalkboard updates for baby P because knowing me I may change my mind one day and decide that I want to re-purpose the chalkboard but if you are sure that you want a menu board you can simply have one of the many wonderfully creative individuals on Etsy make you up some vinyl decals to use as your headers and then use chalk to change it week by week. I know this isn’t a super original idea but since I love to DIY and meal plan this sure made me happy! I hope it inspires you to make your own 🙂

Chalkboard transformation :) Be sure to check out the post on how to DIY this one, it's super easy and can be done using any old mirror or frame!

Chalkboard transformation 🙂 Be sure to check out the post on how to DIY this one, it’s super easy and can be done using any old mirror or frame!


Natural Pear Martini – from an unlikely source!

pear4

I love a good cocktail, and while I’ve had to put my enjoyment of cocktails on hold for the better part of a year on account of squishy baby P, J and I have just gotten back to being able to enjoy a little homemade drink here and there. Since I was sure that any amount of hard alcohol would actually kill me after such a long drinking hiatus, lol I stuck to my occasional glass of wine for a while, but after having a martini while we were home for a visit (and not dying, yay! lol) I decided that I really would like to try to make a homemade version of one of my favorites – a pear martini (without the $12/drink price tag)!

Now, back to baby P, this is where the unlikely source for my recipe comes in – one of the star ingredients is actually baby P’s homemade baby food (questionably bad mother or genius? you decided, lol)! Since I love to cook and I take the time to fix homemade meals for my hubby and I, I figured that I would be doing my squishy baby a disservice if I didn’t do the same for him, so ever since I started him on solids at six months, I have been making his baby food from scratch. Now, I know this can be time consuming and I don’t necessarily save boatloads of money by doing this, so I don’t knock anyone that buys jar food or anything (do yo thang girlll!) but I genuinely enjoy preparing little P’s food and I have the time to do it, so why not? Since the beginning, one of his favorite foods have been pears so I have whipped up several batches of homemade “pear sauce” (recipe below) using my slow cooker – so easy! So when reading over an over-priced cocktail menu while having a date with my hubby while we were home and seeing that one of the ingredients in the pear martini was “pear puree” I thought, “oh hey now, I’ve got some of that”!

In just a second I will stop boring you with my lame stories about baby food and few-and-far-between date nights, lol. First let me tell you that this martini came out amazing and without using any weird ingredients like “elderflower liqueur”, which if you Google “pear martini recipe” is actually called for in most (and FYI it’s $32.99 for the bottle and you will probably need to use less than an ounce, no thanks!). I think it’s also worth mentioning that I’m not sure if you can deem a cocktail “natural” unless you buy one of those organic vodkas so this might not be a 100% “natural” recipe as I claim it to be but other than the vodka there is no added sugar or processed ingredients. Also, if martinis aren’t your thing I’m sure you could find a use for use for the delicious pear sauce, even if you don’t have a baby in need of purees :). Cheers!

PEAR BABY FOOD RECIPE (Makes about 4 cups)

INGREDIENTS 

  • 8-10 pears, cored and large diced
  • 1/2 cup water

DIRECTIONS

Begin by peeling, coring and dicing your pears and placing them in the slow cooker with 1/2 cup of water. Cook on high for 4 hours. When cooking is complete remove the pears with a slotted spoon and place in a blender or food processor (I use my nutribullet) don’t discard the liquid from the slow cooker, this is part of the next recipe.

I know this puree looks wildly unappetizing lol, but I promise it's delish!

I know this puree looks wildly unappetizing lol, but I promise it’s delish!

The pear juice that I collected after the cooking process, works perfectly as a natural simple syrup and it's already pear flavored!

The pear juice that I collected after the cooking process, works perfectly as a natural simple syrup and it’s already pear flavored!

 NATURAL PEAR MARTINI (makes 2) 

INGREDIENTS

  • 4 parts vodka (I sprung for the Grey Goose, but whatever you have on hand will work! Feel free to use pear vodka, I just wanted to use a regular vodka so I could use it easily in other cocktail recipes)
  • 2 parts pear juice (reserved from cooking process above)
  • 1 part pear puree
  • lemon lime seltzer (or 7-up if you want it sweeter and don’t care about the “natural” element of the recipe)
  • Ice

DIRECTIONS

Combine vodka, pear juice and pear puree in a shaker with ice. Shake vigorously for a few seconds and strain between two martini glasses. Top off with seltzer or lemon-lime soda. 

TA-DA! I was too excited by the drink to actually garnish it with a pear slice, but look how cute this pear is with the leaf still attached!

TA-DA! I was too excited by the drink to actually garnish it with a pear slice, but look how cute this pear is with the leaf still attached!

NOTE: I am no mixologist so this may not be the proper “method” for martini making these are just the ingredients that worked for me based on what I had and my limited budget for cocktail making 🙂


Skinny Tzatziki

Having grown up around Greek food and flavors, and now having come up with a lot of my own Greek-style recipes, it is no wonder that traditional Greek tzatziki is one of my favorite condiments. While I enjoy the thick yogurt-consistency tzatziki the way it is served in Greek restaurants, it sadly doesn’t cater to the “skinny” style of home cooking that we try to stick to here at casa de Schulze 🙂 Since tzatziki is something we whip up quite often to go with our Greek inspired dishes, I have come up with a “skinny” tzatziki that I’d like to share with you, that packs the same flavor punch as traditional tzatziki but at 0 grams of fat! Try this one out soon, it’s great to go with just about any Mediterranean style dish and even makes a great salad dressing. Sorry that I don’t have a pic to post, I will get one up just as soon as I whip up another batch which I’m sure will be very soon! 🙂

INGREDIENTS

  • 2 cups fat-free plain Greek yogurt 
  • 1 cucumber, peeled, seeded and grated
  • 2 cloves of garlic, minced
  • 1/2 tsp. dried dill (or fresh, but I make this so often that I always just keep dried on hand)
  • 1/4 tsp. black pepper (or to taste)
  • 1/2 tsp. salt (or to taste)
  • 1 Tbsp. Lemon Juice
  • 1 Tbsp. Red Wine Vinegar
  • 1/4 cup olive oil

 DIRECTIONS

Begin by peeling your cucumber and removing the seeds (I do so by cutting it in half length-wise and running a spoon down the middle to easily scoop out the seeds), then use a box or hand-held grater to grate the cucumber over a bowl. Once your cucumber is grated, use a paper towel to blot any excess water from your grated cucumber, then add in the rest of the ingredients and mix well to combine. Refrigerate your tzatziki for at least 20 minutes before serving to allow your flavors to develop. Enjoy!

Skinny Gyro Pizza

gyro

Who doesn’t love a good gyro? I know I sure do and boy have I been missing gyros and authentic Greek food in general since I moved down south. Back home I was spoiled with an abundance of great Greek dining options (including my Dad’s cooking, lol) and am sure to get my fix whenever I visit, however, since the closest Greek restaurant that I know of locally is about an hour away, I’m always needing to find ways to get my Greek fix at home via my own recipes.

Now, back to my love of gyros, I am obsessed, like if there was a cheap way for me to get that metal spinn-y thing in my home with an endless supply of gyro meat I would seriously consider it, lol. Luckily for me and my waistline that will more than likely never happen, lol, so instead, I’ve come up with a healthy and super easy alternative to a traditional gyro – a “gyro pizza”. This idea actually came to me while I was preparing slow cooker chicken gyros (great recipe I found on Pinterest!) last week and was going to have a ton of my Skinny Tzatziki left over and was determined to use it in this week’s recipe line-up before it went bad. I think that the standard lamb or beef gyro (you know, the one that they slice off the spinning thing, lol) is something that people don’t typically think to try and replicate at home because of the spinning thing (what the hell is that called!? lol), however, while the cooking and serving process may not be home-cook friendly, the flavors certainly are. Having adapted several Greek meals to “skinny” versions I knew that I could very easily create another (I will eventually create an “It’s all Greek to Me” collective post of all of my Greek inspired skinny dishes), I wanted the “pizza” part of it to be my creative spin on a traditional gyro, although after I made it I realized that it’s more of a flatbread than a pizza. It’s also worth mentioning that when I went to cut them into quarters J grabbed his up, folded it like a gyro and started eating it that way, lol, so much for my pizza idea! That being said this recipe can be enjoyed in the “pizza” for as it was originally intended or as a traditional gyro or over a Greek salad, so if you’re looking to get your gyro fix without the guilt or extra time in the kitchen, give this recipe a try 🙂  

SKINNY GYRO PIZZA (makes 6 pizzas)

TIP: If you buy in bulk this is a great money-saving meal to get rid of your freezer stock of ground beef! Beef not your thangg? No problem, just substitute ground turkey or chicken.

INGREDIENTS

  • 2 lbs. lean ground beef (93% or 97% lean)
  • 1/2 large onion, diced
  • 2 cloves garlic, minced (or 1 teaspoon garlic powder)
  • 1 tsp. cumin
  • 1 tsp. oregano
  • 1 tsp. marjoram
  • 1/2 tsp. ground dried thyme
  • 1/2 tsp. ground dried rosemary (this one is not imperative, if you are missing it feel free to skip it)
  • 1/4 tsp. salt (or to taste)
  • 1/4 tsp. black pepper (or to taste)
  • 2 Tbsp. Olive Oil
  • 1 tomato, diced
  • 1 head romaine or 1/2 head iceberg lettuce, shredded
  • 1/2 cup crumbled feta cheese
  • 1 cup tzatziki (use my skinny recipe found here or purchase ready made)
  • 6 whole wheat pitas 

DIRECTIONS

Step 1: In a large skillet, heat olive oil and add diced onion. Cook onion until it just begins to soften (about 4 minutes or so) then add garlic and cook for about 2 more minutes.

Step 2: To the onion and garlic add ground beef, using a wooden spoon to break it into small pieces and cook until it is no longer pink. Drain any liquid from pan and return pan to stove.

Step 3: To the meat mixture add oregano, cumin, pepper, salt, marjoram, rosemary and thyme and allow to cook for about 3-4 minutes longer, stirring constantly.

Step 4:  Heat pitas in a skillet or in a pre-heated oven for a few minutes (this is optional, pitas do not need to be heated I just enjoy mine that way). Taking one pita at a time, spread about 3 tablespoons of tzatziki on each (depending on how much you like) then topping with ground beef, lettuce, tomato and finally a bit of feta. Cut into quarters and enjoy! 

These make great leftovers! Another fun take on this might be “gyro tacos”, using the pita in place of the tortilla.

Skinny Crockpot Broccoli & Cheese Chicken Chowder

broc3

As usual I have a million projects going on and have a bunch of recipes from the last few weeks that I’ve been meaning to post, each of which I’m super excited to share with you, but since it’s a rainy, gloomy day on my end (as it was when I came up with this recipe) this soup recipe seems fitting. Now as you can imagine, soup is rarely on our menu during these summer months when it feels like it’s nine million degrees outside, but as I previously stated, every now and again we’ll get a dreary day that warrants a soup fix. I’m sure I’m not alone in saying I love Panera’s broccoli cheese soup, but being that I really have no business eating anything in its full-fat form until I reach my goal weight, I’ve been forced to explore healthier soup options and this inspired me to come up with a “skinny” version of broccoli cheese soup (and I already had the ingredients on hand).

So upon hunkering down for fake hurricane Arthur, lol, I prepped this recipe and threw it in the crockpot, I decided to add chicken in order to satisfy my hubby’s need for a “meal” (we often disagree on whether or not pasta or soup without meat constitute a meal, I say yes, he says no way, lol) and because I had two chicken breasts left over from the yummy crockpot chicken fajitas I had made a few nights prior. This soup was super easy and was a huge hit! The chicken makes it hearty so you’re less likely to miss the heavy cream and extra cheese. Speaking of heavy, I actually now find myself to prefer the “skinny” version of many recipes, because while comfort food is delicious I tend to feel like a sluggish blob after finishing a meal, where as after enjoying the skinnier version I find myself feeling satisfied but less blob-like 🙂 If you’re a broccoli cheese soup fan try this one out and let me know what you think, it’s super easy (thank you, crockpot!) to throw together andeasy on the wallet as well! In your face, Panera (just kidding, I love you lol)!     

SKINNY CROCKPOT BROCCOLI & CHEESE CHICKEN CHOWDER

INGREDIENTS

  • 2 boneless, skinless chicken breasts, cubed
  • 2 medium carrots, diced
  • 1/2 large onion, diced
  • 10 oz. package frozen chopped broccoli (or use fresh) 
  • 1 cup water
  • 1 Tbsp. (or 2 cubes) chicken flavored bullion (I had the granulated version on hand)
  •  1/2 tsp. black pepper
  • 1/2 tsp. garlic powder
  • 1/2 tsp. dried thyme
  • 1 tsp. dried parsley
  • 1 1/2 cup fat free half-and-half
  • 1/2 cup shredded cheddar cheese
  • 2 Tbsp. corn starch

DIRECTIONS

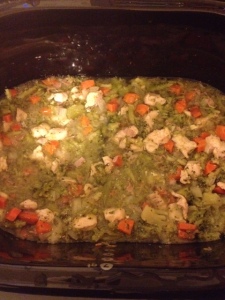
Step 1: Add cubed chicken, diced carrots, diced onions, bullion, black pepper, garlic powder and thyme to the crockpot (if using fresh broccoli add at this point as well), and set to high for 4 hours, adding frozen broccoli when there is about 1 hour remaining.

before

before 4

before adding cream and cheese

before adding cream and cheese


Step 2:  Once time is up add the half-and-half, shredded cheese and corn starch (use some liquid from the pot to dissolve the corn starch before adding it to the pot so that it won’t clump up) and stir to combine. Cook on high for an additional 30-45 minutes. Enjoy! I was too lazy to whip out the emersion blender, but if you like a less chunky soup, blend it up a bit. I served mine with some shredded cheese and crackers, not bad for a two step cooking process, huh? 🙂

I didn't puree mine and it was great, feel free to give yours a buzz if you want it to be a smoother soup :)

I didn’t puree mine and it was great, feel free to give yours a buzz if you want it to be a smoother soup 🙂

Banana Nutella Protein Muffins

pro5

As so many men are, my husband has been blessed with a super fast metabolism and needs to eat a TON to keep from losing weight (must be nice huh? I eat one crab rangoon and am bloated for a week, lol). Given this fact, I am always looking for creative and healthy ways to provide J with snacks throughout the day in addition to the lunches (yes, multiple lunches – why can’t failure to gain weight be my problem? lol) I pack him, because if he were to buy all of his meals/snacks at work we would literally have zero money, haha. I’ve had a lot of success with sending him with “protein balls” (we’re a big fan of this recipe for no bake energy bites) or little egg muffins (I’ll post my version of this recipe soon!), but we’re always looking to switch it up. Since he prefers his pre and post workout meals to be something quick and not too heavy, I decided to create a recipe for flourless protein muffins. In coming up with this recipe, I adapted it from several that I viewed online, just omitted flour and added extra egg whites and nutella since I had it on hand (and who doesn’t love nutella?). Well, I whipped up a few batches during the fake Independence Day hurricane while we were stuck in the house, and J gave me the thumbs up! Granted he will eat anything, but I tried one myself and really like it, you won’t even miss the flour in the recipe (probably because of the yummy nutella lol). Needless to say these went right into the snack rotation for the next work week, since they will keep in a ziplock bag or container for about 3-4 days, I am able to make a large batch on Sunday and have them ready to go for the week. Try these out in place of your protein or power bar, as they are super high in protein and are much more cost effective!

BANANA NUTELLA PROTEIN MUFFINS (MAKES 6)

INGREDIENTS

  • 1/4 cup old fashioned oats
  • 1 whole egg
  • 3 egg whites
  • 1 ripe banana, mashed
  • 1/4 cup Nutella (sub peanut butter or another form of nut butter if you wish)
  • 1 scoop chocolate protein powder (or vanilla, whatever you have on hand)
  • 1 Tsp. baking powder

DIRECTIONS

Step 1: Preheat oven to 375 F. Mix all ingredients together until smooth. 

pro pro1

Step 2: Line a muffin tin with six cupcake or muffin liners (I use the foil ones) and fill each about 3/4 of the way with muffin batter.

I didn't use muffin liners for my first batch but will from now on for easy clean up.

I didn’t use muffin liners for my first batch but will from now on for easy clean up.

Step 3: Bake for about 15-20 minutes or until the tops are no longer gooey and a toothpick inserted into the center comes out clean. Enjoy!  

pro3 pro4

Microwave Stand Re-Do – Using Homemade Chalk Paint

mic8

If you’ve read any of my other blog posts I’m sure you can gather that I love re-doing furniture, so naturally I was pretty sad when we downsized to a smaller home last month, as I took this to mean that there would be very few opportunities for me to re-do new pieces without any space to put them. Thankfully I was wrong! Although we did give up some square footage when we moved on base, I am finding that we still have the need for some smaller furniture items to re-purpose as storage/organization pieces, so I will still have plenty of DIY-ing in my future after all.

This particular project was actually born out of necessity, when in the midst of our crazy fast move, I realized that the new house had no microwave! I had forgotten that in our former home, the microwave was a permanent fixture and would not be making the move with us. I figured, no problemo, I’ll just buy the cheapest counter top microwave Walmart has to offer (“Westbend” I hear that’s what the rich people are using these days, right? lol). I did just that, and of course wound up with a defective microwave, so after an annoying second trip back to Walmart which involved having to schlep a giant box and a cranky baby P in 100 degree temperatures, I finally got a microwave that worked. The next problem was, with my new kitchen being fit for a dollhouse, every inch of counter space already taken up. Now I was going to need somewhere to put my super fancy Walmart microwave, lol. 

I started trolling Craigslist for microwave stands and almost immediately found one that looked promising at our local thrift store. When I went to pick it up the following day and the girl showed me to the piece, I was upset to see that it was not what I was expecting at all. Contrary to the picture online, the actual product was about two feet tall and wasn’t real wood, I nicely let her know “ummm, m’am, this is a night stand” lol. Thankfully she showed me something similar that was the correct height, real wood and the same price as the ugly night stand, it even had some extra storage underneath – sweet!

Now, since I know you don’t care about my microwave drama, I’ll get to the actual project, haha. I have always been a huge fan of chalk paint – in theory, but have never actually used it mostly because the good stuff like Annie Sloane is just way too expensive for me and because of my prior successes with re-doing furniture using latex paint, I’ve never felt the need to try out chalk paint. That being said, after two of my crafty friends both re-did pieces using DIY chalk paint, I knew I needed to give it a shot, especially because both of their projects came out beautifully! I figured the microwave stand would be a great trial piece, after all, I’m hoping that when we finally settle down our home will once again have a built in microwave so this piece would just be temporary.

The verdict on DIY chalk paint? AMAZING! Not only is it super cheap to make, it works great and by applying a furniture wax to seal the piece as opposed to a polyacrylic or gel top coat as I normally would, I eliminated a lot of drying/painting time on the tail end of the project. I am so grateful that I tried this out, even more grateful that it came out better than I could have hoped and most grateful to my friends Lisa and Courtney who I texted (and by texted I mean annoyed, lol) the entire time to make sure I was doing it right haha. Here is my tutorial and description of what I did, including the products I used, hopefully this inspires you to try out chalk paint on your next furniture re-do! 

mic7

Color is “Farmer’s Market” by Valspar, available at Lowes.

REFINISHING USING DIY CHALK PAINT

WHAT I USED:

  • Sample Size 8oz container of latex paint – purchased at Lowes for $2.98 each, I used two because I wasn’t sure how much paint I would need for the project. I probably could have gotten away with using just 8 oz, as I did have a lot left over. Check out my post on my favorite products for refinishing furniture on the cheap to hear me rave about these little sample size paints, lol (really though, they’re the best). NOTE: Adding the chalk to the paint tends to lighten the color a bit, so try going a shade darker if you are trying to maintain a particular hue.
  • Calcium Carbonate – Fancy name for powdered chalk, haha. There are several different ways to make your own chalk paint including mixing paint with plaster of paris, but this method is non-toxic and according to my friend who has tried both, the calcium carbonate works best. The ratio is 1 part chalk to two parts paint. I purchased my Calcium Carbonate via Amazon here for about $10.00 with free shipping. 
  • Black Foam Brushes
  • Sanding Block or Sand Paper
  • Black Satin Rustoleum Spray Paint (if repainting the hardware)
  • Wood Filler (if you need to patch any gouges or holes in the wood)
  • Minwax Paste Finishing Wax in “Special Dark”  – purchased via Amazon for about $13.00, this will last you a long time. I chose to use the hard wax because it is easy to apply and once you have buffed the piece it is ready for use, as opposed to a gel or poly top coat which requires multiple coats and lots of dry time. The Minwax paste wax is also available at your local home improvement store in a variety of colors.
  • Rags (for applying and buffing finishing wax)

HOW I DID IT:

before picture

  before picture

mic2

Step 1: I began by removing all of the doors and hardware from the piece. Since I was going to reuse the hinges and screws I cleaned them off and hit them with a coat of black spray paint and set them aside to dry.

mic5 

this is a very technical process, lol, I just stuck the screws in an old box so that the spray paint would only get the tops and not coat the threads.

this is a very technical process, lol, I just stuck the screws in an old box so that the spray paint would only get the tops and not coat the threads.

Step 2: I gave each surface of the piece a quick sand. I know people say that when using chalk paint there is no need to sand, but I just thought it couldn’t hurt and because I needed to repair a little damage to the top with some wood filler and would ultimately end up sanding anyway I went ahead and did it. I’m sure if you choose not to sand your piece will turn out fine! 

Step 3: After sanding I wiped the piece down with a wet rag and then a dry one to remove any dust particles. I then applied wood filler to the aforementioned spot of damage and smoothed out using a paint scraper. After the wood filler had dried, I returned to the piece and sanded it flat.

area where some of the wood had chipped off and it was uneven

area where some of the wood had chipped off and it was uneven

where I applied the wood filler before smoothing it out and sanding it down

where I applied the wood filler before smoothing it out and sanding it down

Step 4: Next I mixed my DIY chalk paint by pouring my two containers of latex paint (I used satin finish because sample sizes are only available as such, some people will tell you to use a flat paint when making chalk paint but from my friend’s experience, satin finish works better anyway) into a container along with 8 oz of calcium carbonate and mixing together until all large lumps had dissolved. The stuff is going to be thick like pancake batter but don’t worry, this is what you want! 

Step 5: Paint your piece as you normally would, using even strokes in the direction of the natural wood grain. Unfortunately, although it is said that chalk paint only requires one coat, I found this to be false in my experience, as did my friend Courtney (not sure about Lisa). It may just depend on the original color of the piece you are painting, but as you can see in my pictures, even with the dark red going over the light oak wood, I still required three coats, although I probably could have gotten away with two but I had the extra paint and some areas looked lighter so I figured what the hey? Good news in the multiple coats department is – dry time is significantly less than with non-chalk paint, I was able to return to my piece within a few hours and add a second coat. Pay attention to the humidity in your area though, some people say that you can paint after just one hour of dry time but I was working in my garage in high humidity so I allowed about seven hours.

Step 6: Once your piece has dried, inspect it for lumps or bumpy areas. If there are any just sand them down a bit. Some areas had a little dried white grit from where the chalk didn’t dissolve in my paint, so I just sanded them down and dabbed a tiny bit of paint on the spots. Now you are ready to wax!

Step 7: I chose to use the “special dark” wax because I wanted to add that “antique-y” look to my piece and I also found that in doing this the color of the paint was darkened back to it’s original hue, whereas it looked a lot lighter before wax. Confession: I was too scared to apply the wax myself for fear of ruining the piece, so I made J do it, lol. Use a rag (we used old t-shirts) and begin applying a thin coat of the wax all over your piece making sure to rub it into the grooves and edges. Allow it to sit for 15-20 minutes then using another rag, buff it out (as if you were waxing a car). The wax dries pretty quickly so if you are doing a very large piece I might suggest working in sections. Also, the wax is potent stuff so I’d recommend either working outside or in a well ventilated area. Once you have buffed your piece you’re finished and your piece is ready to use, just reattach your hardware and you’re good to go!  

hubby in action, applying the wax!

hubby in action, applying the wax!

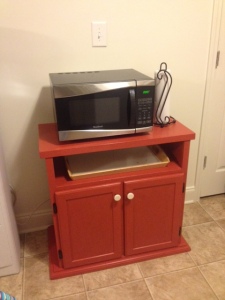
how we have it set up for now

how we have it set up for now

mic12

inside storage area, I didn't paint the inside just the edges, I ran out of painters tape on my last project so I actually used shipping tape haha, worked great! Probably wouldn't recommend it on your walls though!

inside storage area, I didn’t paint the inside just the edges, I ran out of painters tape on my last project so I actually used shipping tape haha, worked great! Probably wouldn’t recommend it on your walls though!

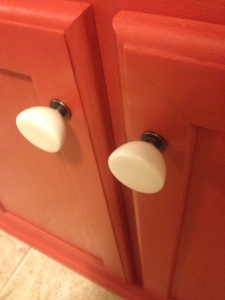
The knobs were purchased at Target of all places! $12.99 for a pack of four, about what you would pay if you purchased knobs individually at Lowes or H.D.

The knobs were purchased at Target of all places! $12.99 for a pack of four, about what you would pay if you purchased knobs individually at Lowes or H.D.

mic13

The total cost of this piece was around $50.00 (the original piece being purchased for $35.00 with the addition of paint and new knobs). We are LOVING it, it fits in with our kitchen so well and matches our DIY menu chalkboard that we have displayed in the living room. I am also delighted to report that even with one of baby P’s favorite activities being slamming doors into furniture, it hasn’t even gotten a scratch! 🙂

mischievous squishy baby knocking the door into the furniture, he knows he's being bad look at that little face! haha

mischievous squishy baby knocking the door into the furniture, he knows he’s being bad look at that little face! haha

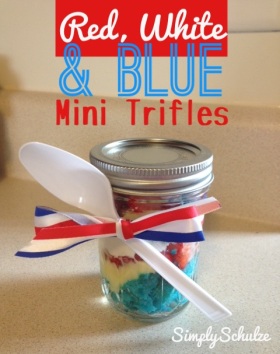
Red, White & Blue Mini Trifles

trif3Before the month of July gets completely away from us, as these summer months tend to do, I wanted to put up a quick post about my mini 4th of July themed trifles! Independence Day has always been my favorite holiday, as I like holidays that are more centered around fun than presents. Well, on my first 4th of July as a parent I very quickly realized that a holiday whose activities include mainly drinking, staying up late and explosives, is not baby friendly, lol. We already knew that the fireworks show on base wasn’t in the cards for us because of P’s six o’clock bedtime, but we did manage to keep him up an extra two hours to attend a BBQ at a friend’s. Coincidentally, this was the same friend who had P and I over for a Memorial Day while J was at fleet week, so I had to come up with another patriotic dessert since they had already experienced my Patriotic Tie-Dye Cupcakes. I had been seeing a lot of flag cakes online, particularly an adorable one by Ina Garten (love her), so these patriotic trifles were my little deconstructed version of a red, white and blue cake. I like to do individual desserts when baking for a casual get-together or party, this way everyone can take one at their convenience and there doesn’t have to be a big to-do with cutting the cake or pie (people are always really weird about taking the first piece! haha). Also, the fact that it is served in a jar makes it easy for people to take one to go on their way out to enjoy at home later. So again, I went the semi-homemade route with this recipe, as I’ve mentioned before my baking skills are quite limited but if you are more blessed than I in the baking know-how department this can be made from scratch as well. Happy Be-lated 4th of July, I was so happy to be able to spend it with great friends enjoying mini desserts 🙂

trif1

RED, WHITE & BLUE MINI TRIFLES (makes 16 trifles in 8 oz. mason jars)

INGREDIENTS

NOTE: If “blue” velvet cake mix is not available you can always purchase white cake mix and add blue food coloring or use red velvet and substitute blueberries for the strawberries to keep with the “red, white and blue” color scheme. 

  • 1 Box Blue Velvet Cake Mix (and required ingredients – eggs, oil/butter and water)
  • 2 Boxes Vanilla Instant Pudding (I used the “cook and serve” kind, but whatever works for you is fine) – don’t forget to pick up whole milk to prepare! 
  • 1 carton strawberries
  • 2 cups heavy whipping cream or 1 regular sized container whipped topping (I opted to make my own whipped cream but if you don’t feel like doing so simply use cool whip instead)
  • 4 Tbsp. sugar, divided (if using prepared whipped topping you will only need 2 Tbsp.)

DIRECTIONS

Step 1: Begin by preparing cake mix and pudding according to package directions.

Step 2: While cake is baking and pudding is chilling, slice your strawberries. I cut off the stems then halved, quartered and then thinly sliced the berries, however you want to cut them up is fine! Once your berries are all sliced, place in a bowl along with 2 Tbsp. of sugar and mix then allow to chill in fridge until you are ready to assemble the trifles. 

Step 3: While cake is cooling and pudding is chilling in fridge, begin preparing your whipped cream by combining the 2 Tbsp. sugar and cold whipping cream and whisking with an electric mixer or by hand until stiff peaks form. Place in the fridge until you are ready to assemble trifles. If you are going the whipped topping route just hang tight!

Step 3: Once you are ready to assemble your trifles, start by cutting the cake into small cubes (although it will probably just end up crumbling when you handle it, which is fine). Place about 2 Tbsp. of cake in the bottom of each jar, then top with about 1 Tbsp. of pudding followed by 2 Tbsp. of strawberries and a heaping Tbsp. of whipped cream. Repeat in this fashion for a second layer, ending with whipped cream.

They will look something like this :)

They will look something like this 🙂

Step 4 (optional): If you are not serving your little masterpieces right away, place the lid on the jar and use a ribbon to tie a plastic spoon to the jar (this is just a fun little “to-go” touch for your guests), then chill until ready to serve! *While these are still good the following day, I don’t suggest making them too far in advance as the whipped cream tends to “deflate”.   
trif