DIY Skeleton Wreath

skel5

When it’s 90 degrees and humid as heck outside it’s hard to believe that fall is right around the corner, but as the stores are already reminding us (most have had Halloween stuff out since July – whaaaaat?!), fall is right around the corner! With that being said I want to get a jump start on sharing some of my fun DIY Halloween décor that I didn’t get around to sharing last year. Since I’m a little wreath obsessed, I want to begin by sharing this super simple but a bit unconventional Halloween skeleton wreath with you. It’s a little something I came up with when I was pressed for time (and cash!) last Halloween but still wanted to get a fun wreath up on the door. I hope this jumpstarts your Halloween creativity and inspires you to think outside the box when it comes to your front door décor!

SUPPLIES

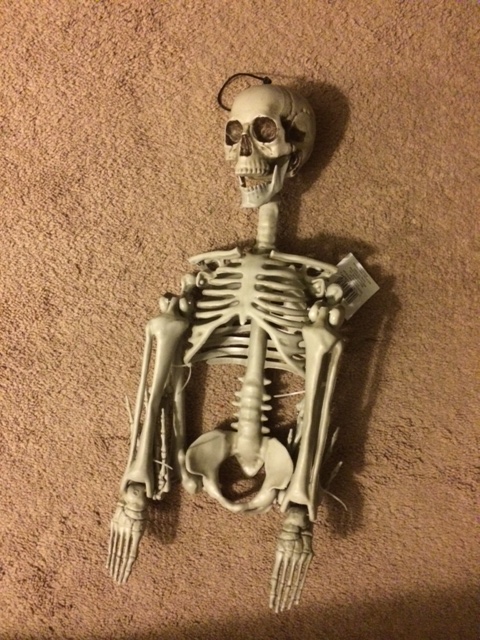
  • 1 plastic skeleton – I purchased mine at Micheals in September and believe it or not it was already 60% off not even close to Halloween! It was originally about $11.99 but I was able to snag it for under $5. I don’t have the exact product escription or dimensions but something like this would work just fine and I’d imagine you could find the same one in Michaels or your other local craft store this year.

skel

  • Twine or fishing line – I thought that twine looked a little more spooky and haunted-house/pirate-like and I already had it on hand so that was my string of choice but in a pinch any weather-resistant string will do!

INSTRUCTIONS

Step 1: Begin by separating your skeleton into pieces. Doing so at the joints will work best because you can just pop them out where they are attached. As you can see, I left the torso in tact and removed the head, legs, arms, feet and hands but the way you decide to break up ‘ol lazy bones is totally up to you!

skel2

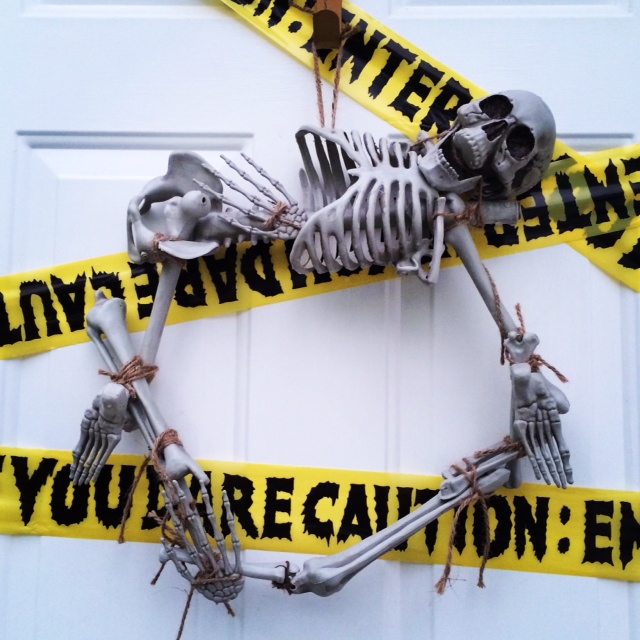
Step 2: Form a rough circle using your torso, arms and legs, then tie them together using the twine (or string of choice). It may take a little manipulation and re-tying but eventually the skeleton will resemble somewhat of a circle.

skel3

Step 3: Lastly, tie your skull, hands and feet to the “wreath” wherever you see fit. You can also go a step further and add cobwebs, spiders or even splatter red paint to look like blood (eek!).

skel4

That’s it! Sometimes the clearance rack is a real gold mine when it comes to last-minute décor and in my case it got me to think outside the box when it came to an October wreath 🙂

10 Minute Burlap Wreath

10minwreat

Wow, it sure has been a while! I had high hopes for some more consistent blog updates over the past few months but apparently moving can really take a toll on one’s free time, lol. Good news is, we have arrived safely (and mostly sanely, ha) at our new home in Quantico and are so happy to be here! We just love our house and new community and I can’t wait to share all of the fun times and crafts that are sure to come at this new station :).

As usual, even though life has been completely crazy I have somehow still found time for lots of projects, one of which was this 10 minute burlap wreath! In trying to meet new people, one of my new neighbors was sweet enough to host a wreath making party and this is the simple design I chose to create for my August wreath. It’s a good thing this wreath only takes ten minutes because of the several hours we spent chatting and sipping wine, there was only a tiny portion of time actually spent making wreaths, haha. This particular design requires very few supplies and even less time, so it’s easy to throw together in a pinch and most importantly for my fellow mamas – you can create it during naptime and still have time for a nap yourself ;)!

10 MINUTE BURLAP WREATH

SUPPLIES

  • 12 inch wire frame wreath – available at your local craft store, I purchased mine at Michaels using a 40% off coupon.
  • 2 10-yard rolls of burlap – these usually run about $5-ish per roll at Michaels but if you hold out for a sale or coupon you can usually get them for 40% off. I purchased mine when they were on a 50% off sale so they only ran about $2 a piece!
  • Floral accents – the options for floral accents and greenery are endless so my suggestion would be to choose the ones that are on clearance, as mine were.
  • Plain wooden letter (optional) – while the letter is optional I think it adds a cute flair to the wreath. Mine was the only “S” left so it was on clearance for only $0.79!!! I hit it with a coat of white spray paint I had on hand and voila, done!

INSTRUCTIONS

Step 1: Begin by unrolling your burlap garlands and secure the end of your burlap to the frame (sometimes this is done using wire but I simply cut a small slit length-wise to create two small tails on the end an then simply tie it to the frame). For weaving your burlap in and out there are a few different methods, one of them is detailed here in this YouTube tutorial, but another would be to cut it into long strips and weave it in and out in an “under-over-under” manner, making sure to “poof” and bunch your loops along the way. As I mentioned in similar tutorial for my 4th of July Wreath it’s a little hard to describe this method and much easier to learn it visually, that being said YouTube is an excellent resource to actually see this method in action.

Step 2: Once you have created the burlap portion of your wreath simply cut the stems of your floral and greenery accents to a manageable length (about 5-10 inches is good, just long enough to be able to wedge them into the frame) and stick them into the frame at your desired location. You should not need any wire to secure them, mine were able to fit tightly into the frame atop the burlap without issue.

Step 3: If you are using an initial or monogram accent, secure it to the opposing side of the wreath by using a decorative ribbon, twine or clear fishing line to secure it to the wire frame. Once this is done you may go back and manipulate any of the burlap loops and floral accents to your liking!

There you have it! Not much to it at all, huh?! It really does take about ten minutes and if you mind your sales and coupons this can be created for less than $10! Mine cost about $12 total 🙂