Simple Valentine’s Day Wreath

IMG_0039

Another holiday is right around the corner and depending on your personality (or relationship status, ha) you either love or hate this one – love everywhere, prepping for a fun night out (or in, in my case), flowers, the color PINK, tiny candy hearts … as you may have guessed I’m in the “love it” camp on this one … Valentine’s Day!!! I’m a sucker for really any holiday and no, we shouldn’t need a special day to shower the one we love with affection and goodies but isn’t it so fun nonetheless? Mine and J’s personal couple tradition since before we were even married has been to dress up and have a fancy dinner at home (this year’s meal includes a special shrimp appetizer that is a Schulze original and as long as it isn’t a total bust I plan on sharing it on the blog next week!). We prefer sharing a few cocktails in the relaxed environment of our own home, cooking a super fancy meal together  and really enjoying each other’s company as opposed to spending our Valentine’s Day in a crowded restaurant. It’s the simple things, right? Which brings me to this wreath – a super simple way to have an eye-catching door all month long!

182734_10150413236975486_818742_n

A few years (and a few pounds *sigh* lol) ago in our old place having our traditional “fancy” night in.

I was originally inspired by a wreath I came across on Pinterest (pictured below). Since the only necessary components seemed to be a grape vine wreath, a wooden letter and an assortment of ribbon, this seemed to be an easy fix for my Valentine’s Day door! I have been super into grapevine wreaths lately and have quite a few posts about them on the backburner (here is a fun springtime wreath using a grapevine frame) but for now I will say that I love them for a few reasons but mostly because they’re super cheap (you can get one for under $5.00, however, I  always use a coupon so it will come in around $2.50 or so) and they are super easy to work with; the tightly wound vines allow things to be stuck into them easily and pretty much any adhesive bonds well with them so it is easy to adhere embellishments as well. This wreath is very reminiscent of my St. Patty’s Day Rag Wreath which utilized mostly left over crafting supplies to create and I applied that same idea here as most of my ribbon I had on hand or was able to find half off at Hobby Lobby. This is a great beginner’s wreath as it doesn’t require any particular skill so if you can tie a knot you can do it, I promise, lol! Check out the tutorial below and if you’re feeling adventurous hop on over to my other Valentine’s Day posts (an Oversized Porch Sign and another Valentine’s Day Wreath) for some more crafting inspiration in this month of love xoxo.

12741884_10156521467810486_1622838805484619586_n

Happy Valentine’s Day from the Schulzes to you!!!


7d4e043a9926a96046b45fe84e816c05

My “pinspiration” – follow the link to find this particular wreath for sale here on Etsy – http://www.etsy.com/listing/175318886
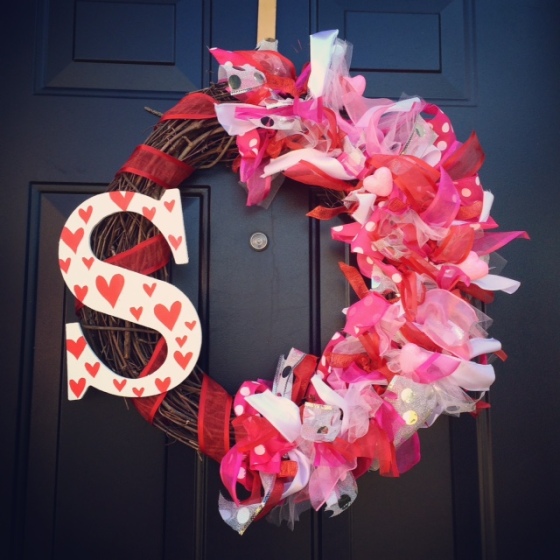
 

IMG_0316

My version!

SUPPLIES

  • 12″ grapevine wreath – available at any craft store or where crafting supplies are sold.
  • assortment of wired ribbon of varying sizes – it isn’t 100% necessary to use wired ribbon but the ribbon will look more poofy and have a bit more structure and ability to stand up to the elements this way. The amount of ribbon is totally up to you, I think I used about six.
  • wooden letter – I chose to paint mine white and then add some hearts using this method. You can always just draw hearts or polka dots using an oil based Sharpie paint pen as well.
  • paint (for wooden letter, optional) –  latex, spray paint, acrylic really anything will do. I chose to spray paint mine because I already had some on hand and it’s probably the easiest method.

INSTRUCTIONS

  1. If you plan to paint your wooden letter, do this first. With any luck it will be dry by the time you finish the rest of the wreath.
  2. Begin by cutting your ribbon into about 3-4 inch strips. Some can be longer or shorter and in fact it’s more fun if they are not all the same size so that it creates a less uniform look.
  3. Next, begin tying your ribbons randomly onto different areas of the half of the wreath you’ve chosen to decorate. Simply loop the ribbon under one of the vines and then tie – that’s it! Repeat in this fashion until you’ve achieved a dense look with little to no wreath base showing through.
  4. To attach your wooden letter either tie it on using ribbon or if you have access to a staple gun (which is what I did) staple a pipe cleaner or other wire to the back of the letter and tie it onto the wreath in this manner.
  5. At this point feel free to add any additional embellishments (like my little glittery Styrofoam hearts) – the dollar store is a great resource for little things like this!

That’s it! If you’re like me and measure units of time in “naptimes” then this should only take you about 3/4 of a naptime lol. 

vdaywreath2

Last year’s Valentine’s Day porch!

DIY Skeleton Wreath

skel5

When it’s 90 degrees and humid as heck outside it’s hard to believe that fall is right around the corner, but as the stores are already reminding us (most have had Halloween stuff out since July – whaaaaat?!), fall is right around the corner! With that being said I want to get a jump start on sharing some of my fun DIY Halloween décor that I didn’t get around to sharing last year. Since I’m a little wreath obsessed, I want to begin by sharing this super simple but a bit unconventional Halloween skeleton wreath with you. It’s a little something I came up with when I was pressed for time (and cash!) last Halloween but still wanted to get a fun wreath up on the door. I hope this jumpstarts your Halloween creativity and inspires you to think outside the box when it comes to your front door décor!

SUPPLIES

  • 1 plastic skeleton – I purchased mine at Micheals in September and believe it or not it was already 60% off not even close to Halloween! It was originally about $11.99 but I was able to snag it for under $5. I don’t have the exact product escription or dimensions but something like this would work just fine and I’d imagine you could find the same one in Michaels or your other local craft store this year.

skel

  • Twine or fishing line – I thought that twine looked a little more spooky and haunted-house/pirate-like and I already had it on hand so that was my string of choice but in a pinch any weather-resistant string will do!

INSTRUCTIONS

Step 1: Begin by separating your skeleton into pieces. Doing so at the joints will work best because you can just pop them out where they are attached. As you can see, I left the torso in tact and removed the head, legs, arms, feet and hands but the way you decide to break up ‘ol lazy bones is totally up to you!

skel2

Step 2: Form a rough circle using your torso, arms and legs, then tie them together using the twine (or string of choice). It may take a little manipulation and re-tying but eventually the skeleton will resemble somewhat of a circle.

skel3

Step 3: Lastly, tie your skull, hands and feet to the “wreath” wherever you see fit. You can also go a step further and add cobwebs, spiders or even splatter red paint to look like blood (eek!).

skel4

That’s it! Sometimes the clearance rack is a real gold mine when it comes to last-minute décor and in my case it got me to think outside the box when it came to an October wreath 🙂

10 Minute Burlap Wreath

10minwreat

Wow, it sure has been a while! I had high hopes for some more consistent blog updates over the past few months but apparently moving can really take a toll on one’s free time, lol. Good news is, we have arrived safely (and mostly sanely, ha) at our new home in Quantico and are so happy to be here! We just love our house and new community and I can’t wait to share all of the fun times and crafts that are sure to come at this new station :).

As usual, even though life has been completely crazy I have somehow still found time for lots of projects, one of which was this 10 minute burlap wreath! In trying to meet new people, one of my new neighbors was sweet enough to host a wreath making party and this is the simple design I chose to create for my August wreath. It’s a good thing this wreath only takes ten minutes because of the several hours we spent chatting and sipping wine, there was only a tiny portion of time actually spent making wreaths, haha. This particular design requires very few supplies and even less time, so it’s easy to throw together in a pinch and most importantly for my fellow mamas – you can create it during naptime and still have time for a nap yourself ;)!

10 MINUTE BURLAP WREATH

SUPPLIES

  • 12 inch wire frame wreath – available at your local craft store, I purchased mine at Michaels using a 40% off coupon.
  • 2 10-yard rolls of burlap – these usually run about $5-ish per roll at Michaels but if you hold out for a sale or coupon you can usually get them for 40% off. I purchased mine when they were on a 50% off sale so they only ran about $2 a piece!
  • Floral accents – the options for floral accents and greenery are endless so my suggestion would be to choose the ones that are on clearance, as mine were.
  • Plain wooden letter (optional) – while the letter is optional I think it adds a cute flair to the wreath. Mine was the only “S” left so it was on clearance for only $0.79!!! I hit it with a coat of white spray paint I had on hand and voila, done!

INSTRUCTIONS

Step 1: Begin by unrolling your burlap garlands and secure the end of your burlap to the frame (sometimes this is done using wire but I simply cut a small slit length-wise to create two small tails on the end an then simply tie it to the frame). For weaving your burlap in and out there are a few different methods, one of them is detailed here in this YouTube tutorial, but another would be to cut it into long strips and weave it in and out in an “under-over-under” manner, making sure to “poof” and bunch your loops along the way. As I mentioned in similar tutorial for my 4th of July Wreath it’s a little hard to describe this method and much easier to learn it visually, that being said YouTube is an excellent resource to actually see this method in action.

Step 2: Once you have created the burlap portion of your wreath simply cut the stems of your floral and greenery accents to a manageable length (about 5-10 inches is good, just long enough to be able to wedge them into the frame) and stick them into the frame at your desired location. You should not need any wire to secure them, mine were able to fit tightly into the frame atop the burlap without issue.

Step 3: If you are using an initial or monogram accent, secure it to the opposing side of the wreath by using a decorative ribbon, twine or clear fishing line to secure it to the wire frame. Once this is done you may go back and manipulate any of the burlap loops and floral accents to your liking!

There you have it! Not much to it at all, huh?! It really does take about ten minutes and if you mind your sales and coupons this can be created for less than $10! Mine cost about $12 total 🙂

DIY Scrap Fabric Wreath – St. Patty’s Day

stpatt

After creating my very first DIY wreath last April (hey, I’ll have to pay it a special tribute this year for prompting twelve months worth of creative wreath making! lol), I was determined to try out a different style of wreath each month. Since I gear each wreath toward either the season or whatever holiday happens to fall within that month, I wanted this wreath to be St. Patrick’s Day themed. While browsing Pinterest for style inspiration I came across this adorable St. Patty’s Day Rag Wreath (pictured below) via The Magic of Ordinary Things blog. I immediately knew that this had to be my next wreath since scrap fabric banners are basically my favorite go-to party décor item of all time (check out my tutorial here). Additionally, I already had a ton of left over green fabric from the various DIY décor projects I had created for Baby P’s “Wild One” party so I was happy to put that to use and the rest of the fabric I found at my local fabric store on the sale rack and in the remnants bin. This wreath is now in my top three favorites (I’ll have to do a “wreath year in review” come April and rank them all, lol), mostly because it resembles my beloved scrap fabric banners but also because it is SUPER cost effective, coming in at just under $7.00!!! If you’re ready for a little more variety among your conventional DIY wreaths, this is super fun and different and can be customized to fit any holiday or color scheme, so dig into your scraps and give this one a try!

my inspiration via "the magic of ordinary things" blog

my inspiration via “the magic of ordinary things” blog

SUPPLIES

  • wire – since lovely home *eye roll* is the only one in the neighborhood without a storm door my wreaths need a fighting chance of standing up to the elements so I used about 3 feet of thick plastic covered wire that I found at Lowes (near the rope) this way the wire couldn’t rust and turn the color of the fabric, it cost about $0.30/ft. (so less than $1 to create a makeshift 12″ wreath frame). If you have a storm door or sheltered front door you can do what was done in the previously mentioned tutorial above and form a wire hanger into a circle.
  • fabric – the amount you need is entirely up to you and depends on how full you want your wreath to be and how many colors you would like to use. I used well over 100 strips, measuring about 1X6″ (as per the first tutorial).
  • duct tape

INSTRUCTIONS

  • Begin by forming your wire into a circle and securing it with duct tape (shipping or packing tape will also do). Mine was about 12″ in diameter.
  • Next, tie your fabric scraps around the wreath until it is completely covered and none of the wire is showing. You don’t even need to knot it, just a simple single tie will do! At this point you can embellish the wreath in any additional manner that you please. I added a mini St. Patrick’s Day sign that I found at Hobby Lobby for 50% off.
stpattt

Finished product!

stpattyboard2

Click on this photo to check out my post on how I created my giant reversible “lucky” sign!

DIY Valentine’s Day Wreath

vdaywreath1

Okay, so I know I’ve been skipping around a lot as far as my posts go and I’m doing my best to finish up those featuring Baby P’s First Birthday Bash so that I can finally share that with you. However,  in the meantime I want to share a cute little Valentine’s Day inspired wreath I whipped up last week because believe it or not, just because I don’t post my holiday décor in correct holiday order doesn’t mean that I am not actually decorating in a timely fashion, lol. This wreath is similar to my DIY Mini-Pennant Banner Wreath that I made last spring and is super easy to create! Since we were headed up to DC to visit friends for MLK weekend I wanted to go ahead and get my Valentine’s Day stoop all set up before we left and wanted to stick to what I knew when it came to my décor and keep it simple. Here is a quick little tutorial for my Valentine’s Day wreath just in time for Valentine’s Day, it’s so quick and easy that you’ll have plenty of time to enjoy it even though the 14th is just a few short weeks away 🙂

vdaywreath2

Valentine’s Day stoop with my sweet little frog photo-bombing! Like my GIANT “XOXO” sign? You can find the tutorial on how to make your own for $9 here!

SUPPLIES

  • 18″ Styrofoam wreath frame (available at local craft stores)
  • 2″ wide ribbon of your choice – I went with a red and beige chevron which I found at Hobby Lobby. This wreath required about 2 1/4 spools of ribbon but it may be more or less depending on the ribbon you choose.
  • 2-3″ wired burlap ribbon
  • twine
  • scrap fabric – the amount will depend on how many fabric roses you want on your wreath
  • glue gun & hot glue
  • small stencils
  • black acrylic paint
  • paint brush
  • scissors

INSTRUCTIONS

Step 1: Begin by wrapping your ribbon around your Styrofoam wreath, securing with little lines of hot glue along the way.

Step 2: Once your wreath is covered cut small pennants using your wired burlap ribbon. NOTE: you can also use regular burlap if you have that on hand, I have just found that the wired burlap holds up better to the elements for me as I do not have a storm door. Next, using your small stencils and acrylic paint, paint each letter of L-O-V-E individually onto each of your pieces and allow to dry.

Step 3: In the mean time, create your fabric flowers, for a detailed tutorial on these adorable flowers check out this post. Once you have the amount of flowers that you desire use hot glue to secure them to the bottom right quadrant of your wreath (or wherever you’d like, this is just how I placed them). NOTE: If you do not have the time or will to create your own flowers you can buy ready made fabric flowers from your local craft store but PLEASE try making them yourself, I promise it is super easy!

Step 4: Since your pennants should be dry by now, use hot glue to attach them carefully to your piece of twine then securing your mini pennant banner to the upper left area of your wreath by wrapping the ends of the twine around the body of the wreath then securing it with a tiny dot of hot glue on the back (or just knotting it in back).

Step 5: This is optional, but if you’re so inclined go ahead and fashion a bow out of any left over ribbon and attach it to the bottom center of your wreath using hot glue. Just adds a little extra somethin’ 🙂

THAT’S IT! There are so many ways to customize this by changing up the colors or saying. I look forward to coming back to this wreath for future holidays and simply changing up the theme!

A picture of our new doormat - just for funsies :)

A picture of our new doormat – just for funsies 🙂

Pottery Barn Hack – DIY Faux Succulent Wreath

image (5)

So I have a confession to make, despite the awesomeness that is this wreath, until I made it I hadn’t gotten swept up in the whole succulent craze. This is probably because anything that becomes popular automatically becomes unnecessarily expensive, even fake plants, lol. Come to think of it, back in the day I knew succulents as “rubber plants” and my parents would lure us to the Home Depot with the promise of being able to buy a little rubber plant or cactus if we cooperated (don’t worry, since then I’ve learned to extort better items from my parents in exchange for favors, lol), haha. Anyway, back to the wreath. J’s sweet Aunt M asked if I would be able to make her a wreath and sent me a picture of a Pottery Barn faux succulent wreath (pictured below) and went on to explain that since the wreath would not be under the shelter of a porch or storm door it would need to be made of materials that would withstand the elements and this one seemed to be fitting. I was super intrigued as I hadn’t attempted a faux flower or moss wreath before and couldn’t wait to get started. Well, in typical Natasha fashion I got caught up in approximately one million other projects (worst niece ever! lol) but the other night I was determined to get both this succulent wreath and my own September wreath  done and did so in just a about two hours (which makes it all the more embarrassing that it took so long for me to start, ha)! The wreath turned out beautifully and is made even more attractive by the fact that the cost came in at around $50.00 while the PB version was $99.00! I was almost sad that I wouldn’t get to keep it for myself, lol, but I am happy to know that it will have a good home being enjoyed by J’s Godparents 🙂 I also think that it is worth mentioning that this is one of the most simple wreaths I have made although it looks the most complicated, all it requires is a wreath frame, some Spanish moss and artificial succulents so please don’t let the illusion of complexity be off-putting to you!

image (6)

Pottery Barn inspiration! No offense to PB but so not worth $100!

SUPPLIES:

  • 18″ grape vine wreath frame
  • 14 artificial succulents (there are SO many out there, I just picked mine based on the PB version to achieve a similar look)
  • Spanish Moss
  • Glue Gun/Hot Glue
  • Wired Burlap Ribbon or Ready-Made Bow
  • 1 Pipe Cleaner

INSTRUCTIONS:

Step 1: I began by laying out my my wreath components: the faux succulents, the moss and the bow. I messed around with the arrangement and grouping of the succulents and moss to see what looked best. I made sure that wherever I wanted to place the succulents their stems could be wedged between the vines and that they would lay flat as possible against the wreath frame.

Step 2: Once I was happy with the layout of my wreath I used hot glue to attach each succulent one by one by covering the stem and bottom of the succulent with a generous amount of glue and wedging it back between the vines and pressing down firmly. For each moss section I would cover the area atop the wreath frame on which the moss was to be attached with a generous amount of hot glue and gently press the moss on. NOTE: When handling the moss and separating your packaging try to tear it apart as little as possible aside from separating it into sections. To get it to cover the area you need gently stretch it.

Step 3: I worked in the above manner until all of my moss and succulents were attached, the long stringy succulents I secured by applying a little glue to the top of the moss or frame where the long strands would lay and attached them that way. Finally I attached my bow using an olive green pipe cleaner, that way if Aunt M chooses she can switch out the bow at her will!

image (2) image (3) image (4)

Obviously there are tons of variations on this wreath, there are so many varieties of faux succulents and they can be arranged in any manner. If you don’t want the trouble of having to use moss you can purchase a wreath that has been pre-covered in moss (although this may run you a bit more price-wise). I will report back to let you know how this wreath withstood the PA fall and winter, however, my DIY Felt Flower Wreath made using the same frame held up nicely without shelter so hopefully this one is equally as resilient!

image (7)

Football Themed Wreath – NY Giants

photo (4)

The past two nights have been all about wreaths! One of which was my “September” wreath which I decided to make football themed to both support our favorite team and because I felt weird putting out a fall themed wreath when it’s still too hot to go outside most days, lol. The other was a faux succulent wreath I made for our dear Aunt Maryann who patiently waited for it while my scatter-brained self took forever to get around to making it (and even longer to send it out, shame on me!) but I finally got them both done – yay! In this post I will be sharing my September football wreath which happened to be my first attempt at a mesh wreath. While we have been transplanted to the south we’re still NY fans to boot so since we don’t have cable at casa de Schulze (we pinch our pennies, remember? lol) this wreath will be our method of team support for the season. Aside from the fact that this wreath turned out HUGE (which I decided was fitting because “Giants” lol) I was very happy with the results and even happier with how easy it was to create! My only gripe with this wreath is that mesh is more expensive in comparison to burlap, however, I do like that mesh gives you the option for super bright fun colors which are great for holidays like Halloween and Christmas which is what will keep me coming back to this method. If you’re yet to jump on the deco mesh bandwagon give this method a shot, it’s just as easy as creating a burlap wreath and super fun!

Squishy baby wearing his Giants tie onsie! :)

Squishy baby wearing his Giants tie onsie! 🙂


SUPPLIES:

photo 1 (2)

  • Wire Wreath Frame – I used a 24″ frame because my craft store was out of 18″ frames but I would definitely suggest going with the 18″ or even a 12″ frame unless your door is exceptionally massive. The mesh adds a LOT of volume to the wreath so a small frame goes a long way!
  • Blue and Red 5″ X 45′ Rolls of Wired Deco Mesh – I used two of each, but if you were to use a smaller wreath frame you would definitely only need one of each.
  • Red and Blue Pipe Cleaners
  • NY Giants Scrap Fabric – left over from my DIY Little Man Tie Onsies
  • Mini Giants Football
  • 2 Mini Giants Helmets
  • Blue 1/4″ ribbon
  • Scrap Burlap Fabric – left over from my DIY Rustic Burlap Pennant Banners
  • Stick-On Fabric Letters
  • Glue Gun & Hot Glue

WHAT I DID:

Step 1: I began by cutting the pipe cleaners into thirds to shorten them, then twisting the shorter pieces around the wreath frame wherever I was planning to bunch up the mesh. Then I used basically the same method I used to create my 4th of July Burlap Wreath, by weaving the mesh in and out of the wire frame (in an over-under-over-under manner) using the pipe cleaners to secure the mesh to keep it “poufed” up. NOTE: Another method would be to use a styrofoam wreath frame (as I did to create my Chevron Wreath) and create loops out of the mesh by stapling them directly to the styrofoam frame to achieve the same look.

photo 2 photo 3

Step 2: After I had finished creating the mesh portion of the wreath I attached my embellishments. I cut a small hole in the back of the mini football and threaded a pipe cleaner through the whole and attached it to the wire frame. I did the same with the mini footballs which already had holes in the sides that were perfect for threading the pipe cleaners through.

Step 3: I then moved on to my mini “Go Giants” pennant banner which I created by cutting mini triangles out of my scrap burlap and then smaller triangles out of my scrap Giants fabric to fit atop the burlap triangles which I attached using hot glue. After I had created all of my little triangles I went ahead and attached my fabric letters which were actually stick-on but I used a bit of hot glue on the backs of the letters as well to ensure that they really stuck since my wreath was going to have to brave the elements. After adding the letters I created the pennant banners by gluing the triangles to my blue 1/4″ ribbon, one reading “go” and the other “giants”. I secured it to the wreath by tying each opposing end to the wire frame.

Step 4: My final step was not planned but after finishing my wreath the episode of SVU I was watching still had a few minutes left (lol) so I took that time to play around with the idea of adding the Giants logo and helmet to the mesh. I cut the logos and helmets out of my fabric and used hot glue to secure the fabric to the top of the mesh and another piece of scrap fabric to hold it in place on back (inside of the mesh) since the hot glue would not fully secure the logo/helmet to the mesh without a backing.

photo 4

please disregard my disgusting doormat! hehe This is the GIANT wreath in all it’s glory, you can see it from space! ha

TA-DA that was it! Now that I’ve attempted this method I will most likely be making another deco mesh wreath for my Halloween/October wreath (except I will use the appropriate wreath frame this time, haha).


DIY Felt Flower Wreath

ffwreath4

Ever since I made my first DIY wreath this past Easter I was hooked and decided that I was going to try my best to create a different wreath for each month. Not only do I love switching up my front door but it gives me a fun project to look forward to at the end of each month (as if I don’t have enough projects going the rest of every month, haha). Since we are coming into football season and the holidays and I’ve got a full list of festive wreaths that I’m planning on creating come fall, I wanted to give one last crafty hoorah to summer with a fun floral wreath for August. I was inspired by a similar wreath I found on Pinterest and especially loved that with very few (and very inexpensive) supplies I could quickly and easily create a fun wreath to send the summer season out with a crafty bang! Before I get to the tutorial allow me to place some emphasis on how amazing fast this craft was – it only took me about 15 minutes to create the flowers and about 5 to attach them to the wreath (so about half an SVU episode worth of time, lol), which is good because according to my new-wreath-on-the-first-of-the-month plan I was already two weeks late in getting it up on display – better late than never! lol

DIY FELT FLOWER WREATH

*There are so many variations on this wreath, if your outdoor decor works on a particular color scheme you can easily adapt this wreath to fit it 🙂

WHAT I USED: 

  • 6 pieces of felt – I purchased a crafting variety pack of felt from Walmart for $1.99 (it came with about 20 pieces!). If you’re looking for specific colors your local fabric store should carry a ton at about 50-99 cents a piece.
  • 10 medium-large buttons – a variety pack I also purchased from Walmart for $5.99 but if you have buttons laying around any will do!
  • 12 inch grape vine wreath – I purchased mine at a local home decor store for $3.99
  • Scissors
  • Glue gun & hot glue sticks
  • ruler

WHAT I DID:

Step 1: I began by measuring and cutting your felt. This part is subjective, as your wreath may be a different width than mine and allow for larger or smaller flowers, but mine worked best with 10 flowers (3 large, 3 medium, 4 small). For my large flowers I cut strips of equal width and length (again, this is up to you), my large, medium and small length measurements were somewhere around 5, 3 and 2 inches, respectively. Then for the amount of flowers that you plan to make, cut a round circle of felt (about 2 inches in diameter) for each.

ffwreath

Step 2: Next I assembled all of my flowers by taking each piece of felt and folding it over to create a loop (these will be the “petals” of your flowers), then securing each with a dot of hot glue. Then gluing each petal onto the felt circle working in an overlapping/fan fashion. Once all of the petals were secured, I glued a button to the center of each flower.

Sorry for the gross finger pic, I'm a nail biter lol

Sorry for the gross finger pic, I’m a nail biter lol

ffwreath2

Step 3: Once I had established the correct design, I glued each flower on one by one, using a generous amount of hot glue.

ffwreath3


That’s all folks! It has been out in the elements for about a week now and is still holding up great even with a few rainy days and no storm door. Keep this in your pocket for next spring OR you can even adapt the colors to fit a fall scheme for the coming months! 


DIY 4th of July Burlap Wreath


4th

Hi everyone! I know I have been just awful about updating the ‘ol blog these past few weeks but between moving and heading back up north for a mini family vaca I have been all over the place! Good news is that I am back on the grid lol, and prepared to pollute blogland with TONS of new posts including my hubby’s surprise 30th birthday bash (a whiskey and cigar themed party, a huge success btw) which I had to keep off the blog until now, as well as some new crafts and recipes I have been working on in between organizing the house and ripping my hair out in frustration over moving haha.

Okay, back to the wreath. Being that we were heading out of town just one short week before Independence Day, I knew I had to eek out my 4th of July wreath if I wanted it to be displayed leading up to holiday. This was not my first burlap wreath rodeo, I had tried my hand at it once before for my Easter wreath (a post that I am yet to get around to lol) and was super surprised at how easy it was to create given how impressed I was with the final product. So while J did his best to wrangle baby P (who is crawling lightening fast these days and getting into everything) I managed to get this wreath done in just about 20 minutes! I will give you a run down of the specific products I used but obviously it is not necessary that these items be used, as the thing I love most about burlap wreaths is that there are a variety of ways on which to elaborate on such a simple idea and that they can be adapted to fit any color scheme or holiday. If you’ve seen one on Pinterest and are hesitant to try it out, don’t be – it is almost impossible to mess up. I know a lot of the written explanations for weaving the burlap can be confusing but if you YouTube “burlap wreath tutorial” you will find a much more helpful guide to making one, I promise! Happy 4th of July everyone, please watch some fireworks for me, baby P goes to bed at six so chances are I will not be watching any aside from what I can see from my porch lol.

4th3

baby P looking adorable right before he started slamming the bouquet violently then trying to eat the petals lol.


4TH OF JULY BURLAP WREATH 

WHAT I USED:

4th1

  • 18″ wire wreath frame – I purchased mine for $2.50 at a local craft store specific to my area but you can get them on Amazon for around $5.00 or so.
  • 2 rolls of red and blue chevron wired burlap ribbon (10 ft. each) – I purchased mine from Walmart for $3.47 per roll but a Google search revealed that it can be purchased just about anywhere, lol.
  • 1 roll of plain burlap ribbon 5 1/2″ X 15 ft – available at any craft store.
  • white satin 1″ wired ribbon
  • Flag Print Faux Daisies – these just happened to work perfect and were available at Walmart, however, any red/white/blue flower combo would work or even a bow instead!  
  • 1 white wooden letter

HOW I DID IT:

Step 1: I began by weaving my burlap into my wreath, I will refer you to YouTube for the tutorial on how to actually weave the burlap in and out of the wire frame so as to not embarrass myself with an explanation that will make no sense, haha. I will say, however, that I did work by weaving the plain burlap for a few loops, then exchanging it with the chevron ribbon and I worked in “sections” of burlap instead of weaving the whole 15 feet through at once because that would have taken FOREVER. I would just work it through for a few feet then cut it and start over in the next section, since my chevron ribbon was wired it was easy to secure it even though I was not using the whole roll at once.

4th2

Step 2: Once I was done weaving my burlap and chevron interchangeably. I wove my 1″ white ribbon through the wreath in no particular pattern. This was simply to be the “white” in the red/white/blue holiday color scheme, the wreath looked perfectly fine without it.

Step 3: I cut three of each print of daisy from the bunch and stuck them through the wire frame, weaving the stem through the three metal bars so that the flower would remain secure. Then using a piece of twine I tied the wooden “S” to the wreath right atop the flowers.

inspecting the flowers again lol

inspecting the flowers again lol

Step 4: Once the wreath was complete, I took a few minutes to “poof” my loops and rearrange my flowers so they looked just right!

4th6

finished product!

This wreath cost me right around $15.00 to make and just out of curiosity I did a quick Etsy search for a “4th of July Burlap Wreath” and almost spit out my drink when I saw that the average wreath was going for an average of $50.00 plus shipping – WHAAAAAAAAT???!!! NO, NO, NO, people, you are getting ripped off, especially because you can buy almost all of the necessary components for one of these wreaths at Walmart. Furthermore, if you make a plain burlap wreath you can simply adjust it to each holiday or season by adding embellishments (a big benefit of the burlap wreath is that it is not permanent, if you mess it up or want to change it simply unweave and re-do) so potentially you can have the best wreath on the block time and time again for just around $10.00 for the year. So please, to keep me from having anxiety over thinking of people swipin’ that credit card for a $60.00 burlap wreath, at least attempt to make your own! Friends don’t let friends pay good money for cheap crafts lol. 

DIY Spring Chevron Wreath with Pennant Banner

wreath7

With J gone for fleet week, I’ve been staying up far too late, watching Hulu (I started Nashville, not my fave show so far, but it’s alright) and crafting my little bootay off. I may have mentioned in previous posts that I love to decorate for holidays/seasons and made a promise to myself to do so, especially while baby P and any future babies are growing up. So far I have made good on my promise, and although most of my decorations come from the dollar store, it still counts, haha! I recently found myself at a loss as to what to do decor-wise between Easter and Memorial Day/Independence Day, so I decided to leave the inside be and just make another cute front door wreath since I was so pleased with the way my Easter wreath came out. Since I had picked up a few yards of burlap for some larger pennant banners I plan on making, I thought it would be fun to add a teeny tiny pennant banner to my wreath, especially because it would act as a trial one for my future banners. This wreath was super easy to throw together, once I had created my mini pennant banner and fabric flowers, it took me under 10 minutes to assemble the whole thing! The best part is, with the exception of the ribbon and Styrofoam wreath, I used items I already had on hand so the project cost me about $8 – BOOM! Give this one a try, if you don’t want to make the fabric flowers yourself you can always purchase ready made ones at your local craft store (but first read my tutorial on fabric roses and see how easy they are to make!), the rest is easy breezy!

DIY SPRING CHEVRON WREATH WITH PENNANT BANNER

YOU WILL NEED:

wreath6

  • Styrofoam wreath (I purchased mine at Michael’s using a 40% off coupon, download the Michael’s app if you haven’t already, they will scan coupons right off of your phone)
  •  Chevron Ribbon (Mine was wired but it doesn’t have to be, they sell large rolls of chevron ribbon at Walmart for $3.99)
  • 8-12 Fabric Flowers (Tutorial Here)
  • String or Twine
  • Burlap (since the banner is so tiny just ask for the smallest piece they can cut for you, burlap costs $2.97 at Walmart so a 1/4 yard will cost you about $0.75 and you’ll still have left over fabric)
  • White Acrylic Paint
  • Small Letter Stencils (I had picked some up for another project I’m working on but I’m sure the dollar store has stencils that would work)
  • Paint Brush
  • Glue Gun
  • Scissors

INSTRUCTIONS

Step 1: Assemble your fabric flowers by following this tutorial. The amount you will need depends on the size of the flowers you make and how much area you want them to cover on the wreath. If you are using store bought flowers or none at all skip this step.

Step 2: Start creating your pennant banner by fashioning a triangle guide out of paper (I used a post-it haha), the size of your pennants will depend on the length of your name or words you are using. My last name is seven letters long and a 2″ wide by 2″ long triangle was perfect for mine. Using scissors, cut out your triangles. NOTE: It is optional to use modge podge or fabric stiffener to seal the edges of your burlap triangles so they do not fray. I skipped this and they are fine.

wreath5 wreath4


Step 3: Once your triangles are cut out, using your stencil, paint and paint brush, carefully paint your letters onto the burlap triangles. Be sure to protect your work surface with a piece of paper or wax paper since the paint will seep through the burlap. Allow a few mins to dry, this is a good time to start working on the body of the wreath!

wreath3

Step 4: Take your wreath and ribbon and attach the end of your ribbon to the styrofoam wreath using hot glue. Keep wrapping the ribbon around the wreath, overlapping the previous section each time, place a dot of glue underneath the ribbon each time you wrap it (I suppose this isn’t totally necessary but I didn’t want my ribbon to move at all once I was finished covering the wreath).

wreath2

Step 5: Your burlap letters should be dry by now. If so, take a piece of twine, ribbon or string and use hot glue to attach your burlap triangles to the string by applying a line of top glue to the back top of each and pressing onto the string, it is best to do this over wax paper so that the glue will not stick to anything. Make sure you leave a decent amount of string before the start of your first triangle so you will have a means to attach that side to the wreath.

Step 6: Attach your banner to the wreath by tying each end to each side, you be the judge of placement and tautness of the string. Once I got the banner tied how I wanted, I used a small dot of hot glue on each side to secure the string (again, overkill with the glue but it can’t hurt right? lol). Now, attach your flowers however you see fit, I alternated sizes and colors but feel free to arrange them however you’d like! The bow is optional, I just thought the top looked naked. Now throw that bad boy on your front door and know you’ve now got the best wreath on da block 😛

wreath