Giant Reversible Holiday Sign – St. Patty’s Day Edition

stpattyboard

Eek! Time keeps on slippin’ and another month has came and went! I have been keeping busy with my not-so-tiny frogman (and of course a few projects in between!) and in some other exciting news we have been busy preparing for our next move which will be taking us to VA! We love the DC area and NOVA so we are super excited to see what this new assignment has in store for us.

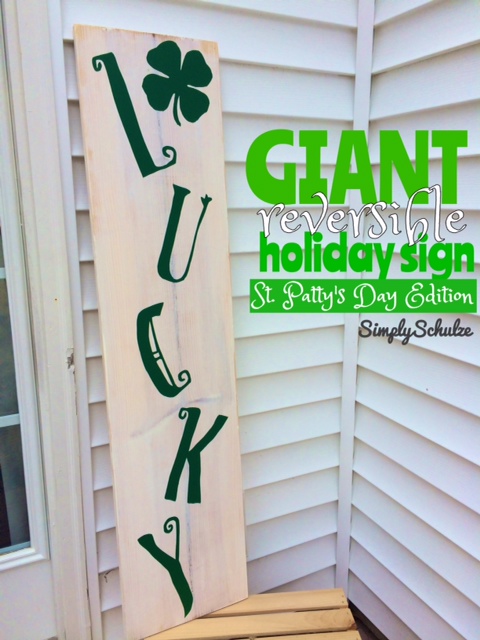
Although most of my time recently has been spent trying to purge our useless items rather than take on new projects I did take a quick minute to spruce up our stoop for St. Patrick’s Day. Even though between my husband and myself there is zero Irish heritage that doesn’t mean we don’t love this fun holiday all the same, after all who doesn’t appreciate a little Irish cheer [insert infinite beer emojiis]? 😉 Additionally I appreciate any holiday that gives me the excuse to craft and ever since I created our giant “NOEL” porch sign for our outdoor Christmas display I’ve kind of done the idea to death in my head thinking of ways that I can transition the same idea into other holidays, first in the form of my “XOXO” board for Valentine’s Day and now a “LUCKY” one for St. Patty’s Day! I had mentioned in my Valentine’s Day board post that I had experienced a minor lapse in brain function when I didn’t simply paint the “XOXO” art onto the back of my “NOEL” board so that my holiday porch décor could double as Valentine’s décor by flipping it over once February arrived. With that being said I’m happy to report that I did remember to do that this month which is what makes this holiday sign “reversible” – my “LUCKY” board is actually the back of my Valentine’s Day board which makes this month’s porch sign FREE! I hope this inspires a little outdoor design creativity in you, with a little luck you might wind up with the most fun porch in the neighborhood! 😉

Our St. Patty's Day sign as it is displayed on our porch, with a little leprechaun photo-bombing of course <3

Our St. Patty’s Day sign as it is displayed on our porch, with a little leprechaun photo-bombing of course ❤

For a full length supply list and tutorial for this project check out my “XOXO” Valentine’s Day Sign, but if you would like to duplicate my “LUCKY” board exactly here are the details

vdaywreath2

Side #1 – Valentine’s Day

Side #2 - St. Patty's Day

Side #2 – St. Patty’s Day

FONT: “Christmas on Crack” available for free download via dafont.com. I used font size 970 just be sure to adjust your page margins so that it will fit.

COLOR: “Four Leaf Clover” by Valspar – funny thing, I didn’t actually pick this because of the name I just randomly grabbed a green color chip and that was the name, how fitting right!? lol I purchased a sample sized paint in this color for $2.98 – to learn more about my obsession with sample sized paints for projects check out this post.

CLIPART: For my four leaf clover silhouette I just copied a google-image four leave clover to a word document and enlarged it to my desired size before printing it out. Here is the link to the exact one that I used.

Flashback to St. Patty's Day last year - click on this picture to check out an adorable post about my little DIY St. Patty's Day photo with my little lucky charm <3

Flashback to St. Patty’s Day last year – click on this picture to check out an adorable post about my little DIY St. Patty’s Day photo with my little lucky charm ❤

DIY Valentine’s Day Wreath

vdaywreath1

Okay, so I know I’ve been skipping around a lot as far as my posts go and I’m doing my best to finish up those featuring Baby P’s First Birthday Bash so that I can finally share that with you. However,  in the meantime I want to share a cute little Valentine’s Day inspired wreath I whipped up last week because believe it or not, just because I don’t post my holiday décor in correct holiday order doesn’t mean that I am not actually decorating in a timely fashion, lol. This wreath is similar to my DIY Mini-Pennant Banner Wreath that I made last spring and is super easy to create! Since we were headed up to DC to visit friends for MLK weekend I wanted to go ahead and get my Valentine’s Day stoop all set up before we left and wanted to stick to what I knew when it came to my décor and keep it simple. Here is a quick little tutorial for my Valentine’s Day wreath just in time for Valentine’s Day, it’s so quick and easy that you’ll have plenty of time to enjoy it even though the 14th is just a few short weeks away 🙂

vdaywreath2

Valentine’s Day stoop with my sweet little frog photo-bombing! Like my GIANT “XOXO” sign? You can find the tutorial on how to make your own for $9 here!

SUPPLIES

  • 18″ Styrofoam wreath frame (available at local craft stores)
  • 2″ wide ribbon of your choice – I went with a red and beige chevron which I found at Hobby Lobby. This wreath required about 2 1/4 spools of ribbon but it may be more or less depending on the ribbon you choose.
  • 2-3″ wired burlap ribbon
  • twine
  • scrap fabric – the amount will depend on how many fabric roses you want on your wreath
  • glue gun & hot glue
  • small stencils
  • black acrylic paint
  • paint brush
  • scissors

INSTRUCTIONS

Step 1: Begin by wrapping your ribbon around your Styrofoam wreath, securing with little lines of hot glue along the way.

Step 2: Once your wreath is covered cut small pennants using your wired burlap ribbon. NOTE: you can also use regular burlap if you have that on hand, I have just found that the wired burlap holds up better to the elements for me as I do not have a storm door. Next, using your small stencils and acrylic paint, paint each letter of L-O-V-E individually onto each of your pieces and allow to dry.

Step 3: In the mean time, create your fabric flowers, for a detailed tutorial on these adorable flowers check out this post. Once you have the amount of flowers that you desire use hot glue to secure them to the bottom right quadrant of your wreath (or wherever you’d like, this is just how I placed them). NOTE: If you do not have the time or will to create your own flowers you can buy ready made fabric flowers from your local craft store but PLEASE try making them yourself, I promise it is super easy!

Step 4: Since your pennants should be dry by now, use hot glue to attach them carefully to your piece of twine then securing your mini pennant banner to the upper left area of your wreath by wrapping the ends of the twine around the body of the wreath then securing it with a tiny dot of hot glue on the back (or just knotting it in back).

Step 5: This is optional, but if you’re so inclined go ahead and fashion a bow out of any left over ribbon and attach it to the bottom center of your wreath using hot glue. Just adds a little extra somethin’ 🙂

THAT’S IT! There are so many ways to customize this by changing up the colors or saying. I look forward to coming back to this wreath for future holidays and simply changing up the theme!

A picture of our new doormat - just for funsies :)

A picture of our new doormat – just for funsies 🙂

DIY Pinata – “Where the Wild Things Are”

  As I dive back into blogland after my extended hiatus I figure I will get back into the mix by sharing a few posts about Baby P’s first birthday which although is now three months past (how is time … Continue reading

DIY Hand Painted Coat Rack

Ever since I successfully created the hand-painted sign for our laundry room/command center I felt as though I’ve opened a Pandora’s box of DIY decor options, lol. The second I finished my sign my imagination ran wild with endless possibilities for … Continue reading