

As usual last night I was up way too late crafting, but I was excited to get these done and off of my to-do list. I have a few parties coming up and I knew these burlap pennant banners would add a little extra something to the table displays and make for a great piece of decor to have on hand for future events. There is nothing too special about these and as I’m sure you’ve seen on Pinterest they are extremely popular, lol. However, since I used cheap store bought stencils for my project, I thought my tutorial would be worth sharing as I noticed that a lot of tutorials as that you create your own stencils which is just way too time consuming for my lazy butt. I would say more but there isn’t much else to say, just easy breezy party decor at it’s finest! Hope this tutorial comes in handy for your next shindig, I will be posting pics of how I use them at each event at a later date! Happy Memorial Day everyone, thank you to those who have served, past and present and of course, to those who made the ultimate sacrifice for our freedom.

Squishy baby says thank you to our troops!
DIY RUSTIC BURLAP PENNANT BANNERS
NOTE: If you’re interested in making these with a different fabric check out my post on DIY fabric pennant banners, great for parties or photo backdrops!
YOU WILL NEED:

- Burlap Fabric (the amount you need will depend on how many letters are in your words, I was able to get over 30 large squares out of 2.5 yards)
- White Acrylic Paint
- Paint Brush
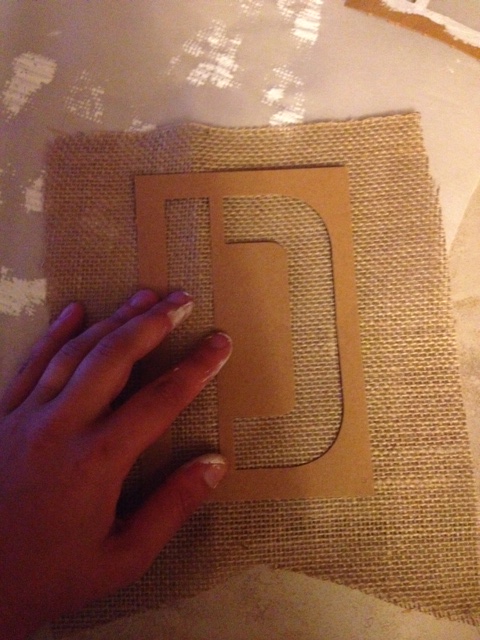
- Large Alphabet Reusable Stencils (available at Staples for about $7.00, I will be using these for several projects so it was a good investment, alternatively you could print your letters out on paper and use an X-acto knife to cut them out and create your own stencil)
- Glue Gun
- Twine or Ribbon
DIRECTIONS:
Step 1: Create a template for your pennants in whatever shape you would like, I chose a rectangle with an inverted point at the bottom. The measurements will depend on the size of your stencils but if you are using the large 5″ ones as I did, I found a good measurement to be 7.5X7.5 inches.

Step 2: Using your pattern as a guide, cut out as many pieces of burlap as you need. NOTE: I did not care about fraying as I though it added to the rustic look, however, to keep your piece from fraying you can spray it with a bit of fabric stiffener or brush the edges with mod podge and allow to dry before going on to the next step.

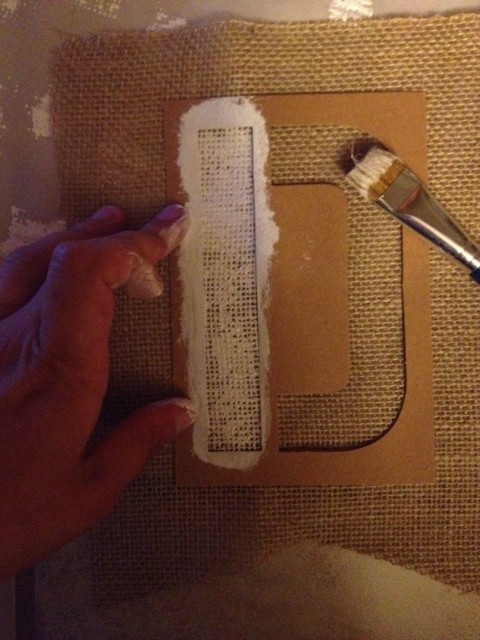
Step 3: Using your stencils, holding each steadily in place paint your letters onto the burlap and set aside to dry.

soooo many letters! lol
Step 4: Once letters are dry (I allowed mine to sit overnight), lay out a piece of twine long enough to accommodate the letters with slack on either end for tying the banner up for display.
Step 5: Apply a line of hot glue to the top of each burlap square and fold it onto itself, pressing down to create a firm seal. The spacing of the letters is up to you, I did not measure it out, just eyeballed it. Once you are finished your banner is ready for display!!! Check back to see how I display mine 🙂
Fun idea: If you want your letters to be interchangeable simply do not glue them to the twine but rather use a small hole punch to punch two holes along the top of each pennant and weave the twine through or use mini clothes pins to hold them to the twine!

That is such a great idea!
Pingback: DIY Scrap Fabric Banner | simplyschulze
Pingback: DIY Painted Plastic Planters | simplyschulze
Pingback: Football Themed Wreath – NY Giants | simplyschulze
Pingback: Rustic Burlap “Autumn” Pennant Banner | simplyschulze