

When we moved into our house on base I was pretty set on not doing anything to spruce up the landscaping. After all we are technically renting this house, so what bigger waste of money than to landscape somebody else’s property? Well after about one week of staring at the ugly, weed infested pine straw “garden bed” that lies around the front of the house, my will to want my home (renting or not) to look it’s best got the better of me and I decided we needed to do something to spruce it up even if it was just changing out the pine straw for mulch.
In my landscaping-on-a-budget post I discussed how we went about sprucing up our Honey Tree home with basically empty pockets, so we decided to apply the same principals here to make our new happy little home look a little more happy on the outside. I will most likely be posting about our new little landscaping project in detail but for now I wanted to share my little pièce de résistance of my outdoor decor – my painted plastic planters! These were inspired by a pair of painted terracotta pots I found on Pinterest (see picture below) and had the terracotta pots at Lowes been on sale I probably would have duplicated the project exactly, but at clearance prices of $2.99 and $1.49 and I couldn’t resist purchasing the large plastic containers that I ended up using instead. Another reason this project had me so giddy, is that since I already had spray paint on hand all that I needed besides the pots were a few plants and of course I chose perennials so that I could enjoy my little plastic wonder pots year round 🙂 This project can absolutely be done using any kind of planter, or better yet planters that are already black in color, I just chose to go with clearance items since the black ones were full price. You can even save yourself the trouble of using a store-bought stencil by checking out my hand painted sign tutorial and using the same technique for creating a stencil using painter’s tape. Hope this inspires you to do some fall landscaping while everything is going on sale! 🙂

My Pinterest inspiration!

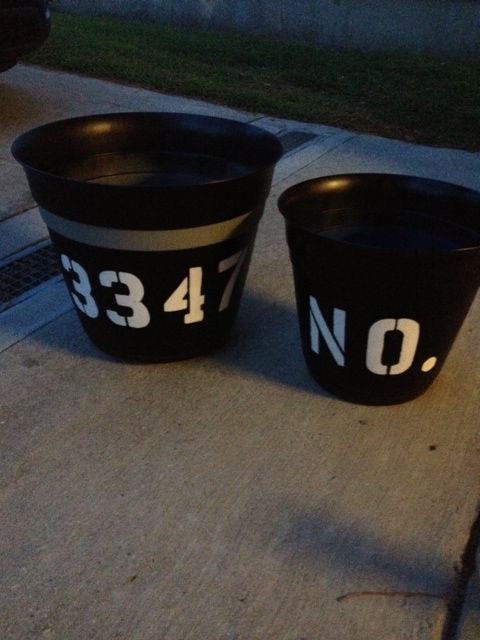
My version 🙂
DIY PAINTED PLASTIC PLANTERS
WHAT I USED:
- 2 plastic planters – 1 medium, 1 large. I purchased mine on clearance at Lowes for less than $3.00 each!
- Black matte finish spray paint – make sure it says that it is suitable for plastic and the outdoors, something like this would be good.
- Clear matte finish spray paint/enamel – something like this would be fine.
- White paint – I used white latex paint that I had left over from another project.
- Stencils – I purchased mine at Staples. If you do not want to use stencils check out my Hand Painted Sign Tutorial for an alternative stenciling method using painter’s tape.
- Painter’s tape
- Small paint brush
WHAT I DID:
Step 1: I began with these two medium and large sized plastic planters, in grey and blue (because that’s what they had on clearance). Since I wanted them to be black I hit them both with an even coat of flat black outdoor/plastic grade spray paint. The recommended dry time was about 15 minutes so I waited about an hour before moving on to the next step due to humidity.


I didn’t bother painting the insides since the dirt would cover the interior.
Step 2: Once my pots had dried, I secured my store bought reusable stencils (the same ones I used for my DIY Rustic Burlap Pennant Banners) to the pots using painter’s tape and used a paint brush to paint the “NO. 3347” using white latex paint. White acrylic paint will do as well, since you will be sealing it against the elements using a clear enamel it doesn’t matter whether or not the white paint is suitable for the outdoors. FYI, this is not an exact science, once I removed the stencils I returned and added another coat of paint and touched up any areas where the paint had leaked under the stencil. If you do not want to be troubled with this check out the above mentioned tutorial on hand painted signs for the painter’s tape method. You can also use white spray paint for the letters and stencils but I do not recommend it, it is super messy and will not be as tidy looking.
Step 3: Once your wording/numbers have dried, hit that area of your pot with a few coats of clear spray paint/enamel. This will keep your letters safe from the elements no matter what type of paint is underneath. That’s all folks! I waited until the next day to pot my plants to ensure that the enamel and spray paint had fully dried.
Finished product!
My goal in creating this little potted display was to cutsie up my stoop using a barely-existent outdoor decor budget. This would undoubtedly work better using ceramic pots since the paint would be less likely to peel or chip, however, the benefit to mine aside from the extremely low cost is that I don’t need to worry about these cracking come winter (which will be here before we know it, eek!). There are so many variations on this so go nuts! 🙂

For the plants I kept it simple with a small evergreen tree and three small lirope plants. The two mums alongside are potted in $1.98 Walmart pots.
