
The master bathroom was the last major house project we tackled before baby P was born. We had been putting off this particular project because we anticipated that it would be the most expensive of our DIY projects as well as the most work. Well, it took us two other bathroom updates (the guest bathroom and the half bath downstairs) to realize that replacing the entire vanity was a stupid idea. While both of the other bathrooms came out great and our cute little modern vanities look amazing, replacing the old vanities meant ripping out the cabinets and sinks, having to sand and repaint the walls, install new tiles in the empty space that was left on the floor and replace the floor molding before installing the new vanities – SO much work. We spent hours laying tile, grouting and cutting molding when we very well could have just updated the old cabinets and just purchased a new vanity top. Oh, well, lesson learned and we still got two cute bathrooms out of it so no harm done. Needless to say when it was time to tackle the master bath, I was determined to simply repaint the cabinets and replace only the vanity top. Having already repainted our kitchen cabinets (I will post about this soon!), this was not my first cabinet rodeo, lol. When ordering the new vanity top, we ended up choosing a cultured granite in a light gray because it went with our color scheme but was also neutral enough to compliment really any paint color, should the new owners decide to change the wall color. After purchasing our vanity top, I got to work on the cabinets. These were a super easy project (all the more reason I wanted to kick myself in the head for not doing this in the other bathrooms as well), especially when compared to the kitchen cabinet process, this one paled in comparison!
Now, I will get to the tutorial, but first some advice. If you buy an older home take a good look at the existing cabinets and fixtures before you look to do a complete overhaul of the place. While some things may be physically damaged beyond repair and need to be replaced for non-cosmetic reasons, if it is just ugly but still functional try to look beyond the hideous 1982 stock cabinetry because chances are you can save a lot of time (and maybe some cash too) with just a quick paint job! In our case the cost of the projects were going to be about the same (the cost of the custom vanity top was comparable to the cost of a new full vanity and replacing the floor tiles) so we didn’t necessarily save a significant amount of money by going the repainting route BUT we sure did save a heck of a lot of time and aggravation! I am a HUGE advocate for making simple cosmetic changes, it is AMAZING what a little paint and DIY decor can do for a room and with little to no effort and cash you can bring an old, dingy space back to life (and more importantly, into the 21st century, lol)!
REPAINTING BATHROOM CABINETS
*NOTE: This can also be applied to kitchen cabinets as well! Basically all of the same principles can be applied to painting wooden furniture, check out my post on re-doing old furniture here.
YOU WILL NEED:
- Semi or High Gloss Kitchen/Bathroom Paint (the label will say “kitchen and bath” these paints are specifically designed to withstand the moisture caused by showering and cooking. If you don’t want to buy a bathroom or kitchen specific paint go with a semi or high gloss regular latex paint, I DO NOT recommend any finish below satin, as eggshell and flat paint don’t hold up to moisture well at all).
- Sanding Blocks or regular sand paper
- Foam Brushes or Small Rollers (they make rollers specifically for cabinets, they are good for the large surfaces but I found that I needed to use the smaller foam brushes on the edges anyway so I recommend skipping the rollers altogether, as they won’t really save you too much time).
- Polyacrylic Top Coat (I suppose this could be optional because you are using a high or semi gloss paint, however, I wanted the extra protection on the cabinetry).
- Drop Cloth
- Bonding Primer (optional)
- Caulk (optional)
INSTRUCTIONS:
- Begin by removing all of the drawers and doors, then remove all hardware. If you are planning on reusing the hardware you can let it soak for a few minutes in warm soapy water then clean them with a toothbrush or you can repaint them using a satin spray paint).
- Give the surfaces of your doors and drawers a quick sand, no need to go nuts, just about a minute on each surface will do, you are simply trying to remove a good amount of the original sheen or varnish. Once you are done sanding, wipe all surfaces down with a damp cloth to remove any sanding dust. Don’t forget to sand the exterior body of the vanity as well. Once you are finished sanding, vacuum or dust the insides of the drawers and around the vanity itself to ensure that no particles will get on your wet paint once you begin working. NOTE: Some tutorials and cabinet painting kits (such as Rustoleum) suggest using deglosser (aka liquid sandpaper) in place of sanding. I have done both and I now prefer to just sand, it takes about the same amount of time and you won’t have to deal with the greasy disgustingness of the deglosser.
- Another optional step is using white paintable caulk to fill in any cracks or holes in the wood, this is a great trick! Just squeeze it in and smooth it out using your finger. This will make your cabinets look even newer as you will be hiding any wear and tear or factory imperfections. Most caulk is paintable after just a half hour. Again, this step is optional but if you are a perfectionist I wouldn’t skip it, as once you paint your cabinets (especially if you are using a light color) imperfections in the wood will be more apparent.
- Set up a work area for painting the doors and drawers, since this is usually a few day project, I do not recommend doing it outside. The garage or spare bedroom will probably be best (since I didn’t have any tiny humans crawling around at the time, I simply moved our dining table to the side, laid a giant plastic drop cloth of the tile floor and set up shop there). Lay a drop cloth (I suggest plastic) and you are ready to paint!
- If you are using stark white paint as I did you might consider applying a coat of bonding primer or cover stain first, that way you won’t require as many coats of paint to hide the wood color beneath. This is optional, however, and if you are using a darker color paint this is definitely unnecessary. As far as the method for painting the drawers and doors, the drawers can usually prop up on their own, but for the doors I use the same method as I do when cooking a whole chicken in the crock pot (lol), I create a few balls out of tin foil then prop each door up flat so you can easily paint the sides and edges. Now, give all exterior surfaces an even coat of paint, using even strokes in the direction of the original wood grain. I don’t paint the insides or sides of the drawers, when I first tacked my kitchen cabinets I posed this question to the Google gods (haha) and it seems that even professionals don’t paint the insides or sides of cabinets when refinishing them, which worked for me – less work, woo-hoo!!! Once you have applied your first coat of paint to the drawers, doors and exterior body of the vanity or cabinet itself, allow about 12-24 hours of dry time. I know that sounds like a lot of dry time, however, good dry time is key in ensuring that your piece will hold up and it is extra important in the case of cabinets as they will be handled on a daily basis. This is a good nap-time or after work project as you can spend an hour or so each day over the course of a few days.
- Repeat the painting process until you have applied the desired amount of coats, for darker colors this may only be two but for stark white you may need up to four if you choose to forgo the cover stain. Once your final coat has dried you can go ahead and apply your first coat of polyacrylic top coat if you are using one. I chose to apply two coats of the clear polyacrylic just to be safe. Once your final coats have tried go ahead and reattach your hardware and you are finished!!!

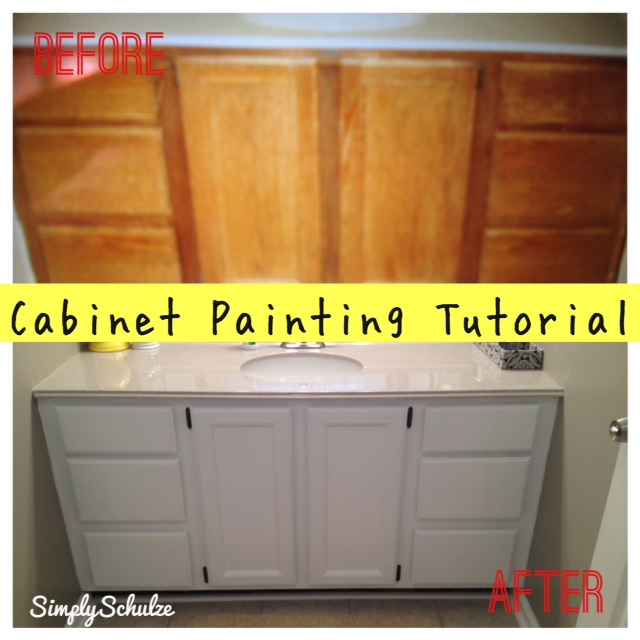
I hope that by looking at these before and afters you can see what a difference refinishing your cabinets can make. You would NEVER know that my vanity was originally a piece of crap 80’s builder-grade cabinet! I will be making another post soon on our entire master bathroom re-do and give you some more budget-friendly decor pointers, so be on the lookout for that. In the meantime, here is a sneak-peak of the before and afters just to give you an idea.


Tasha I absolutely LOVE your blog, it’s like a manual on how to be a grown-up, lol. I’m definitely taking notes for when I have a house & kids! Also loving the baby pics of course. 🙂 Keep up the awesome work, I know I speak for many many others when I say I love reading your posts!
Thank you so much, it means so much especially coming from people like you who are actually doing REAL grown up things (like being gainfully employed haha). I’m glad you like my posts 🙂