DIY Fabric Covered Photo Mat – Made from a Cereal Box!!!

fabmat4

Who doesn’t love free stuff? I actually have quite a few “free” projects in the works currently that I’m super excited about, but for now I’ll share this one with you as it was part of our gallery wall which I will reveal soon! This project actually happened by accident when I realized that the frame I was using wasn’t a standard photo frame and I was going to need to cut a photo mat to fit it. Since the piece of art (I shouldn’t say art, it was a weird picture of a cat or something, lol) that was originally in the frame had an ivory mat around it I was going to have J cut it to fit using a box cutter. Of course he misunderstood me (anybody else have an issue with their men having selective hearing when it comes to their crafting requests? lol) and cut the wrong part of the mat, rendering the part I needed useless. Boo-hoo! It was time to come up with a plan B, which I thought would be just to buy and cut a standard mat to size but then I realized that a standard mat wouldn’t fit this frame either (gahh!). Just as I was getting super frustrated and about to ax the use of that particular frame altogether, I remembered that I had seen a picture mat that somebody had covered in fabric by simply mod podging fabric onto a plain picture mat. Now, that still didn’t solve my problem of not having the right mat size, but if I thought that if I could only find a thin cardboard to fashion my own mat I could take advantage of my left over fabric from past projects. I knew that a poster board cut to size would work just fine but in the interest of not having to traipse into town to get one I thought to myself “what do I have in the house that is of similar thickness/material to a poster board?” and then it came to me – a cereal box!!! About a half hour and a little mod podge later I had myself another fancy photo mat (check out my first DIY photo mat here) that not only matched the fabric on our side-light window panels but was free!!! All it required was a little thinking outside of the “box”, so to speak (get it? cereal box, ha.ha.ha). I hope this inspires a free photo mat on your end (you need not use a cereal box like I did, any thin cardboard will do) and should you not have the need for a photo mat right now, keep this one in mind as a great DIY gift opportunity come the holidays!

I'll have plenty of more frame projects in the works if I keep catching more adorable moments like this! These two melt my heart <3

I’ll have plenty of more frame projects in the works if I keep catching more adorable moments like this! These two melt my heart ❤


DIY FABRIC PHOTO MAT

SUPPLIES:

  • 1 large cereal box or poster board of some sort
  • fabric of your choice
  • mod podge (I used matte finish but it doesn’t matter what you use)
  • glue gun & hot glue
  • foam brush
  • measuring tape
  • scissors

INSTRUCTIONS:

Step 1: If you are using a cereal box break the box down by cutting along one of the corners so that it can lay flat like a piece of cardboard. Then measure and cut four strips of equal length or four pieces that can come together to form a rectangular mat since it wont matter what your pieces look like beneath the fabric as long as the shape of the mat is even (depending on the size of your box you may not be able to get four equal pieces but rather four pieces just long enough to overlap and connect to form a rectangle). If using a poster board simply measure and draw out your mat and then cut it out already formed.

fabmat

My cereal box! In the interest of pinching our pennies I opt for “crisp rice” instead of rice krispies haha

Step 2: Once you have your four pieces connect them so that your print side (if using a cereal box) is all facing one direction using hot glue to form the mat. Ignore this step if you have used a poster board and your mat is ready to go. Now you are ready to measure and add your fabric!

fabmat1

ensuring that it fits in the frame

fabmat2

Step 3:  Measure your fabric by laying the fabric print side down (upside down) and laying your mat on top, use a pencil or pen to mark an area just a tad bit larger than your mat size or enough to be folded over the edges (I will explain in the subsequent steps). Once you have marked your rectangle on the fabric, cut it out using your scissors (this should be obvious but keep the rectangle in tact! To cut the center simply puncture a hole in the center of your fabric and cut along the insides).

Step 4: Place your mat so that the non-print side is facing up and lay your fabric cut out over the mat to make sure that it will line up correctly. In each of the inner and outer corners cut a small slit that extends from the edge of the fabric to the corner of the mat (this is so your fabric can be tucked underneath without puckering at the corners).

Step 5: Now you are ready to attach the fabric to the mat. Using your foam brush, brush a generous amount of mod podge onto the mat surface and then lay your fabric atop it and press down to secure. Some mod podge will likely seep through the fabric, this is fine, simply use your foam brush to brush it off so that it doesn’t form clumps. At this point your fabric will still be larger than necessary for the mat but allow it to dry this way before moving onto the next step.

Step 6: Once your fabric has dried for the most part, turn your mat upside down and use hot glue to attach your fabric’s edges to the underneath of the mat, making sure to pull it tightly so that isn’t loose along the edges and holds to the mat securely.

Step 7: Now turn your mat back over and add another coat of mod podge to the top of the fabric, ensuring that you are adding and even layer and are not allowing it to pool or clump along the top. Allow it to dry and you are ready to use it in your frame!!! Ta-da!!! 

fabmat5

My DIY frame displayed on our gallery wall!


To see more of our family pictures from baby P’s 6 month photo session see this post! 


DIY Printed Photo Mat

printedmat

When planning my gallery wall I knew that I wanted to incorporate some unique design elements when it came to our pictures and frames. Since I had to scale down the size of the gallery wall due to lack of space in the new house, I decided that instead of incorporating typography prints into the design I could free up room for more photos on the wall by simply adding a printed mat to one of the larger photos. I drew inspiration from a photo mat I had seen handwritten on using a sharpie but didn’t duplicate the idea exactly because while I do believe my hand writing to be pretty neat (*hair flip* lol), I figured given that I would have to see this project on display everyday that I would leave the printing job up to my trusty ol’ laser printer. The particular photo I was needing a mat for was one of our wedding photos, so what better wording to surround it than the lyrics to our first dance? Which is “The Book of Love” by Peter Gabriel if you’re wondering (if you want to see me cry buckets just wait until I finish my third glass of wine and put this song on repeat, lol), if you’re a Scrubs fan you’ll know this as the song that plays in last scenes of the series finale. Anyway, enough about that (but really, how awesome is the show Scrubs? lol). This project is quick and easy and with the holidays right around the corner, would make a great gift! This can be done using any text, you can use song lyrics, the text from a love note or even an excerpt from a novel (for all the book worms out there like my hubby!), to name a few. Lastly, if the adorableness that is my hubby and I in the vineyard hasn’t already made you nostalgic for your own wedding and itching to craft (haha), allow me to further convince you – this project costs next to nothing, all you need is access to a laser printer, a photo mat and some mod podge! I hope this inspires you to frame one of your favorite photos or jazz up an existing framed piece 🙂

WHAT I USED:

  • Plain Photo Mat
  • Laser Printed Wording –  it must be a laser print! If you use an inkjet print it will smear when you paint on the mod podge. If you do not have a laser printer you can print the document at your local print center for a few cents a page. NOTE: I printed mine at home and cut it into sections. If you are going to be super OCD about your wording all lining up, print your wording on a paper size that is LARGER than your frame mat and cut the paper to fit the mat using an x-acto knife. This way your paper will fit your mat exactly.
  • Mod Podge – matte or glossy, doesn’t matter. Personally, I prefer matte.
  • Scissors
  • Foam Brush

WHAT I DID:

Step 1: I began by typing up my wording. I simply copied the lyrics from a lyric site, then pasted it onto a Word document and lined it up as shown below. Next I copied the entire body of text and just pasted it over and over until I had a full page of wording then printed.

printedmat1 printedmat2

Step 2: Next I cut the pages into sections to fit my mat. I did not care about my wording lining up perfectly since it was going to be displayed at a distance, but if I had wanted it to be perfect I would have done as I suggested above by having a 16X20 sized document printed at my local print center then cutting it to fit the mat using an x-acto knife.

Step 3: I coated the backs of each of my printed pieces with mod podge and placed them carefully onto my frame mat. I gently smoothed the paper once I had placed them onto the mat ensuring that there were no air bubbles trapped between the paper and the mat. I then allowed the mat to dry.

printedmat4 printedmat3

Step 4: Once my mat had dried I used a my foam brush to coat the top of the mat (atop the print), then allowed this coat to dry. That’s it! Once the mat dried my beautiful picture was ready for assembly and display 🙂

printedmat5

Total project cost was right around $5.00!!!

Baby P’s DIY Father’s Day Photo Gifts

fath5fath

Father’s Day is just a few short weeks away and baby P and I both agree that J is just about the best daddy there is and deserves nothing but the best for his special day! Thing is, the gift that my frugal hubby would love the most is for me not to spend money, haha, lucky for him I had been planning two budget friendly, DIY, grand slam Father’s Day gifts for months now (well actually since baby P was born lol). Since J is up in NY for fleet week for two weeks, I knew this would be the perfect opportunity to get my Father’s Day pics out of the way, printed and wrapped before his return. Additionally, I like to share my holiday crafts with my Mommy friends, so I always like to test out my projects before hand, to ensure it comes out as planned and make it easier for me to host a craft play date without having to wrangle baby P at the same time.

Okay so back to the photos, can I tell you that I literally cried after I saw how amazing these pictures turned out? Baby P is just the squishiest, happiest little thing and I know J is going to DIE when he opens this gift on Father’s Day (if I can wait that long to give it to him lol jk I will)! Don’t worry I made him promise not to read the blog for a few weeks and since he loves surprises so much I know for a fact he won’t peek ;-). Since the pics are self explanatory I’ll just go into a bit more detail with each picture below. Hope this inspires you to have some fun with your little and give their Daddy something fun and meaningful for Father’s Day!

*For more examples of DIY holiday photos check out this post!

“DAD” PHOTO

fath2fath4fath3

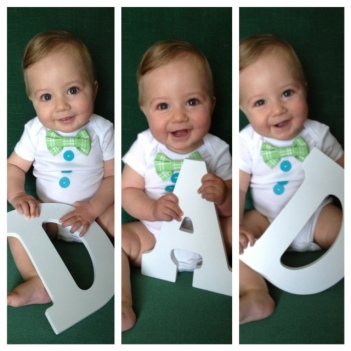
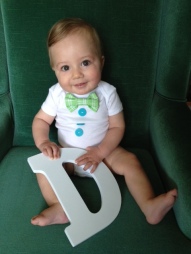
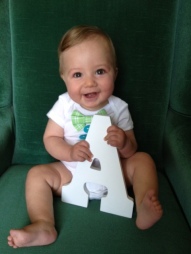
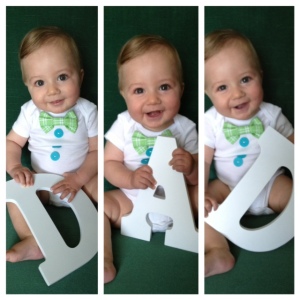
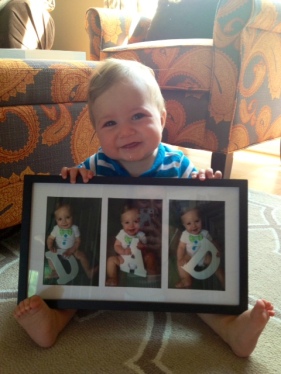
Okay, obviously you’ve seen this one all over Pinterest, so needless to say this isn’t an original idea but sooo stinkin cute nonetheless! I purchased a “D” and an “A” from Michael’s at $3.99 a piece and used a 30% off-entire-purchase coupon, I also returned the following day to purchase the frame (originally priced at $12.99) using a 40% off coupon. Confession: in my super stingy mind I did for a moment consider returning the letters after I was done (I know, terrible)  but I decided it would be best to keep them to repeat this Father’s Day craft  for my crafting play date and with any future children I may have. The onsie is another one of my DIY projects that I came up with specifically for this picture, check out the tutorial for DIY Little Man onsies here, they are super cheap and mostly no-sew! For the picture itself I just sat him on our vintage wing back chair (which actually made for the perfect backdrop!) and snapped his pictures with my smart phone. When I was done, I used the Walgreen’s photo app to upload my pics and picked them up the next time I was out, three 4X6 pictures cost me about $0.40 after coupons!!! Quick plug for the Walgreen’s photo app – I LOVE it, it’s so convenient since it’s all done from your phone, just make sure you Google “Walgreen’s photo coupons” before completing your order since there are always coupon codes for photo prints (this time it was 40% off!). Including all components this project cost me right around $14.00. TIP: If you want to save on framing costs simply purchase an 11X14 frame from a thrift store and arrange the photos side by side over a colored piece of paper or cardstock, as opposed to buying a three hole frame or simply use the app “picstitch” or another photo app/kiosk to turn your three images into a three frame single photo.

fath8

Baby P testing out the chair and modeling his onsie before the pics!

fath5

fath9

so proud of the finished product! lol Look at those curled little toes 🙂

“DADDY’S SHOES” PHOTO

fath

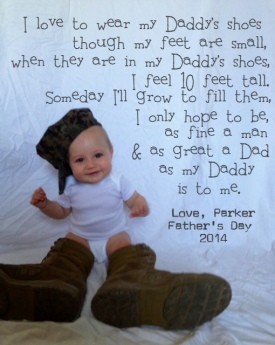
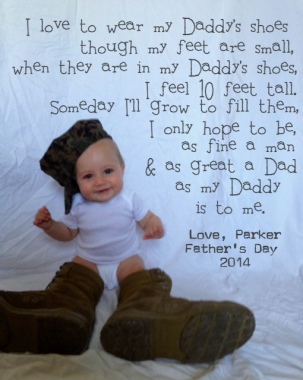
This photo was a copycat of a professional Father’s Day photo I found here on Pinterest, which I then adapted to include my hubby’s military gear. I figured since I was going to be recreating this idea with all of my Mommy friends, who are all military mamas as well, including the military boots and cover would be an extra special touch. To set up the picture I followed my usual steps for a DIY photo backdrop and then added the words using the free photo app “Phonto” (see this post for detailed instructions for use of the app) after taking the picture. This photo I printed in size 8X10 via Shutterfly for $1.79, the frame I will be using is one that we already have so that part will be free, which means … this gift cost me $1.79, say whaaaaaaat??! NOTE: When doing the picture with a little girl I plan to change the end of the poem to “… as great a person and as true a friend, as my Daddy is to me”, since the original poem is specifically for another male.

fd1

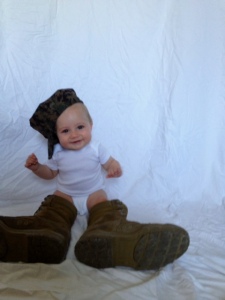
the original image before I added the text. I made sure to take the photo off center so that there would be a good amount of empty space for the poem.

There you have it – two ADORABLE Father’s Day gifts coming in right at around $15.00!!! My hubby will LOVE these gifts, and love their price tag as well!

fath1

We’ll be celebrating this wonderful man come Father’s Day! He does it all and then some, we love him so much! I caption this photo “look, here’s my Dad!” lol


DIY Mother’s Day Picture!

moth

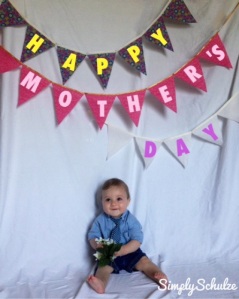
As I’ve mentioned before, I’m big on sending cards to family and friends for just about every holiday, so now that Mother’s Day is just a short week away this was no exception! Quick money saving tip I want to mention – if you’re like me and have 10+ people on your holiday card list (and I’m not talking Christmas, this is just a simple holiday like Mother’s Day lol), DO NOT get sucked into buying your cards at the local drug store or supermarket (if I did this I would easily spend upwards of $30.00 on cards per holiday), I head to the Dollar Tree and get all of my holiday cards for $.50 each, they’re not anything spectacular but they have a good selection and you won’t have to spend $4.99 on one card, haha. Okay, back to the picture. Since baby P has a lot of awesome moms/grandmas/aunts in his life I wanted to whip up a cute little pic to send along with my cards. This pic was super easy, all I used was my DIY pennant banners, a white sheet and a smart phone (check out my post on other DIY holiday pictures here). For a more detailed step-by-step description check out the previously mentioned post, but I will give you a quick rundown of what I did below. I hope this inspires you to do your own little holiday photo with your little, I love taking advantage of this squishy age because lets be real, how long is he really going to let me torture him like this? haha Happy Mother’s Day to all my fellow mommies xoxo.

WHAT I USED:

  • White Sheet
  • Smart Phone or other camera
  • DIY Pennant Banners
  • “Phonto” free picture editing app (if you would like to add text to your photo)

HOW I DID IT:

  1. First, I set up my white sheet on a wall facing a window (so I had lots of natural light), by laying half the sheet on the floor and using tape to secure the other half against the wall.
  2. Next I hung my pennant banners, securing them with tape.
  3. I took a test shot using my smart phone to make sure that I was happy with the area captured in the picture as well as the lighting.

    pen15

    I simply secured the banners using clear tape

  4. I sat my squishy baby down and gave him a bouquet of fake flowers that we use as decor in the bathroom and snapped away until he started eating the flowers, haha.
  5. After I chose the picture I wanted to use the free “phonto” app to add the words “Happy Mother’s Day” to the pennant banners. This was extremely easy because the app will allow you to add as much text as you would like and manipulate the placement, tilt and color. Since the app automatically reverts back to the previously used font, size and color when adding multiple text to the same picture, it made it super simple for me to arrange the letters so it looked as if they were already on the pennants.
  6. Once I was finished adding text to the picture, I used the free Walgreen’s app to upload my photo and purchase 10 copies for under $1.00, using a 40% off coupon code (every time I am ordering photos I always google “walgreens photo coupon” and there is usually always one available). I love this app because your photos are usually ready within minutes for store pick-up and our Walgreen’s is just three miles from home!
pen7

Isn’t my squishy baby sweet? Unfortunately, the change in seasons has him a little under the weather so I could only snap a few pics before he started getting mad (and eating the fake flowers lol), but even though he’s not looking at the camera it’s still SUPER cute!

DIY Holiday Picture – Easter!

easter

Nothing makes me happier than my squishy baby P and since I feel like all the little thing has done since birth is grow, grow, grow, I try to take as many pictures of him as I can (and I am succeeding since my phone is currently at storage capacity lol). While I wish that I could get professional pictures taken of him for every holiday, my budget (and most people’s budgets) will not allow for this, so I have to improvise! Since I am big on sending cards for every holiday to friends and family, I love to stick a little picture of P in there to make it extra special (in this case EGGS-tra special lol). Now let me begin by saying, photography is not my forte unless you count being able to max out my phones storage space in under 3 months lol. I take all of my pictures using an iPhone camera and am yet to become proficient in Photoshop, so if this sounds like you, I am about to give you living proof that you can still whip up a cute little holiday photo for a few bucks in no time flat! When I first decided to do my own little baby-photo booth it was after I had seen a professional picture of a newborn on a cute little Valentine’s Day set and I’m no expert but from the looks of it, all it seemed to be was a baby on pillow, in front of a white background with some heart bunting, and I thought “hey, I can totally do this!”. I’ll share my Valentine’s Day and St. Patty’s Day pictures below as well. The best thing about this little DIY holiday picture is that it will probably cost you under $5.00 (or if it’s an Easter pic it will be FREE since you probably already have plastic eggs and a basket for the kiddos right?). So if you have a smart phone, a white sheet and access to a dollar store you’re good to go!

YOU WILL NEED:

  • Smartphone or other camera
  • White sheet or large piece of fabric (it doesn’t have to be white, but I feel like most of us have a white sheet lying around somewhere).
  • A room with a window.
  • Painter’s Tape (or any other kind of strong tape)
  • Props (get creative! I hit up my local Dollar Tree and pick up a few items that I think would work well, for Valentine’s Day I used the heart garland, St. Patty’s Day the little hat and for Easter the bunny ears, basket and eggs).
  • “Phonto” Free Picture editing App (if you want to add text to your picture)

HOW I DID IT: 

  1. Start by setting up your backdrop. Use a wall that is facing a window, this is a tip I got from a photography savvy friend, that way you’ll have lots of natural light for your photo. Take the sheet and tape it along the wall (I usually use painter’s tape so as not to damage the paint, but this time I didn’t have any on  hand so I just used shipping tape and the paint still survived haha) so that half of the sheet is against the wall and half is spread out along the floor below.
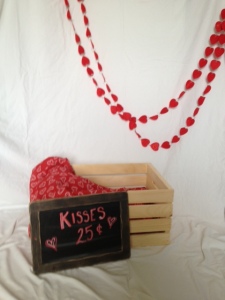
  2. Set up your props, then using your camera take a test picture to be sure that you like the way the photo looks and that you are able to capture your subject (child) and all of the props in the photo frame. These were my test pictures for Valentine’s Day and Easter (the Easter shot looks a little dark but I adjusted this using the enhance tool on my phone lol).                                                                                                                           east2 vday
  3. Set up your little cutie and snap your photos! FYI this works best with a happy child lol I shot for right after nap time.
  4. After you’re happy with your photos, use the “Phonto” App to add text if you wish. Next I will use the free Walgreen’s app to upload and print my photos for store pick up. Make sure you Google Walgreen’s coupons! For my Easter pics I was able to print 15 photos for $1.71 using a 40% off coupon!!!

TIPS: 

  • If you’re in need of a cute outfit for your babe, Walmart always has holiday themed outfits for between $3.00-4.00. The St. Patty’s Day onsie P is wearing below was $3.25.
  • This is a great idea for a kids holiday party or a play date! Just set it up and let your friends take pics!
  • If you want to add a little extra something pic up a half of a yard of holiday fabric, it’s always cheap and available at your local fabric store. I think the heart fabric I used in the Valentine’s Day pic cost about $1.00.


val2

The wooden crate I already had but was purchased at Walmart for $7.00 (it was good for this pic because P wasn’t sitting up yet). The chalkboard also had but was purchased on Amazon.

val

east


east1

stpat

This one I whipped up quick by simply draping the white sheet over a chair.