Pottery Barn Hack – DIY Jumbo Advent Calendar

phonto

I don’t know about you but I’m currently in the final phases of what I like to call the holiday season “hangover” or the period immediately following the holidays when BAM – regular routine resumes. While you’re expected to just jump back into the swing of things it’s a little hard when you’re inevitably left with a house full of decorations in need of taking down (which you feel like you just put up), tons of cleaning that you’ve been putting off, a to-do list longer than Santa’s naughty list and if you’re anything like me, lets face it, probably an actual hangover haha. Needless to say the holidays are one heck of  a whirlwind but after a weekend of cleaning and de-Christmas-ing my home I can finally say that the Schulze household is almost back to normal.

As I was sadly packing up the last of my holiday decor I realized that I was yet to share one of my favorite DIY holiday projects with you – my DIY advent calendar! I don’t know about you but my favorite projects tend to be the ones that save me the most coin, I mean we all love saving money but to me saving money and creating something great is the ultimate win-win. That is how I feel about this advent calendar, mostly because when that holiday edition of the PB catalogue comes to my door and I already know before opening it that I can’t justify buying a single thing in it, it is SO nice to once in a while use their over priced items as inspiration for something I can create for a fraction of the cost! The original cost of this advent calendar was $149.00 plus shipping – INSANE. That is almost two weeks worth of groceries for us lol. After all was said and done my total cost came in at around $25.00 and about an hour and a half of my time! Now bear in mind that your version need not be this big, I know it’s hard to find a place for a five foot seasonal wall hanging (haha) but I hope this project can inspire a little DIY advent calendar project of your own and get you looking forward to next holiday season as I always am! xoxo

phonto1

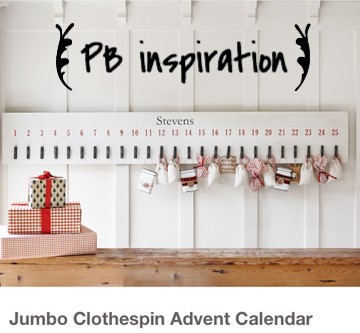
My inspiration for this project!


DIY Jumbo Advent Calendar

SUPPLIES

*Note: these are the supplies that I used to create this particular project, you can adapt your version as you see fit (smaller board, different font, colors, clothespin size etc.).

  • 1 large wooden board – Mine measured 5′ X 10″ (I think the total length was 6′ at time of purchase but I had it cut down). I used a pine board because I wanted it to be a little more durable and less likely to warp should I ever have to store it in the garage or in a basement depending on where we live at the time. It was a little more expensive (only by a few dollars, but still). If I wanted to save some extra coin I would have used the same wood that I chose for my Jumbo Outdoor Holiday Signs, which runs about $8-ish for a 4 foot piece.
  • 25 standard wooden clothespins – available pretty much anywhere, I believe even Dollar Tree carries them!
  • 25 small canvas bagshere is the link to where I purchased them via Amazon.
  • small letter/number stencils – available at any craft store but here is a link to a similar product on Amazon.
  • painters tape
  • x-acto knife
  • measuring tape
  • 2 large D-rings
  • industrial strength wood glue or multi-purpose glue – I use E-6000 for most of my projects that require a heavy duty adhesive and it always works well for me.
  • paint brushes
  • latex paint – I used black, red and white
  • red acrylic paint – for the canvas bags
  • red spray paint – for the clothespins

INSTRUCTIONS

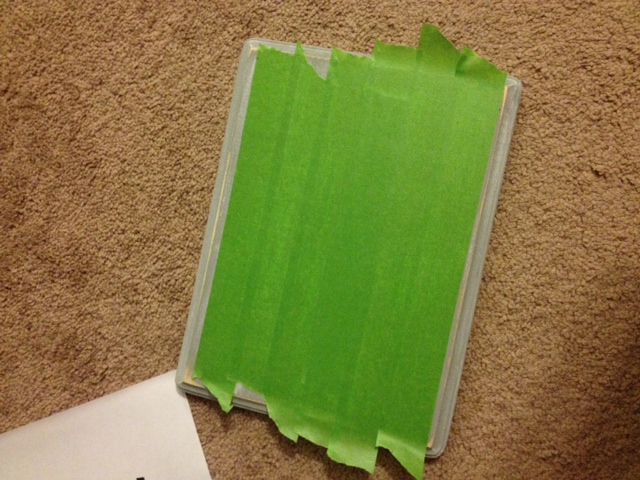
I began by sanding down my wooden board just to smooth it out a bid and then painting it with one coat of white latex paint. I wanted some of he wood grain to show through since I was going for the “rustic” look of my PB inspirational piece.

While the board was drying I spray painted my clothespins on all sides and left them  to dry. I also used my stencils and red acrylic paint to paint the numbers 1-25 on each of my small canvas baggies.
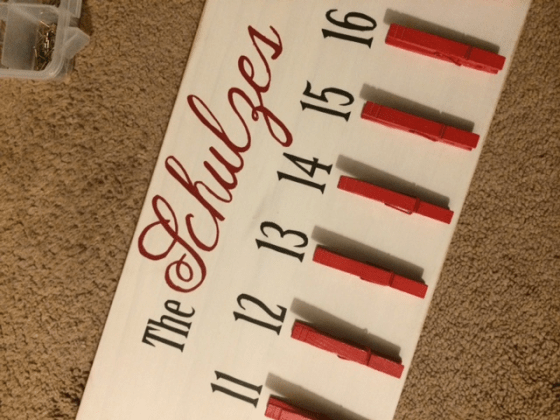
untitled1

finished product!


Once my large board had dried I distressed it a little using my electric sander (a hand sander would work also) then used my painters tape and x-acto knife method to paint “The Schulzes” and the numbers 1-25 onto the board. You can find a quick tutorial for this method here! Before painting the letters on I placed the clothespins on the board (without gluing them) just to get an idea of how I wanted everything spaced out. If you like the fonts I used for this project the script is “Austie Bost – rest of our lives” (available for free download via dafont.com) and I believe the standard font is just a variation of Times New Roman.


After your paint has dried take a moment to screw the d-rings into the back of the board (this is easier to do prior to attaching the clothespins so that the board can still lay flat).

Finally, use the E-6000 glue to attach the clothespins below each of the numbers on the board. The glue dries clear and pretty fast so you should be ready to attach your little baggies in no time!

123

There you have it! One of my favorite holiday projects to date. I especially love that the bags are large enough to hold small toys and even little wooden trains so that we could fill them with surprises other than candy 🙂


DIY Oversized Valentine’s Day Sign – A $9 Project!

xoxosign2

After posting about my DIY Valentine’s Day Wreath I felt super proud to have gotten a post up that actually preceded the holiday for which I created it, haha. So in keeping with that rhythm I’d like to share one more Valentine’s Day DIY project that I had made mention of in my wreath post – my DIY oversized Valentine’s Day “XOXO” sign, perfect to lean on your front porch and cause your neighbors to do a double take when driving by :). This project was actually inspired by DIY Oversized Holiday Sign that I displayed throughout the holidays (I will do a separate post about that soon along with the rest of my DIY Christmas décor). As I was reluctantly stripping my stoop of all of it’s holiday awesomeness I realized that since my “NOEL” sign was so easy to create (less than $9!) I could just create a similar one for Valentine’s Day! Before I get to the tutorial I am going to admit a serious “mom-brain” moment and let you know that you can actually make two of these signs for the price of one by simply making your sign reversible, something I myself didn’t realize until my friend commented on my picture and said “I would love to have one of those with something for Christmas on one side and Valentine’s Day on the other” – DUH, Natasha! So had my brain actually been functioning on the day I created this I would have simply turned my “NOEL” sign over and painted the “XOXO” on the back. However, no harm done as I can just do my St. Patty’s day sign on the back of my Valentine’s Day one, that’s right, I love this project so much that I’m pretty sure I’ll be making one for each and every holiday! Hope this inspires you to create a simple project that makes a BIG statement :).

val2

For my throwback-Thursday I’ll share this adorable Valentine’s Day picture of my little Baby P, at the time just four months old, my how time flies! Click on this picture for the link to my post about all of my little DIY Holiday Photos, if you love squishy babies you’re in for a treat! 🙂


SUPPLIES

  • 1 4ft X 1 ft board – the cheap “white board” stuff is fine, that’s how I got away with this being a $9 project, since these boards already come in this size there is no need to have it cut (although if you’d like it smaller go ahead and have them cut it down to size for you right there in the store). I purchased my board at Lowes for $8.97 less my military discount. Try to pick a piece that doesn’t have any large cracks as some of them do.
  • latex paint – any color you wish! For the background of my board I used “March Breeze” (aka white lol) and for the letters I used “Front Door Red” and “Dusty Garnet” all by Valspar. These colors I already had on hand since I tend to collect those little sample sized paints available at Lowes, please check out this post to read more about those.
  • black foam brushes
  • electric sander or sanding blocks – for distressing, if you do not plan to distress and your board is in pretty good shape you could probably do without these.
  • painter’s tape (preferably wide)
  • x-acto knife
  • printer
  • Minwax Finishing Paste – any topcoat will do, I used this paste wax because I already had it on hand and it doesn’t require extensive dry time. I used “special dark” to give the sign a more vintage/rustic look.

INSTRUCTIONS

Step 1: Begin by sanding down your board lightly just to soften up any rough or little jagged areas. Next paint your board whatever background color you have chosen. Since I was going for a distressed/white-washed look I only did one thin coat but you can do as many as you want. NOTE: Since my sign wasn’t reversible this time I did not bother to paint the back if you are planning to do a second holiday or saying on the back you can save time by painting the back now, once your front has dried.

Step 2: Next I distressed my board on the edges and a little along the front using my electric sander. This could also be done by hand using sanding blocks or regular sand paper.

Step 3: Using whatever word processor you have at your disposal, create your words. Sometimes I find it is easiest to get the biggest letters by Googling, for example, “letter X” and then copying and pasting the stock image onto your blank document, this way you can maximize your margins and adjust the picture of the letter to be as big as possible, whereas when simply typing the letter x you may not get it to be as big. Make sense? The hearts I just created using the “insert shape” function on your word toolbar, and inserting them right into the middle of the O. Once you are happy with the size of your letters just print out your document. NOTE: this probably goes without saying but if you’re anything like me your brain is occasionally scooped out and the obvious may be temporarily lost on you, but since “XOXO” contains two of each character you need only create one X and one O document and print each twice. This is great because you can be sure that they’re even!

Since I didn't take step-by-step photos of the "XOXO" board here is one from this step when creating my "NOEL" board at Christmas time.

Since I didn’t take step-by-step photos of the “XOXO” board here is one from this step when creating my “NOEL” board at Christmas time.

Step 4: Now cover your board with painter’s tape (this is where it helps to have the wide painter’s tape). Next, arrange your letters on your board, if you’re super OCD you can use a measuring tape or ruler (even a level if you’re super nutty) or you can just wing it and place the letters so that they look even to you and use a bit of tape to hold them in place. Then using your x-acto knife carefully (no craft-induced ER trips please lol) cut around your letters and hearts pressing firmly enough to cut through both the paper and tape, once you have finished (or as you go along, whatever works for you) peel off the letters and you will be left with a stencil of your letters and hearts (Os should be filled in with the exception of the heart portion). *For more on this method check out my post on my first DIY Hand-Painted Sign.

Step 5: Once your little makeshift stencil  is ready to go you can now paint! Using your foam brush apply an even coat of paint to each letter in the colors of your choosing. Allow about half an hour in between coats, juts enough for any wet areas to dry. Since your background is white you should not need more than 2-3 coats. NOTE: If you’re painting a light color over a dark background I would suggest hitting your letters with a coat of cover stain/bonding primer in either brush or spray form (see this link for a product recommendation) then applying your color on top, I will touch more on this when I post about my DIY Oversized Holiday Sign).

Step 6: Allow your piece to dry about 8 hours or overnight. Once it is dry peel off the rest of your painters tape to reveal your beautiful hand-painted letters! At this point you may want to give the letter a very light sanding just to remove any thick areas where the paint may have built up between the tape and the edge of the letters but if you’re happy with how it looks you can just move onto the final step – waxing your piece.

just before the waxing step!

just before the waxing step!

Step 7: Using a lint free cloth or rag apply a thin layer of your paste wax and allow to sit for the recommended amount of time (15 mins I think?) then return with a clean rag and buff your piece. If you are using a liquid or spray topcoat just follow the directions on the package and wait the appropriate amount of times between coats and be sure to allow enough dry-time before displaying your piece out doors. Personally I am partial to the wax (a) because I already had it on hand and (b) once you buff it, it is ready for display, no dry time!

Squishy baby photo-bombing my Valentine's Day stoop photo :)

Squishy baby photo-bombing my Valentine’s Day stoop photo 🙂

Like my wreath? Check out this post to find out how you can easily make one yourself!


DIY Hand Painted Sign

handsign7

Please forgive that my past few posts are all related to the laundry room/command center that I am yet to post about (I promise to do so soon!), but it just so happens that a lot of my DIY projects as of late have been part of that particular little room makeover. This little sign I made as decor for our little family command center, emphasis on “little” since I didn’t have much space to work with, this cutsie little sign was the perfect thing to jazz it up. Another reason I am so excited about this little sign is because it was my first attempt at a hand painted sign using this particular method (printing out the wording and using painters tape cut with an X-acto knife to create a stencil). Additionally this project was my guinea pig for what will be two larger painted decorative signs that I am now planning to get to work on in the next few weeks given that this one came out so well! So if you’re like me and love the idea of DIYing something that fetches a fortune on Etsy (like hand painted signs!), give this one a try, all you need is wood, some painter’s tape and a steady hand. I also want to add that my inspiration for this project was both my glass etchings (see tutorial here which is generally the same idea only with glass and etching cream as opposed to wood and paint) and my friend Courtney of Wildly Domestic’s tutorial for her growth chart ruler in which she uses this same technique for stenciling and painting the ruler! If you’re skeptical about your ability to pull this one off give it a try anyway by practicing on some scrap wood, just be careful with that X-acto knife, I wouldn’t want my project to be the reason for any DIY-induced ER trips :-P.

DIY HAND PAINTED SIGN

WHAT I USED:

  • 1 small wooden plaque – normally I would just use scrap wood or cheap lumber from Lowes, however, my laziness got the best of me when I saw this little pre-cut plaque at Michael’s for only $2.99 that fit the space perfectly and already had a decorative edge.
  • chalk paint – you need not use chalk paint, that is just what I had left over from my previous projects and the color was right for the space. Any latex or even acrylic paint will do. Check out my post on using homemade chalk paint here. For this particular piece I used “Stone Mason Gray” by Valspar, read about my love for sample size paints here!
  • white paint – for distressing the wood. If you do not plan to dry-brush the wood for a distressed look you can skip the white paint altogether. I just used latex trim paint we had lying around from our work on the Honey Tree house.
  • acrylic paint – I used acrylic paint for the wording but latex paint will do as well if you have some lying around in your desired wording color, it will just take a little longer to dry than if you were to use acrylic.
  • sanding blocks or sandpaper
  • foam brushes, for painting
  • regular paint brush, for dry-brushing
  • small paintbrush, for wording
  • clear topcoat – I used this Krylon Matte Spray Finish purchased at Walmart for about $3.00, since I had it leftover from my DIY Painted Plastic Planters (post coming soon!)
  • painter’s tape
  • scotch tape (or any clear tape)
  • X-acto knife

INSTRUCTIONS:

Step 1: I began by preparing and painting my piece of wood. For a more detailed description of how I dry-brushed and distressed the wood check out my DIY Rustic Picture Display to see the step-by-step instructions on a larger piece. For the purposes of this post I’ll give a more concise version  – first I sanded down the wood surface quickly so as to remove any roughness or scratches, then I painted the wood piece with a coat of chalk paint (you may need more than one depending on your paint color, I only used one). Once the coat of chalk paint had dried, I dry-brushed the surface using a regular 2″ paint brush (see above mentioned post for detailed instructions) and once that had dried I sanded down the edges and a bit on the surface to give the wood a distressed look and wiped it clean with a dry rag.

handsign1 handsign

Step 2: Once my wood was prepped, I used painter’s tape to cover the surface of my wood. Then I simply created a document in Word of my wording in my chosen font and printed it out. I cut each of the words out individually and used scotch tape (any clear tape will do) to secure them onto the painter’s tape by covering the entire surface of the words with clear scotch tape.

handsign2handsign3

Step 3: I used an X-acto knife to carefully cut out each of the words. This is pretty tedious but goes much faster if you have some SVU re-runs on in the background :).

handsign4

Step 4: Once you’ve cut out all of your words use your smaller paint brush to paint the wording onto wood inside of your makeshift stencil. As soon as you have finished painting all of your words carefully remove the painter’s tape from the wood (I gave mine a few minutes to dry before removing the paint but didn’t wait too long because I didn’t want any of the edges to glob up against the painter’s tape and dry in weird pattern).

Step 5: As soon as your piece has dried apply your top coat and you are finished! If you like the way your piece looks sans topcoat this is fine too since your sign will most likely be mounted on a wall indoors, there isn’t much need for added protection to the wood.

handsign6