
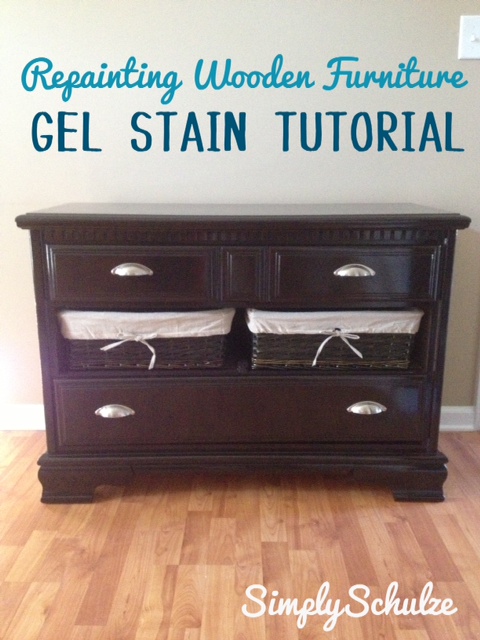
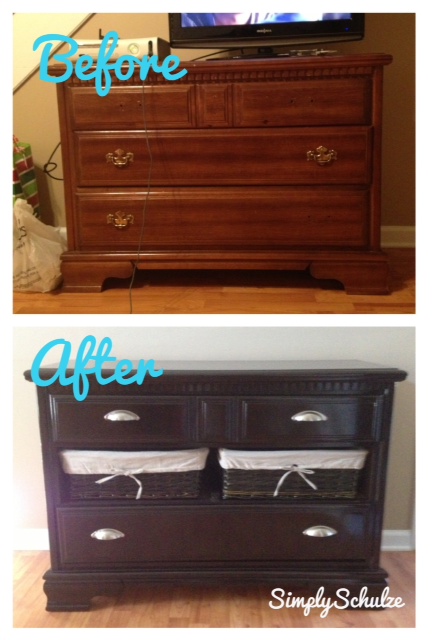
This is one of my favorite projects, mostly because it was my first one! For a while we used it as a TV stand and once we found out we had a tiny babe on the way we decided to use it for the nursery. I love the way the baskets give it a great look and are still super functional. I located the dresser on Craigslist and purchased it for $45, it was solid wood and dovetailed (a sign that it was handmade), the guy was about 20 and he said that he had been in possession of it since he was like 5, pretty cool huh? This thing will probably make it through a few more generations. I replaced the center drawer with two baskets from Michael’s (originally $12.99 ea. but on sale for 60% off) and added four new drawer pulls for $2.37 ea. The grand total of this project was right around $60.00!!! I decided to use the java gel stain by General Finishes (I talk about it here in my favorite products post), since I knew I wanted the piece to be brown and was to intimidated by regular stain but didn’t necessarily want it to be just flat brown as it would be with a simple paint job. This was my first project so it definitely speaks to how easy this product was to use!
Here are the steps and products I used for this particular re-do (unfortunately I do not have step by step pics, I will do my best to explain in detail):
YOU WILL NEED:
- General Finishes Java Gel Stain (or other gel stain of your choice)
- A Man’s Sock
- Wood Filler (if hole-patching is needed)
- Black Foam Brushes
- Drop Cloth
- Rag
- Sanding Blocks or Sandpaper 100-150 grit
- Top Coat (gel or polyacrylic)
HERE’S HOW I DID IT:
- First, I removed all hardware, to include the pulls and an ugly metal emblem that was on the font.
- Remove the drawers. If your piece of furniture is super dirty, wipe it down with a little soapy water using a rag. This is not a super important step, I only did it to one piece that had some kind of sticky residue on it. You’ll find that sanding will remove most dirt anyway.
- Next, begin sanding (I always do steps 3 & 4 outdoors to keep my indoor workspace clean). I don’t go nuts with sanding, my goal is simply to remove a good amount of whatever varnish or clear coat is original to the piece, I don’t try very hard to get it down to the wood grain, I find this is only really necessary when re-staining a piece. I sand for about a minute on each surface, paying attention to the edges and grooves. This particular piece had a weird design along the top of the first drawer, I didn’t bother sanding inside every groove since they wouldn’t be exposed to getting hit or bumped into once the project was complete.
- Once you have finished sanding, take a damp rag and wipe down the whole exterior of the dresser and drawers to remove any sanding dust. I also take the time to vacuum or dust out the insides of the drawers since you don’t want any dust sticking to the paint once you being the painting process. After the wet wipe-down is complete dry the piece off with a dry cloth and you’re ready to begin – YAY!
- I set up my painting area so I have plenty of room to move around and be sure that all of my work space is covered by a drop cloth of some kind. I dip my man’s sock into the stain dabbing off any excess and begin wiping it onto the furniture in long even strokes (you could also use a foam brush for this step), when painting furniture always paint in the direction of the original wood grain, not against.
- After you have finished putting the first coat on all of the pieces you are finished for the day. At this stage it’s not going to look good at all, don’t worry, it will get there!!! I allow 12-24 hours between coats, so I will generally return to the piece the same time the next day to apply the second coat, this makes it a great after work project or naptime project for all you fellow mamas out there!
- On this particular piece I applied four coats (I think lol it may have been three, if it looks good after three than you’re good). I must note that I do not sand in between coats when painting or when applying my top coat, many tutorials (and the outside of the top coat can lol) will tell you to do this, I just found that it was an extra step I did not need but feel free to add it if you want, it won’t hurt! After your final coat is applied and dry you are ready to start your top coat. Take a black foam brush and begin applying the clear coat in an even layer using even brush strokes, be mindful not to leave behind any bubbles (sometimes the polyacrylic will do this, just go over the area with your brush) and not to allow the clear coat to pool at the edges of the piece. I generally apply three top coats, allowing 12-24 hours dry time in between coats.
- The final step is replacing the hardware. For this particular piece, I purchased new pulls (here is a link to the exact ones I used, available at Lowes), but if the original pulls are in good shape simply clean and reuse them or update them with some spray paint (I use a Rustoleum satin finish spray paint when repainting my pulls).
- DO YOUR HAPPY DANCE, YOU’RE DONE!!! Revel in the glory of your awesomeness and be sure to tell everyone I MADE THIS!!!

Pingback: Baby Rocking Chair Re-Do – My first re-upholstery project! | simplyschulze