My obsession with repainting furniture was born when we moved into our new home. Trying to furnish a large house on a small budget was presenting us with quite a task, so I decided to get creative. After experiencing success using gel stain on the dresser I repurposed (see my tutorial here), I decided to redo two chests for our bedroom (since our dresser and all the closets in our home still weren’t enough to house all of my clothes lol). I located one at a thrift store for $35.00 and another on Craigslist for only $15.00!!! Since both of the chests were going to be used in our bedroom, I painted them black to match our bedroom furniture, not too exciting in the creativity department but they look great in the space!
My next wooden redo (and the mother of all projects) was a super long dresser that I repurposed as an entertainment stand/center for our living room. This is probably my favorite redo yet. Given what it looked like to begin with this came out amazing and I am so proud of it! I spent quite some time looking for a piece that would work as our living room entertainment center, everything I was finding was too small and the ones that did fit my size requirement were too pricey. I finally located a long ornate looking dresser at one of our local thrift shops and knew it would be perfect, especially for the price – it was only $85.00! Yet again, I am sad to say that I do not have step-by-step pictures of these projects but I will do my best to explain in detail, check out my pics below for before and after images of all three projects. Here’s how I did it:
YOU WILL NEED:
- Sanding blocks or sandpaper (100-150 grit)
- Latex Paint (I use 8oz sample paints available at your local home improvement store, I talk about them here). *Note: when possible purchase a flat latex paint (it will adhere to the furniture best and resist chipping), that is what I used on the black dressers. If you are purchasing sample size paints they are only available in satin finish which I’ve found to work just fine.
- Wood Filler (if you need to patch any holes or cracks)
- Clear Top Coat (gel or polyacrylic)
- Black foam brushes
- Drop Cloth
- Rags
HOW I DID IT:
- First, I removed all hardware, to include the pulls and any metal pieces that you will either discard or replace after the fact.
- Remove the drawers. If your piece of furniture is super dirty, wipe it down with a little soapy water using a rag. This is not a super important step, I only did it to one piece that had some kind of sticky residue on it. You’ll find that sanding will remove most dirt anyway.
- Next, begin sanding (I always do steps 3 & 4 outdoors to keep my indoor workspace clean). I don’t go nuts with sanding, my goal is simply to remove a good amount of whatever varnish or clear coat is original to the piece, I don’t try very hard to get it down to the wood grain, I find this is only really necessary when re-staining a piece. I sand for about a minute on each surface, paying attention to the edges and grooves. My repurposed entertainment center had some very ornate designs on the front, I didn’t bother sanding inside every groove since they wouldn’t be exposed to getting hit or bumped into once the project was complete.
- Once you have finished sanding, take a damp rag and wipe down the whole exterior of the dresser and drawers to remove any sanding dust. I also take the time to vacuum or dust out the insides of the drawers since you don’t want any dust sticking to the paint once you being the painting process. After the wet wipe-down is complete dry the piece off with a dry cloth and you’re ready to begin – YAY!
- I set up my painting area so I have plenty of room to move around and be sure that all of my work space is covered by a drop cloth of some kind. Begin your first coat by using a foam brush to apply an even coat of paint, when painting furniture always paint in the direction of the original wood grain, not against. Since you will be allowing 12-24 hours dry time in between coats, feel free to wash and reuse your foam brush.
- After you have finished putting the first coat on all of the pieces you are finished for the day. At this stage it’s not going to look good at all, don’t worry, it will get there!!! If you are using a flat paint it is going to look very streaky and uneven, this is fine, any places where the light hits the paint weird will be covered by the top coat. I allow 12-24 hours between coats, so I will generally return to the piece the same time the next day to apply the second coat, this makes it a great after work project or naptime project for all you fellow mamas out there!
- The amount of coats you will require for each piece will depend on the color of your paint choice. For instance, the black dressers required only two coats, where as the long dresser required three coats. I must note that I do not sand in between coats when painting or when applying my top coat, many tutorials (and the outside of the top coat can lol) will tell you to do this, I just found that it was an extra step I did not need but feel free to add it if you want, it won’t hurt! After your final coat is applied and dry you are ready to start your top coat. Take a black foam brush and begin applying the clear coat in an even layer using even brush strokes, be mindful not to leave behind any bubbles (sometimes the polyacrylic will do this, just go over the area with your brush) and not to allow the clear coat to pool at the edges of the piece. I generally apply three top coats, allowing 12-24 hours dry time in between coats. *Note: For wooden furniture I am partial to the gel top coat, I have found it to be super durable and easily cleaned, but if you are not comfortable using oil based products then a polyacrylic is a good substitute.
- The final step is replacing the hardware. For the two chests, I purchased new pulls (here is a link to the exact ones I used, available at Lowes), I got a little obsessed with the farmhouse pulls lol. If the original pulls are in good shape, which was the case for my repurposed entertainment center, simply clean and reuse them or update them with some spray paint (I use a black Rustoleum satin finish spray paint when repainting my pulls).
- You’re finished! Do a touchdown dance and get ready to blow peoples minds when they ask you if you got your piece at Pottery Barn (which has happened to me!) and you tell them “no, bish, I MADE THIS!!!” 🙂
BEFORE & AFTERS:

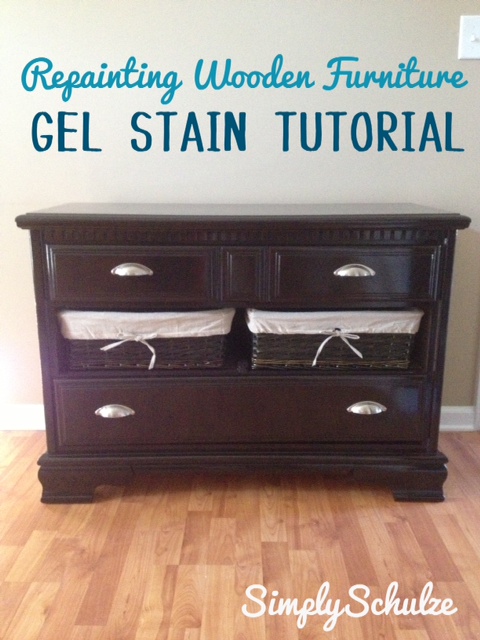
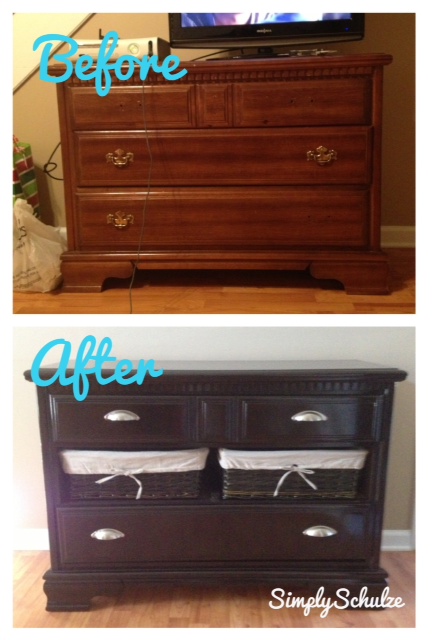
This is one of the chests that I redid for our bedroom (sorry the before picture is so crappy, I had already removed the hardware and sanded the piece before I remembered to take one). I found this one on Craigslist for $15.00 which was amazing because it was in great shape! I half thought it was a ploy that would lure me to my death, but for a $15.00 dresser I was going to take my chances haha jk. I used flat black paint (any brand will do, black is usually sold pre-mixed in the paint aisle but you can also have a sample sized tinted to black if you don’t want to purchase a pint) and the General Finishes Gel Top Coat. Follow the link I mentioned in the tutorial for the pulls I used, I purchased them on sale but according to Lowes website they will run you about $3.30 each, still not bad price-wise but not necessarily a bargain so try for something cheaper or repaint the existing hardware if you’re working with a tight budget. The baskets I purchased at Michael’s on sale for about $4.00 each. This piece has held up extremely well, I have moved it, bumped it and put drinks without coasters on it and it has proved super durable and easy to clean. COST: ~$35.00
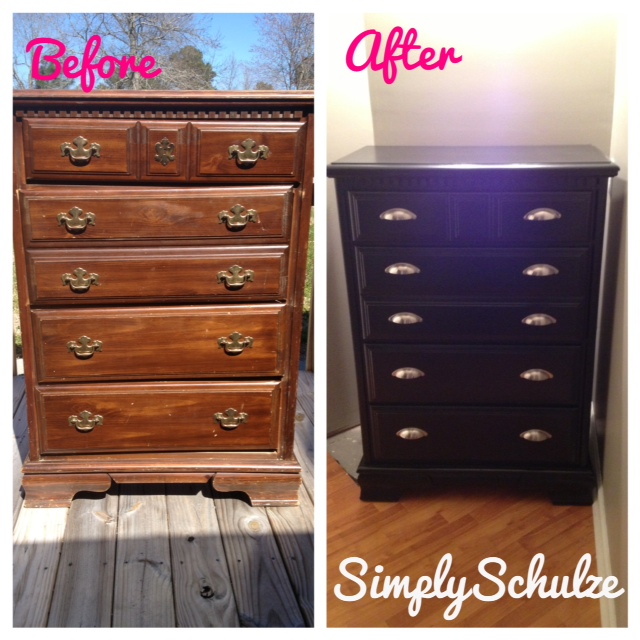
After redoing the $15.00 chest mentioned above, I decided I needed one more small dresser to contain the rest of my shirt overflow (yes, this dresser contains only shirts and not even all of them lol). I was excited to find this dresser for $35.00 at a local thrift store, albeit a little bummed that I wasn’t going to be getting too creative with it since I wanted it to match the other chest in our bedroom. Since my husband said I was getting a little “basket crazy” lol I decided to leave all the drawers in tact on this project. As you can see I just removed the weird metal emblem (if you encounter one of these on your projects just wedge a flathead screw driver underneath and it should pop off fairly easily, then just patch the holes with wood filler) and replaced the pulls. Unfortunately I spend about $25.00 on pulls for this dresser but it was all made worth it when the realtor that was touring our home pointed to the dresser and dead serious said “Pottery Barn right? I think I saw that there.” I was super flattered and he couldn’t believe that I had made it! Like the piece above, I used a flat black paint and General Finishes Clear Gel Stain. This piece has held up great as well. COST: ~$60.00


This piece is my favorite redo so far! It is also my Everest lol This beast is over 70 inches long, weighs as much as a car (at least that’s what it feels like lol) and has nine drawers (the same amount of months pregnant I was when I took on this project lol), needless to say this one was quite the project but my hubby helped me a ton so he deserves a lot of the credit :). After we decided to move our TV stand into the nursery I was on the hunt for a new “entertainment center” and by that I mean a dresser whose drawers could house the Xbox, cable modem, DVD player and all the wires. The issue I was faced with was the fact that for the length I was looking for (something that could eventually accommodate a 55″ TV, not the dinky one pictured above), I was only finding dressers that cost upwards of $200.00. After about a month of trolling the local thrift stores and Craigslist postings I came across this gem for $85.00, I was super happy that J trusted my vision on this one because it looked rough lol. As I mentioned before it weighs about as much as a house, it took three guys to load it into my car (which it was too long for, we had to drive with it hanging out the back, haha), and since I couldn’t participate in any of the lifting when we got home my hubby had to just shove it out the back of the car and hope that it didn’t shatter into a million pieces (it didn’t lol). On this particular piece I used “Borough” by Valspar and General Finishes Gel Top Coat (which was a total bitch because in fear of my child coming out with five arms, every time I put on a coat I would have to leave the house for hours because of the fumes lol). If you notice from the pictures, we repainted the original hardware using a Rustoleum black satin spray paint, they are still in good shape and haven’t faded or chipped at all. Lastly, my hubby drilled holes in the back so that all the wires could connect to the electronics inside the drawers while remaining out of sight. This piece has held up great, since P’s arrival I am constantly bumping it with toys and rockers and what have you and it is yet to chip! We feel bad for the movers that will have to transport this beast to our next home, but we love it!!! I almost forgot to mention, this piece came with two hideous mirrors that the thrift store basically forced us to take even though we told them we didn’t want them, check out my easy chalkboard tutorial to see how I turned them into a neat DIY project! COST: ~$95.00