Updating Our Guest Bathroom

upbath13

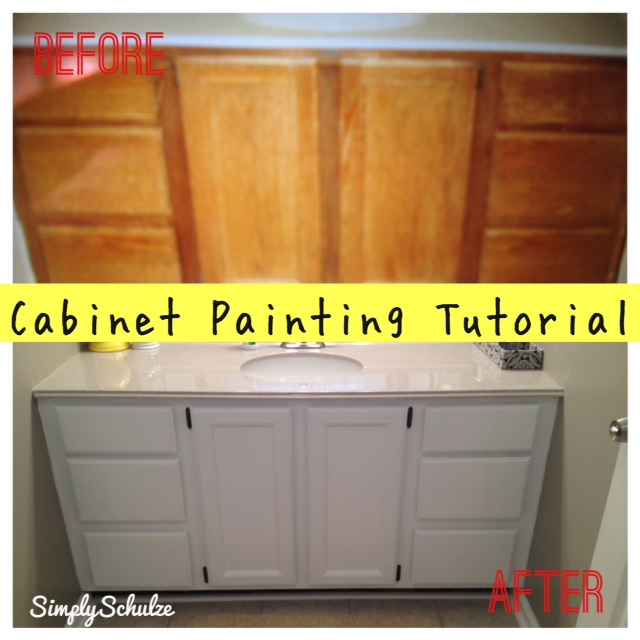
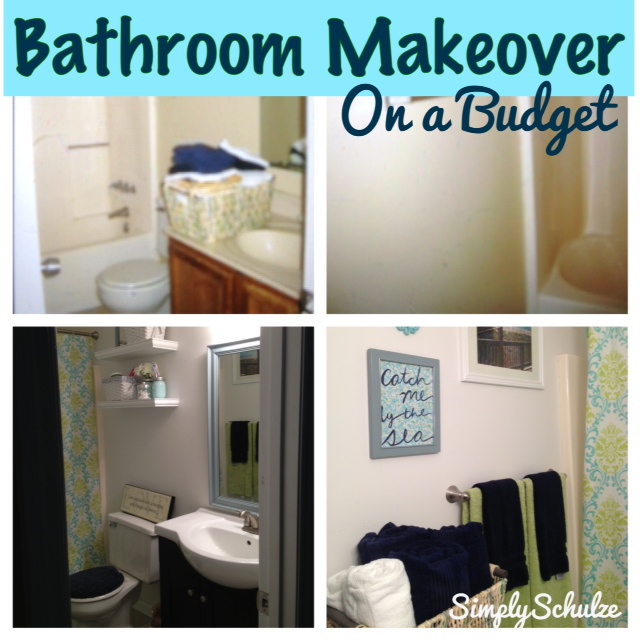
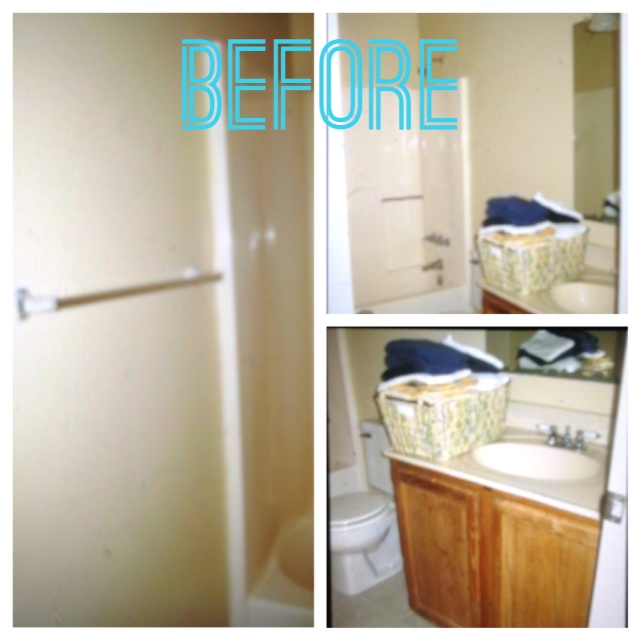
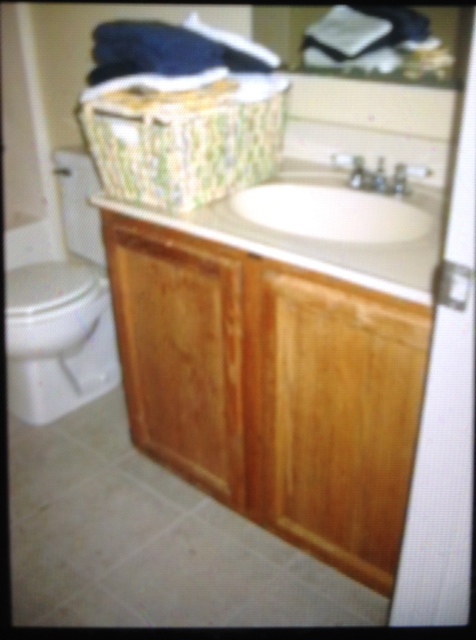
I’d like to share our guest bathroom update, which was one of the first projects I tackled upon moving into our home. I know I’ve mentioned in my other house posts that I like to stretch our budget by simply updating our rooms with DIY decor and fresh paint, as opposed to doing a complete reno. The upstairs bathroom was in decent shape, the tub surround, toilet and light fixtures were good, and although we decided to replace it, the cabinet portion of the vanity was acceptable as well, so I regret not simply replacing it and purchasing a new vanity top (don’t make the same mistake we did, read my tutorial on repainting cabinets and get to it!). I decided to go with a beachy-chic feel for the bathroom decor, normally I’m into a little more monochromatic design with pops of color because I feel it is a little more modern, but I figured for the guest bathroom it wouldn’t hurt to have a little fun with it, after all we had just moved to the coastal Carolinas! The majority of the bathroom update was simply adding decor, with the only hard part being the replacing of the bathroom vanity (don’t get me wrong, I love the way it looks but it was a major pain in the arse).

Before I get to the specifics of the bathroom update, let me help you to hopefully avoid one of our giant missteps in the project by giving you a much simpler DIY solution. If you are considering replacing a vanity completely, before you tear out the existing one I urge you to first take a lay of the land and ask yourself – is there physical damage, missing or rotten pieces of wood? If so, replacing the piece may be your only option, however, if you are just dealing with something that is ugly but functional read my post on refinishing cabinets, mine were as ugly as they come, a real 1980s builder-grade gem lol. If you are still not convinced, let me tell you this – replacing a vanity, especially one that is original to the home, will involve replacing parts of the floor beneath it before installing your new vanity, and I can assume that since you are reading DIY posts on home updates you are not in fact a professional builder, haha. Once you rip that old vanity out there’s no going back, you’ll be stuck as we were, having to sand and paint the walls (which will be damaged by your removal of the vanity), install new subfloor (oh, and the fact that we owned only a hack saw and drill as far as power tools went made it even more fun – NOT lol), then lay new tiles and grout before you can even THINK about putting in that cute new vanity that has been sitting in your garage for the weeks it took you to prepare the space for it. Still sound like a good idea? If you are up for a challenge, by all means, go nuts but if you are like me and would rather spend your weekends at the beach instead of on your hands and knees grouting a bathroom floor when all you wanted was a new vanity, then I plead with you to go the repainting route haha. That being said, our bathroom did come out super cute and if you do decide to replace your vanity you can still DIY it (if you have any questions about replacing the floor tiles leave a comment, we had no idea what we were doing and it still came out great). Now for the specifics, since this isn’t a tutorial I’ll just explain the update and give sources for all of my decor finds.
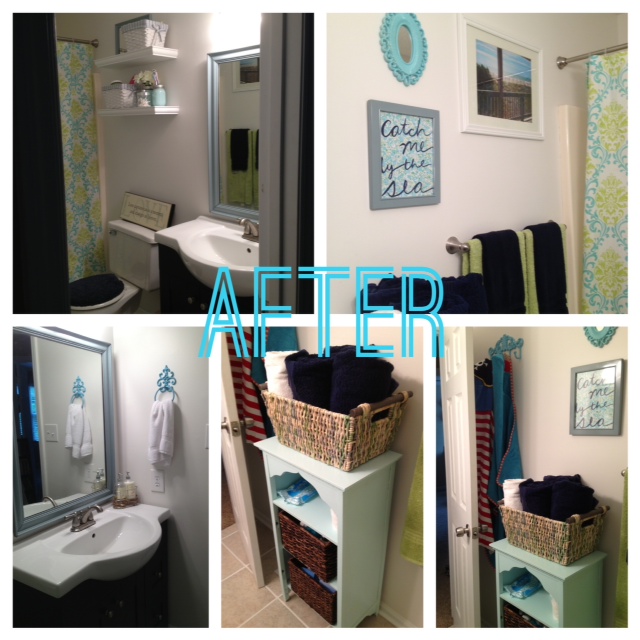
upbath9upbath12

WHAT WE DID: 

  • Removed the vanity, replaced the floor tiles around it and installed a new sink/vanity combination. As I mentioned above, I do wish we had simply repainted the vanity in retrospect, however, the smaller vanity open up the bathroom a great deal and made the space seem bigger.
  • Painted the walls.
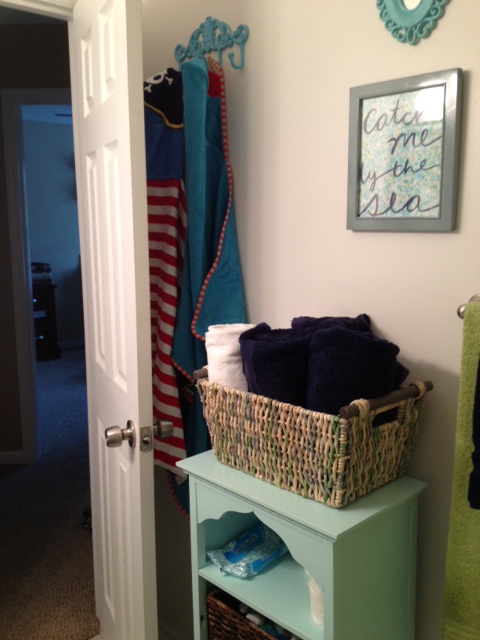
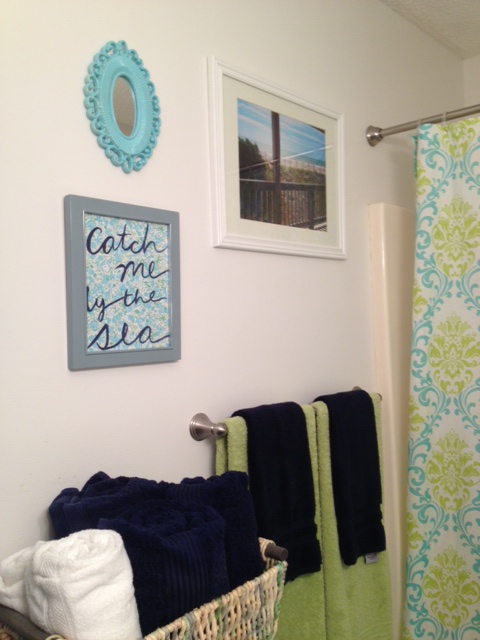
  • Removed the vanity mirror and replaced it with a hanging mirror.
  • Installed two floating shelves above the toilet.
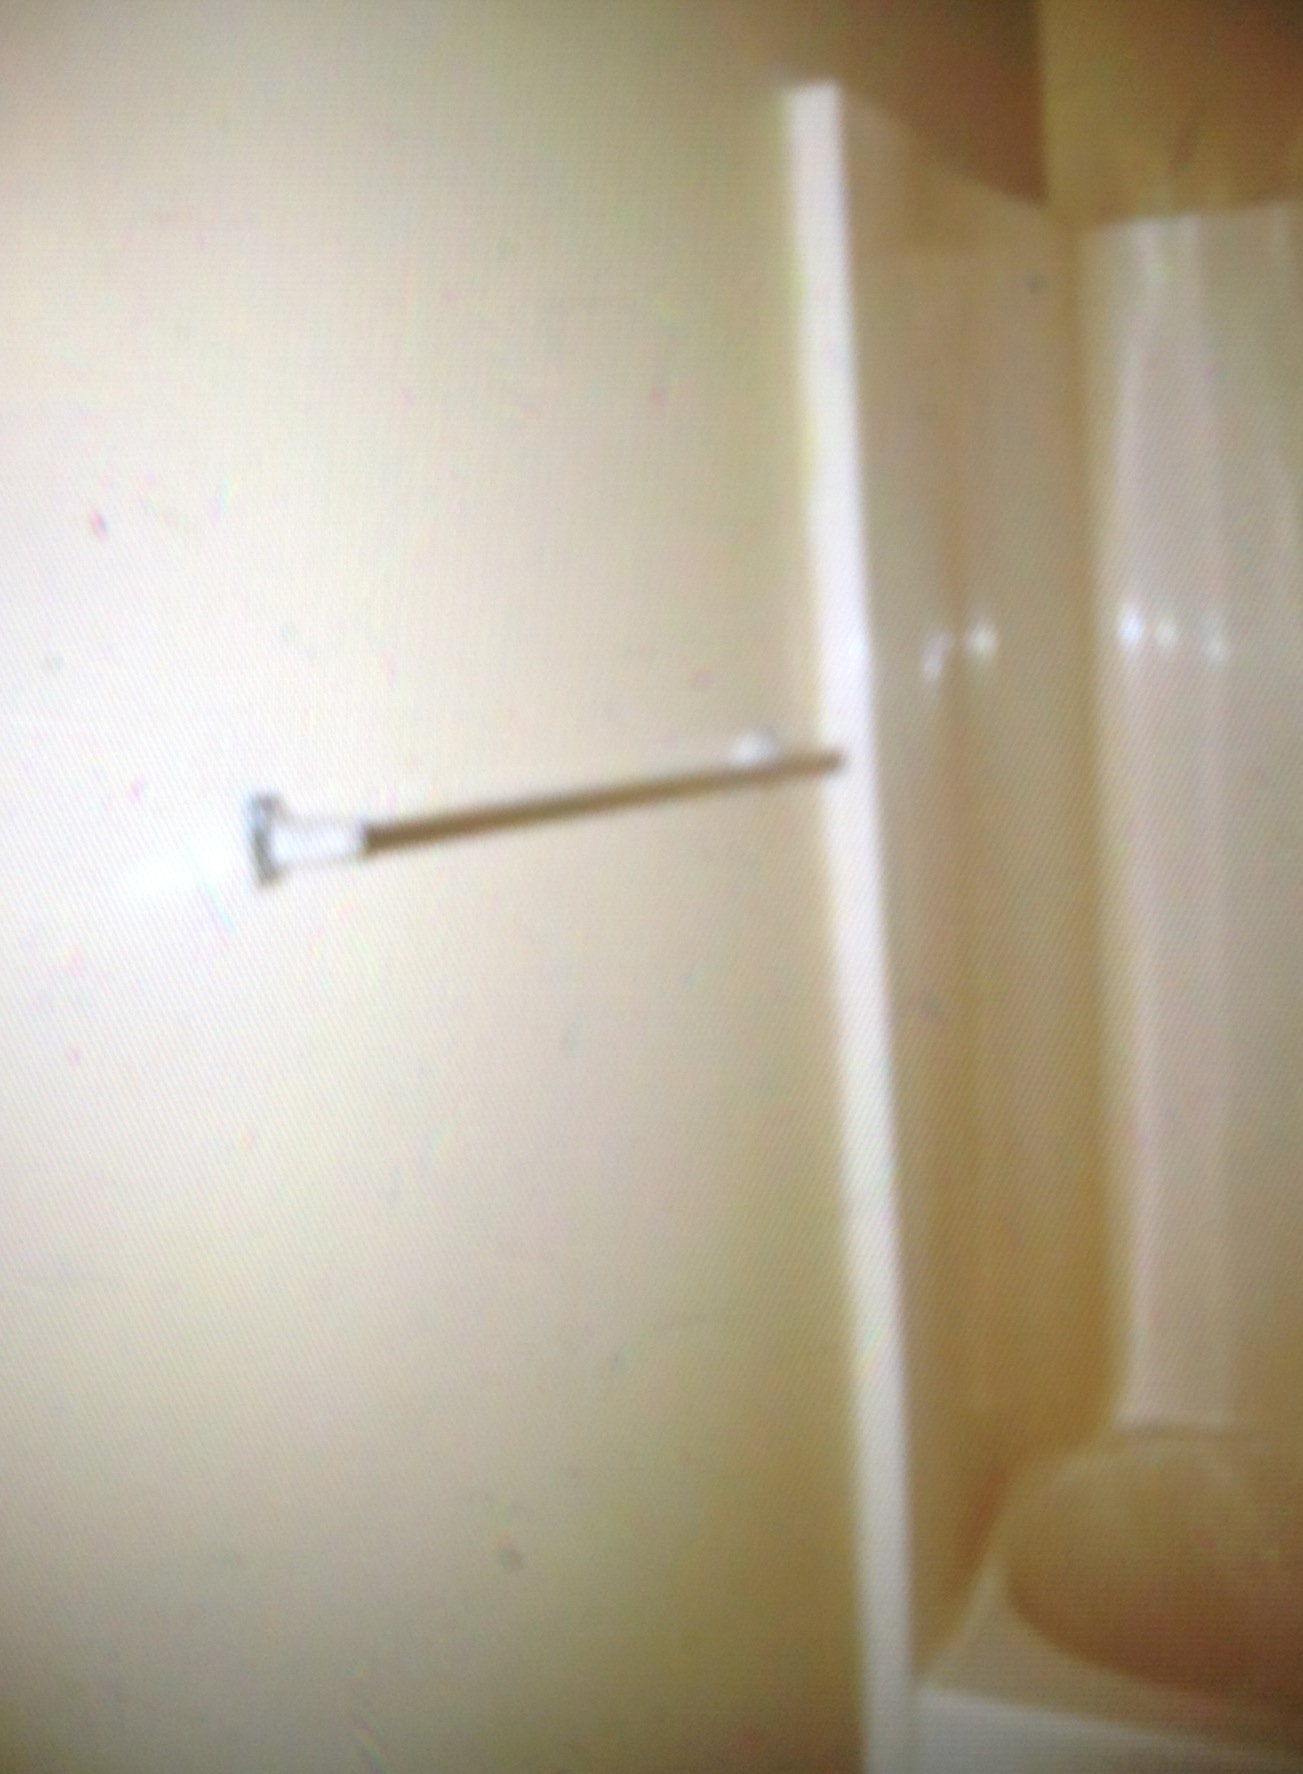
  • Replaced the towel bar.
  • Installed a hand towel ring.
  • Installed  a three-hook rack for hanging towels.
  • DIYed a free-standing small linen storage unit.
  • Hung pictures.

SOURCES:

  • Vanity  // Purchased at Lowes, available here for $269.00. NOTE: If you don’t care about having extra drawers they have another similar option for $189.00.
  • Floating Shelves // Purchased at Home Depot, available here for $28.80 each. They are also available at Target, but I believe H.D. is still cheaper.
  • Free-Standing Storage Unit // Thrift Store find. After project costs, the item comes in at around $29.00. See my post here on painting laminate furniture to see more about this particular piece.
  • Wall Paint // Color is “Woodlawn Bedroom” by Valspar.
  • Vanity Mirror // Thrift Store find. Purchased for $10.00 and hit it with a coat of gray spray paint.
  • Towel Bar // Purchased at Lowes, Moen Brand Spot Resistant Brushed Nickel 24″ Towel Bar, available here for $19.98. We had a Lowes credit or else we would have hit up Walmart for this item to save a few bucks.
  • Three Hook Towel Rack // Purchased from “TheShabbyShak” via Etsy for $23.00. This shop has lots of great shabby chic decor in a huge variety of colors and finishes. I chose the aqua in keeping with my beach theme.
  • Towel Ring // Purchased from “VeritasInspired” via Etsy for $22.99.
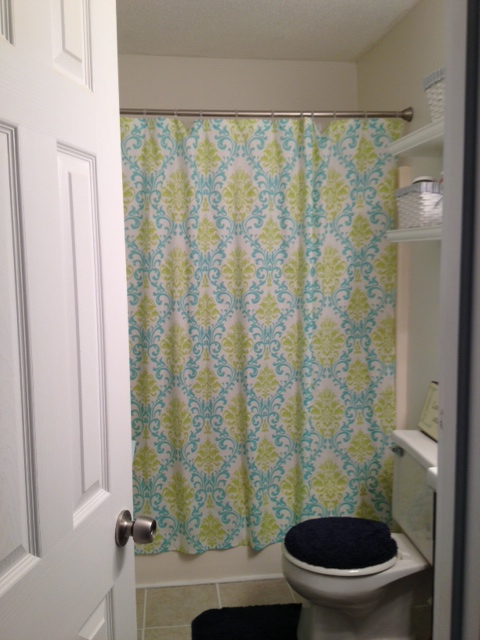
  • Damask Shower Curtain // Purchased from Amazon for $36.00. Available here.
  • Towels // Lime Green Bath Towels – Target, Target brand $4.99 each. Navy Blue Hand Towels – Bed Bath & Beyond, Wamsuetta Brand (these were wedding gifts or else we would have gone for the Walmart or Target option on these, expensive hand towels? Ain’t nobody got time fo dat).
  • Baskets // All three baskets in my bathroom (as well as those hidden under the sink), were purchased from Michael’s. I LOVE baskets. I once saw a Hoarders episode featuring a woman who had over three thousand baskets or something like that and I’m not saying that’s me but I’m well on my way, lol. NOTE: I only purchase baskets from Michael’s with a 40% off coupon or when they are on sale for over 40% off or else they are a total rip off. I would say these three cost somewhere in the neighborhood of $5.00 each for the small ones and $8.00 for the large one.
  • Wall Art // Each item on this wall was virtually free. The beach picture was a picture I had taken myself right on our own Onslow Beach here on Camp Lejeune, I just blew it up at our local drugstore for around $1.00, the frame was the second half of a buy-one-get-one deal they were running at Michael’s so we had it sitting around anyway. The “catch me by the sea” print was one I found on Pinterest, saved as a JPG and printed at our local drug store in size 8X10 (this may or may not be legal, but there was no watermark so I assume it was a free print, if not I’m sorry copyright gods!). If you want to do the same just Google “free whatever-you’re-looking-for images/quotes” and you should find some, the quality may not be so fab but it’s just for looks. The frame for my print was one of the old ones we used in our condo so I just hit it with the same gray spray paint as the mirror. The tiny mirror was a thrift store find for $3.00. Not pictured here is my DIY nautical rope frame, which you can make for under $1.00 read the post to find out how!


BEFORE

upbath6upbath7upbath8

AFTER

upbathupbath1upbath2

upbath3upbath5

We estimate the total cost of the project at around $500.00, and for the transformation we achieved I think this is a GREAT price, keeping in mind a full bathroom reno by professionals can cost you around 5K on the low end, which even if we had the cash (which we definitely don’t, lol), I don’t think I would be able to stomach. Say it with me people, “D-I-Y” it’s a beautiful word!!! 

NOTE: This transformation occurred over about 5-6 months, we only bought things as we could afford them which really made that $500.00 project price tag a little more bearable, because I don’t know about you but even though it’s not a 5K reno, $500.00 is still a lot of money, especially when taking on multiple house projects at a time.

There you have it, our beachy-chic guest bathroom re-do! This would not have been possible without my wonderful hubby J who helped my 7-9-month pregnant self hang and place various items when I couldn’t physically bend that way, lol. Hope this inspires you! XOXO

Bathroom Vanity Makeover – Cabinet Painting Tutorial

master3

The master bathroom was the last major house project we tackled before baby P was born. We had been putting off this particular project because we anticipated that it would be the most expensive of our DIY projects as well as the most work. Well, it took us two other bathroom updates (the guest bathroom and the half bath downstairs) to realize that replacing the entire vanity was a stupid idea. While both of the other bathrooms came out great and our cute little modern vanities look amazing, replacing  the old vanities meant ripping out the cabinets and sinks, having to sand and repaint the walls, install new tiles in the empty space that was left on the floor and replace the floor molding before installing the new vanities – SO much work. We spent hours laying tile, grouting and cutting molding when we very well could have just updated the old cabinets and just purchased a new vanity top. Oh, well, lesson learned and we still got two cute bathrooms out of it so no harm done. Needless to say when it was time to tackle the master bath, I was determined to simply repaint the cabinets and replace only the vanity top. Having already repainted our kitchen cabinets (I will post about this soon!), this was not my first cabinet rodeo, lol. When ordering the new vanity top, we ended up choosing a cultured granite in a light gray because it went with our color scheme but was also neutral enough to compliment really any paint color, should the new owners decide to change the wall color. After purchasing our vanity top, I  got to work on the cabinets. These were a super easy project (all the more reason I wanted to kick myself in the head for not doing this in the other bathrooms as well), especially when compared to the kitchen cabinet process, this one paled in comparison!

Now, I will get to the tutorial, but first some advice. If you buy an older home take a good look at the existing cabinets and fixtures before you look to do a complete overhaul of the place. While some things may be physically damaged beyond repair and need to be replaced for non-cosmetic reasons, if it is just ugly but still functional try to look beyond the hideous 1982 stock cabinetry because chances are you can save a lot of time (and maybe some cash too) with just a quick paint job! In our case the cost of the projects were going to be about the same (the cost of the custom vanity top was comparable to the cost of a new full vanity and replacing the floor tiles) so we didn’t necessarily save a significant amount of money by going the repainting route BUT we sure did save a heck of a lot of time and aggravation! I am a HUGE advocate for making simple cosmetic changes, it is AMAZING what a little paint and DIY decor can do for a room and with little to no effort and cash you can bring an old, dingy space back to life (and more importantly, into the 21st century, lol)!

REPAINTING BATHROOM CABINETS

*NOTE: This can also be applied to kitchen cabinets as well! Basically all of the same principles can be applied to painting wooden furniture, check out my post on re-doing old furniture here.

YOU WILL NEED: 

  • Semi or High Gloss Kitchen/Bathroom Paint (the label will say “kitchen and bath” these paints are specifically designed to withstand the moisture caused by showering and cooking. If you don’t want to buy a bathroom or kitchen specific paint go with a semi or high gloss regular latex paint, I DO NOT recommend any finish below satin, as eggshell and flat paint don’t hold up to moisture well at all).
  • Sanding Blocks or regular sand paper
  • Foam Brushes or Small Rollers (they make rollers specifically for cabinets, they are good for the large surfaces but I found that I needed to use the smaller foam brushes on the edges anyway so I recommend skipping the rollers altogether, as they won’t really save you too much time).
  • Polyacrylic Top Coat (I suppose this could be optional because you are using a high or semi gloss paint, however, I wanted the extra protection on the cabinetry).
  • Drop Cloth
  • Bonding Primer (optional)
  • Caulk (optional)

INSTRUCTIONS:

  1. Begin by removing all of the drawers and doors, then remove all hardware. If you are planning on reusing the hardware you can let it soak for a few minutes in warm soapy water then clean them with a toothbrush or you can repaint them using a satin spray paint).
  2. Give the surfaces of your doors and drawers a quick sand, no need to go nuts, just about a minute on each surface will do, you are simply trying to remove a good amount of the original sheen or varnish. Once you are done sanding, wipe all surfaces down with a damp cloth to remove any sanding dust. Don’t forget to sand the exterior body of the vanity as well. Once you are finished sanding, vacuum or dust the insides of the drawers and around the vanity itself to ensure that no particles will get on your wet paint once you begin working. NOTE: Some tutorials and cabinet painting kits (such as Rustoleum) suggest using deglosser (aka liquid sandpaper) in place of sanding. I have done both and I now prefer to just sand, it takes about the same amount of time and you won’t have to deal with the greasy disgustingness of the deglosser.
  3. Another optional step is using white paintable caulk to fill in any cracks or holes in the wood, this is a great trick! Just squeeze it in and smooth it out using your finger. This will make your cabinets look even newer as you will be hiding any wear and tear or factory imperfections. Most caulk is paintable after just a half hour. Again, this step is optional but if you are a perfectionist I wouldn’t skip it, as once you paint your cabinets (especially if you are using a light color) imperfections in the wood will be more apparent.
  4. Set up a work area for painting the doors and drawers, since this is usually a few day project, I do not recommend doing it outside. The garage or spare bedroom will probably be best (since I didn’t have any tiny humans crawling around at the time, I simply moved our dining table to the side, laid a giant plastic drop cloth of the tile floor and set up shop there). Lay a drop cloth (I suggest plastic) and you are ready to paint!
  5. If you are using stark white paint as I did you might consider applying a coat of bonding primer or cover stain first, that way you won’t require as many coats of paint to hide the wood color beneath. This is optional, however, and if you are using a darker color paint this is definitely unnecessary. As far as the method for painting the drawers and doors, the drawers can usually prop up on their own, but for the doors I use the same method as I do when cooking a whole chicken in the crock pot (lol), I create a few balls out of tin foil then prop each door up flat so you can easily paint the sides and edges. Now, give all exterior surfaces an even coat of paint, using even strokes in the direction of the original wood grain. I don’t paint the insides or sides of the drawers, when I first tacked my kitchen cabinets I posed this question to the Google gods (haha) and it seems that even professionals don’t paint the insides or sides of cabinets when refinishing them, which worked for me – less work, woo-hoo!!! Once you have applied your first coat of paint to the drawers, doors and exterior body of the vanity or cabinet itself, allow about 12-24 hours of dry time. I know that sounds like a lot of dry time, however, good dry time is key in ensuring that your piece will hold up and it is extra important in the case of cabinets as they will be handled on a daily basis. This is a good nap-time or after work project as you can spend an hour or so each day over the course of a few days.
  6. Repeat the painting process until you have applied the desired amount of coats, for darker colors this may only be two but for stark white you may need up to four if you choose to forgo the cover stain. Once your final coat has dried you can go ahead and apply your first coat of polyacrylic top coat if you are using one. I chose to apply two coats of the clear polyacrylic just to be safe. Once your final coats have tried go ahead and reattach your hardware and you are finished!!!

master2

I hope that by looking at these before and afters you can see what a difference refinishing your cabinets can make. You would NEVER know that my vanity was originally a piece of crap 80’s builder-grade cabinet! I will be making another post soon on our entire master bathroom re-do and give you some more budget-friendly decor pointers, so be on the lookout for that. In the meantime, here is a sneak-peak of the before and afters just to give you an idea.

master

master1

Baby P’s DIY Father’s Day Photo Gifts

fath5fath

Father’s Day is just a few short weeks away and baby P and I both agree that J is just about the best daddy there is and deserves nothing but the best for his special day! Thing is, the gift that my frugal hubby would love the most is for me not to spend money, haha, lucky for him I had been planning two budget friendly, DIY, grand slam Father’s Day gifts for months now (well actually since baby P was born lol). Since J is up in NY for fleet week for two weeks, I knew this would be the perfect opportunity to get my Father’s Day pics out of the way, printed and wrapped before his return. Additionally, I like to share my holiday crafts with my Mommy friends, so I always like to test out my projects before hand, to ensure it comes out as planned and make it easier for me to host a craft play date without having to wrangle baby P at the same time.

Okay so back to the photos, can I tell you that I literally cried after I saw how amazing these pictures turned out? Baby P is just the squishiest, happiest little thing and I know J is going to DIE when he opens this gift on Father’s Day (if I can wait that long to give it to him lol jk I will)! Don’t worry I made him promise not to read the blog for a few weeks and since he loves surprises so much I know for a fact he won’t peek ;-). Since the pics are self explanatory I’ll just go into a bit more detail with each picture below. Hope this inspires you to have some fun with your little and give their Daddy something fun and meaningful for Father’s Day!

*For more examples of DIY holiday photos check out this post!

“DAD” PHOTO

fath2fath4fath3

Okay, obviously you’ve seen this one all over Pinterest, so needless to say this isn’t an original idea but sooo stinkin cute nonetheless! I purchased a “D” and an “A” from Michael’s at $3.99 a piece and used a 30% off-entire-purchase coupon, I also returned the following day to purchase the frame (originally priced at $12.99) using a 40% off coupon. Confession: in my super stingy mind I did for a moment consider returning the letters after I was done (I know, terrible)  but I decided it would be best to keep them to repeat this Father’s Day craft  for my crafting play date and with any future children I may have. The onsie is another one of my DIY projects that I came up with specifically for this picture, check out the tutorial for DIY Little Man onsies here, they are super cheap and mostly no-sew! For the picture itself I just sat him on our vintage wing back chair (which actually made for the perfect backdrop!) and snapped his pictures with my smart phone. When I was done, I used the Walgreen’s photo app to upload my pics and picked them up the next time I was out, three 4X6 pictures cost me about $0.40 after coupons!!! Quick plug for the Walgreen’s photo app – I LOVE it, it’s so convenient since it’s all done from your phone, just make sure you Google “Walgreen’s photo coupons” before completing your order since there are always coupon codes for photo prints (this time it was 40% off!). Including all components this project cost me right around $14.00. TIP: If you want to save on framing costs simply purchase an 11X14 frame from a thrift store and arrange the photos side by side over a colored piece of paper or cardstock, as opposed to buying a three hole frame or simply use the app “picstitch” or another photo app/kiosk to turn your three images into a three frame single photo.

fath8

Baby P testing out the chair and modeling his onsie before the pics!

fath5

fath9

so proud of the finished product! lol Look at those curled little toes 🙂

“DADDY’S SHOES” PHOTO

fath

This photo was a copycat of a professional Father’s Day photo I found here on Pinterest, which I then adapted to include my hubby’s military gear. I figured since I was going to be recreating this idea with all of my Mommy friends, who are all military mamas as well, including the military boots and cover would be an extra special touch. To set up the picture I followed my usual steps for a DIY photo backdrop and then added the words using the free photo app “Phonto” (see this post for detailed instructions for use of the app) after taking the picture. This photo I printed in size 8X10 via Shutterfly for $1.79, the frame I will be using is one that we already have so that part will be free, which means … this gift cost me $1.79, say whaaaaaaat??! NOTE: When doing the picture with a little girl I plan to change the end of the poem to “… as great a person and as true a friend, as my Daddy is to me”, since the original poem is specifically for another male.

fd1

the original image before I added the text. I made sure to take the photo off center so that there would be a good amount of empty space for the poem.

There you have it – two ADORABLE Father’s Day gifts coming in right at around $15.00!!! My hubby will LOVE these gifts, and love their price tag as well!

fath1

We’ll be celebrating this wonderful man come Father’s Day! He does it all and then some, we love him so much! I caption this photo “look, here’s my Dad!” lol


DIY Little Man Onsies with Interchangeable Bow Ties

littleman

Who doesn’t love a tiny little baby boy dressed up like a man, right? I for one, LOVE dressing baby P up like a man (he’s looked like a little mini man ever since birth, kind of weird and cute at the same time lol), and even before I had met my little guy my Etsy shopping cart was filled with cute little onsies with tie appliques and little bow ties. Only problem was, I quickly realized that at between $25 and $35 a pop (for a onsie, really? lol), my full blown little man wardrobe was going to have to wait until I hit the lotto, haha. Luckily, I was able to find a few little man onsies on clearance and be gifted a few others (a lot of them are featured in his monthly and holiday pictures) but I still was left wishing that there was a cheap way to get my hands on some more little man clothes!

Flash foward a few months, some friends and I are planning a “little man” baby shower for one of our girlfriends who is expecting a little boy. I thought it would be so cute to recreate the adorable onsie clothesline that my girls had displayed at my shower, but with little man themed onsies. Obviously the same problem of these little man onsies being so damn expensive presented itself once again. So I began to wonder if there was a way I could actually make these myself, without them looking like crap, that is (haha) – it turns out there was! Since I don’t sew other than by hand (learning to use my sewing machine is on my long list of things to do lol), it never occurred to me to make these onsies myself, but after a little research on Pinterest and inspection of items I already had, I was able to come up with my own variation of a little man onsie using, cheap fabric, hot glue and my limited sewing skills. So with limited expectations I got to work and was absolutely thrilled with the result of my project and definitely had a few “holy-crap-I-made-this?” moments throughout lol. Not only will I be able to use these at my friend’s shower, but I now have a home-run of a gift for any of my family and friend’s future baby boys (or girl for that matter, these can be hairbows too, say whaaaaat?!). I also plan to make hundreds (okay, maybe not hundreds, but a lot lol) of these for baby P until he no longer wishes to wear bow ties (which hopefully is never since he is a little man, lol), starting with the one he will wear for his Father’s Day picture.

Give this craft a shot! If you have zero sewing skills you can still make it work, I promise! If you need more of a reason than how adorable a little man onsie is then here’s another – a onsie and six interchangeable bow ties cost me about $3.00 when you break it down (compared to an average of about $22.00 per onsie on Etsy, usually including only one bow tie), so cost-wise it’s a no-brainer!!! NOTE: I also plan to make a matching bow tie for J, I just have to mess around with the bow tie tutorial to figure out fabric measurements for an adult bow tie but once I do I will post my own tutorial!

LITTLE MAN ONSIE & BOW TIE

*The use of Velcro or Nylon snaps is totally up to you, if the child is over six months and you know how to sew by hand I would suggest the snaps, as they are less easily removed by the child, lol. Velcro is still fine though, I found that baby P was more interested in the buttons than the bow tie.

MONEY SAVING TIPS:

  • Hit up your fabric store’s remnants bin, a 12X12 square of fabric that cost under $1.00 was enough for me to make about 6 bow ties!!!
  • Since you don’t need anything fancy use the cheapest brand of white onsies you can find, I believe Walmart carries a Gerber brand 10-pack for around $8.00.
  • Use cheap buttons, this works well anyway since cheaper buttons will be more plain and you want the color/style to work well with multiple bow ties.

YOU WILL NEED: 

  • White Baby Onsie
  • Hot Glue
  • Fabric of your choice
  • 2-4 buttons of your choice (amount depends on size of button)
  • Needle & Thread
  • Sew on Velcro or Sew on Nylon Snaps (if you are not planning on sewing at all, you will need to use Velcro)
  • Fabric Adhesive (you only need this if you are not sewing at all, make sure the label says “washable” meaning the item can be run through the washing machine after the glue has been used)
  • Ruler or Measuring Tape

INSTRUCTIONS:

Step 1: Use this bow tie tutorial to create as many bow ties as you want. I used the hot glue method and wherever it said to iron I didn’t (I’m lazy, lol) and my project still came out great. Important Note For Nylon Snap: If you are planning on attaching a nylon button adapt the previously mentioned tutorial to include the following instruction for attachment of the nylon snap. When you are gluing the smaller 2.25X2.25 piece in half place a very small dot of glue on each end and the middle (as opposed to just putting a whole line of glue down the seam), you want a space near the end where glue will not obstruct your needle once hardened. When securing your small piece to bow part of the bow tie, use a dot of glue to secure the one end, then using a needle and thread, sew the half of your nylon snap to the opposite end, so that when you pull it around and secure it, it will be facing out on the back of the bow tie where you would snap it to the onsie (see blue gingham bow tie pictures). Important Note For Velcro: If you are attaching velcro simply follow the instructions for construction of the bow tie to the end, once the bow tie is complete, use a dot of hot glue or fabric glue to attach a piece of velcro to the back of the bow tie. Here are some pictures I took as I went about making my bow ties.

ones4

this is the washable fabric glue that I used to apply the velcro

lm7

I used velcro dots but if it is cheaper to purchase velcro in a roll or larger piece you can just cut it yourself. The nylon snaps are shown as well, I chose these as opposed to metal snaps because they don’t require a special tool to attach them to fabric.

ones ones1 ones2 ones3

Velcro placement

Velcro placement

ones6

nylon snap method

nylon snap placement

nylon snap placement

Other bow ties not shown on onsies.

Other bow ties not shown on onsies.

Step 2: Once you complete your bow ties, you are ready to work on the onsie. For Nylon Snap: Find the center of your onsie, I placed mine about 3/4 of an inch down from the top of the neck, but use your own judgement as to what you think looks best. Use a needle and thread to attach the connecting piece of your nylon snap to the onsie. For Velcro (No-Sew): Find the center of your onsie, I placed mine about 3/4 of an inch down from the top of the neck, but use your own judgement as to what you think looks best. Use your washable fabric glue to adhere the connecting piece of velcro to the center of the onsie, it will probably need to dry for about 24 hours. Do Not use hot glue for this part, if you do not use a machine washable glue your velcro will probably fall off in the washing machine. I used a few stitches to secure my velcro after I glued it for further security but if you are going with the no-sew method that is fine too.

ones8

Plain white onsie

ones9

nylon snap placement.

Step 3: After attaching your velcro or snaps, you can work on the buttons. Use a measuring tape or ruler to mark the areas on the onsie where you would like to attach the buttons. I used three buttons for medium sized buttons and two buttons for larger buttons and placed them about two inches apart (measuring from the button center). Use a needle and thread to attach your buttons. If you are not sewing you can absolutely skip this step, the onsie looks just as cute without buttons! I suppose if the onsie is for a newborn or very small infant (aka one that doesn’t have the capacity to pull the buttons off and eat them lol) you could glue the buttons using washable fabric glue, however I have not tried this myself, if you do attempt it let me know how it holds up!

ones10

Ta-da!!!!

Ta-da!!!!

Enjoy your onsie!!! For care turn inside out when running through the washing machine, and for best results hand wash and hang dry when possible.

My squishy baby rockin the onsie!

My squishy baby rockin the onsie!

He seems to be happy with it :-P

He seems to be happy with it 😛

lm2

Glass Etching Tutorial

glasset

So I’ve been MIA from the blogosphere for the past week while my squishy baby and I traveled to NY to celebrate my nieces 1st birthday. We had lots of fun and right before I left I managed to eek out one of my favorite DIY/craft projects that I can’t wait to share with you – glass etching! I have mentioned before that I LOVE crafts and recipes that are super easy but appear really fancy and involved and make people say “you just had a baby how do you have time to do any of this!?” hehe little do they know  ;-). Not only is this craft pretty quick, it’s easy and makes great DIY hostess or holiday gifts, and since wedding season is in full swing, these will also make great bridal shower gifts. This post will serve as the tutorial but you may view my separate post on etched glass DIY gifts (coming soon), where I’ll show you some other variations on this project.

As for these DIY oil and dish soap dispensers, I had gotten sick of dragging the giant container of olive oil out every time I needed just a little bit (and then drowning my food due to lack of a slow dispensing top) and was equally as sick of looking at the gross Palmolive container of soap sitting on my counter, not cute. I had made an ADORABLE olive oil dispenser last year but alas, my pregnancy induced clumsiness caused me to knock it off the counter and shatter it into a million pieces (I cried real tears when that happened lol), so I was eager to replace it! This time instead of buying an actual oil dispenser (which you can totally do, they are available at Walmart and KMart for about $3-$4 a pop) and etching it I decided to repurpose wine bottles instead (yet another reason to love Trader Joe’s Two Buck Chucks!). Since I already had the empty wine bottles all I had to do was buy the bottle pourers (I found 6 for $6 on Amazon, link below). I was super happy with the result and happily left on my trip knowing that I would return to my cute little DIY oil and soap dispensers upon my return! I urge you to give this one a try, especially if you are tight on cash around the holidays or if wedding season has taken you for just about all that you’re worth lol, I promise you your recipient will love this just as much as their other gifts if not more and you will get to feel accomplished and a little less broke 🙂

GLASS ETCHING TUTORIAL

*NOTE: This project includes use of harsh chemicals and sharp objects, be sure little hands are far away if you decide to attempt this.

YOU WILL NEED: 

etch

  • Armour Etch or other etching cream (available at Michael’s and other major craft retailers)
  • Empty wine bottle or Olive Oil Dispenser (it MUST be glass, this will not work on other mediums)
  • Dispenser top
  • Paint Brush
  • Latex Gloves
  • Masking Tape
  • X-acto Knife

INSTRUCTIONS:

Step 1: If you are using a store bought piece of glass skip this step. If you are using a wine bottle use either goo-gone or soap and water to remove the label. If you’re using a cheap-o wine like I was you’ll be fine just soaking it in a little soapy water then using the coarse side of a sponge to rub off the label and any remaining residue. When you are finished, wash your bottle with soap and water and dry.

Step 2: If you are using a plastic stencil, skip this step. Place masking tape over your piece as shown, the height and width will depend on how large you want your etching to be. When masking tape is on rub it down firmly with your fingers or use the edge of a credit card to burnish the tape and make sure that it is completely adhered to the glass.

etch3

Step 3: For the lettering there are a few ways you can do it.  I consider myself pretty good at hand lettering (hair flip, lol) and didn’t want to be bothered with printing out a guide so I simply hand lettered the wording by looking at the text on my computer. If you’re not comfortable doing that you may either find a font you like print out the wording in whatever size you would like, cut it out and trace around it onto the masking tape or instead of cutting and tracing the wording just tape it over the masking tape and use your x-acto knife to cut the words out (cutting through the paper and the masking tape at once). One other option is to purchase a plastic stencil (sold at craft stores) and tape the stencils directly to the glass and use that as your wording guide, eliminating the use of masking tape and x-acto knife altogether. While the stencil route will limit you in font options, if you feel that you need a fool-proof method that might be the best option for you. *For my font I used “Birds of Paradise” on DaFont.com.

etch4

For whatever reason pencil wouldn’t work on the masking tape that I purchased this time so I had to use pen, the messy parts are where I corrected mistakes. Not too pretty but got the job done!

Step 4:  Using your X-acto knife CAREFULLY cut out your lettering, making sure to leave the centers in letters like o, a and p. If you have never used an X-acto knife the thing is like a friggin scalpel and no craft is worth a trip to the ER so take care in cutting!

etch5

Step 5: If you are satisfied with your little masking tape stencil you are ready to apply your etching cream. NOTE: Obviously since you are using this stuff to etch glass so you know it’s harsh, this is a corrosive, abrasive substance and if it gets in your mouth or in your eyes or stays on your skin for an extended period of time you will calling poison control and heading to the ER, you do not want this, so wear gloves and work very carefully – you have been warned lol. That being said, use a small paint brush to apply a generous amount of the etching creme to your stencil, I glob it on there, don’t worry about wasting it because that tiny bottle has lasted me about ten projects and is still not empty! Once you have covered your stencil wash off your brush and set your timer for 15 minutes. NOTE: The bottle says to leave it on for 4 minutes, I found that to be far too short of  a time and 15 seems to work best for me so that’s what I suggest.

etch7

Step 6: When time is up, put on latex gloves and rinse your piece off in warm water, using your gloved fingers to peel off the masking tape as your rinse it. Once all of the etching creme is washed off, remove any remaining masking tape and re-wash your piece this time using soap and water. Dry it off an voila, you’re done!!!   These make amazing gifts and people will not believe that you did it yourself! *If you are making an olive oil or soap dispenser here is the link to where I purchased the little dispensing tops on Amazon.

etch8

  Sorry the quality of this photo is terrible but you get the idea, lol.

etch10

The pink soap in the clear bottle makes it hard to see the lettering so I am going to buy a clear soap next time.

etch2

Since I am yet to create my post on DIY etched glass gifts I will give you some quick ideas. While the possibilities are endless here are a few that I have done or plan to do:

  • Bottle of Wine with personalized etched wine glasses
  • Olive Oil Dispenser gifted with a bottle of specialty olive oils
  • Soap Dispenser gifted with some fancy dish soap and dish towel
  • Personalized mixing bowl gifted with some cake mix, mixing spoons etc.


Margarita Cupcakes with Tequila Lime Frosting

marg5

Happy Cinco de Mayo, y’all!!! I am so excited to share this adorable cupcake recipe with you! I came up with this recipe after seeing these cute little margarita cupcakes on Pinterest (of course, lol) and decided that they would be the perfect treat for the little Cinco de Mayo play date that baby P and I were invited to attend. I love all holidays and especially fun holidays that don’t involve presents, just lots of food and drinking (although the drinking has come to a temporary halt on account of my squishy baby, lol), so naturally Cinco de Mayo is one of my faves. While I would love to enjoy a nice margarita today, I’m pretty sure any amount of tequila would probably kill me at this point, given that I haven’t had any hard liquor in over a year, so I figured a margarita cupcake would have to do the trick this year. Since I rarely bake anything from scratch, my goal is always to jazz up a box of cake mix enough to keep anyone from caring that I didn’t make the actual cake myself, and it always works :)! Point being, you can keep your recipes super simple and “semi-homemade” and still look like a rockstar baker or cook. Here is how I whipped up my margarita cupcakes by adding just a few simple ingredients to ordinary Betty Crocker cake mix (which was buy one get one free at Food Lion this week, woo-hoo!). Hope you can enjoy these at your next fiesta!

MARGARITA CUPCAKES WITH TEQUILA LIME FROSTING

(Makes 24 cupcakes)

FOR CUPCAKES:

INGREDIENTS

marg

Ignore the yellow food coloring, I don’t know why that’s there – sometimes my brain doesn’t work lol

  • 1 box cake mix (golden vanilla, white or yellow will do – I used golden vanilla)
  • Zest of 1 lime
  • 2 1/2 Tbsp. Tequila Mixer (or 2 Tbsp. lime juice and 1 Tbsp. orange juice)
  • Green food coloring
  • 2 Limes (for garnish)
  • Decorative Straws or cocktail umbrellas (for garnish)

DIRECTIONS

  1. Prepare your cake mix according to package directions, then add in your tequila mix or lime juice and orange juice, and lime zest. Mix until combined.
  2. Add in 1-2 drops of green food coloring and stir to combine. This is optional, I just wanted to make mine look margarita-y lol.
  3.  Bake your cupcakes according to package directions and allow to cool before frosting.
  4. Meanwhile prepare your garnish by slicing limes into thin rounds, then slicing the rounds into little half moons with a slice down the middle so they will be able to stand atop the cupcake once frosted (see pic). Cut your straws so they are about 3 inches each, I only used about 4 whole straws total (I purchased my super cute straws at Target in the party section).
  5. Once cupcakes are cooled frost using prepared frosting (recipe below). I piped mine out of a plastic ziplock bag with the corner cut off and used a large star tip icing tip. Then apply your garnish. Enjoy!

marg2 marg3

FOR FROSTING:

INGREDIENTS

  • 1 container vanilla icing (I used cream cheese flavored icing because I had it on hand, but any white icing will do)
  • 1 tablespoon lime juice
  • 1/2 tablespoon tequila (optional)

DIRECTIONS

  1. Combine frosting, lime juice and tequila. NOTE: I did not use tequila this time because I didn’t realize that liquor stores down here aren’t open on Sundays, lol. They were still delicious!
  2. Spoon frosting into a piping bag (or plastic ziplock bag) fitted with a decorative tip and pipe onto cupcakes. I allowed my frosting to sit in the fridge for a few minutes after I mixed it to allow it to become a little less fluid.

marg4

DIY No-Sew Pennant Banner

pen8

So if you’ve seen my post on DIY holiday photos with my squishy baby, you better believe I was going to do a Mother’s Day pic with P as well :). Let me entice you into doing this craft by saying, it cost me about $3.00 (and depending on how often you craft and the supplies you have available, it very well could be free).  Since there aren’t any real Mother’s Day props, this sparked my idea for a DIY pennant banner – simple and spring-y and able to double as both prop and springtime home decor! This project is super quick and easy (no sewing, yay!) and only cost a few dollars to make. The finished product was super cute and made the perfect backdrop for my Mother’s Day photo, I liked it so much in fact, I will definitely be revisiting this project next time I need some quick party decor and especially when I have to decorate the next nursery! Speaking of party decor, if you’re into pennant banners, check out my friend Courtney’s DIY chalkboard pennant banner that she made for her son’s first birthday party, it’s adorable as is her blog! Here is how I made and used my pennant banner:

YOU WILL NEED:

  • Fabric of your choice (the amount depends on how long you would like your banner to be)
  • Fabric stiffener (available anywhere fabric is sold, if you are using a stiff or heavy fabric you may not need this)
  • Glue Gun
  • Ribbon of your choice
  • Scissors
  • Wax Paper (optional, it is just so you have a surface to work on)
pen

TIP: I hit up the remnants bucket at my local fabric store and purchased these random 12X12 squares for less than $1.00 each. If you don’t have a print/fabric preference you can use an old clothing item or one that you purchase from a thrift store.

INSTRUCTIONS:

  1. First, create a pattern for your pennant in whatever shape you would like. I chose a traditional triangular shape and using a ruler and a blank piece of scrap paper, drew a triangle 6″ wide and 7″ long and cut it out using scissors.
  2. Next, lay your fabric print side down and using a pen or other writing instrument, trace as many triangles as necessary onto to fabric, then cut each one out. pen1
  3. Arrange your fabric on the wax paper (or other surface) and spray each one with an even coat of fabric stiffener. Mine was the “quick dry” kind so it only took about an hour to dry, mine also gave me the option to put it in the microwave for 30 secs to speed up the drying process but I didn’t feel like doing the extra work, but if you are in a rush the microwave is apparently a drying option. Also, as I mentioned above, fabric stiffener is not vital to the project, but because I was using a lightweight material I wanted to be sure it laid flat and stiff when hung.

    pen2

    Don’t mind the markers, I was just weighing down the edges for the pic.

  4. Once your pennants have all dried, lay them face up, tip to tip on a piece of wax paper. Heat your glue gun then, working one by one, apply a thin line of hot glue to the top of each triangle and then apply your ribbon pressing down firmly (be sure to leave enough ribbon length before the start of the first pennant for hanging). Once you have finished display however you would like! See my example below of how I used it for a photo prop and be sure to read my post on baby P’s Mother’s Day pic and his other holiday picspen4

    pen6

    Here is my most adorable squishy baby hangin out under my banners! Check out my post on baby P’s Mother’s Day Pic to see how I added the lettering using only my smart phone!

“Short Stack” Pancakes – Perfect for Brunch!

pancakes9

I LOVE tiny food, I basically wish each of my meals were served in the form of a wedding cocktail hour (cocktails included obviously lol). I also love brunch, as I enjoy breakfast foods but not necessarily at breakfast time, also brunch usually means mimosas :). This week our weekly baby play date was a brunch and I was all about it since I couldn’t wait to try my hand at making some of those adorable mini pancakes that have been popping up all over Pinterest. Since I have been trying to really stick to our grocery budget (I plan to post about my budget soon!) I wanted to make something for our brunch date using mostly pantry ingredients so pancakes were perfect, all I had to buy were blueberries. The pancakes were a hit and I even had left over batter for breakfast this Saturday, J was so pleased :). I was able to whip these up during P’s morning nap using a pancake recipe that was proclaimed “best pancake recipe” on Pinterest. I liked the pancakes a lot, however, they were a little on the sweet side, so next time I think I will reduce the sugar by half, although I compare all pancakes to Long Island diner pancakes which are my fave and the recipe had rave reviews by other pinners, so perhaps this recipe is in fact the “best pancake recipe” it just is not what I am used to, so try it out for yourself :). Here is how I assembled my “short stacks”:


First, make your pancakes using whatever recipe you choose, I used the one mentioned in the link above but you could also use store bought mix or your own favorite recipe. I made the pancakes using a 1/2 Tbsp. measuring spoon to spoon tiny little pancakes onto the griddle.

pancakes

  amazingly I only ate about 5 during the cooking process 🙂

Next, assemble your pancakes into stacks of three. This recipe would have made close to 50 stacks  total if I had used all the batter.

pancakes1

Now, take a toothpick and thread on a blueberry or fruit/garnish of your choice and stick your little stack 🙂

pancakes2pancakes3

That’s it! I served with syrup in a tiny little spouted cup that I stole from a diner somewhere – so cute!

pancakes5pancakes6

and you know what else was cute that day … my squishy baby!!!

pancakes8

I can’t even! 🙂


Landscaping on a Budget

garla

When we first purchased our home, the landscaping was acceptable at best. The previous owners had done just enough to make sure the front garden bed looked presentable in the listing photo by throwing some shrubs into the space (and I mean literally throwing, they were just pots sitting atop the soil not even planted lol) and planting a few petunias (which died before we even got close to closing). For the price of the home we didn’t very much care about the state of the landscaping but needless to say by the time we closed on the home the “garden bed” looked more like an open grave where plants went to die, haha. After tackling some of the inside projects spring rolled around and we decided we wanted to give our little front garden a little TLC, ya know, in order to have our home appear as though we were actually part of society lol. Since our original intention was to rent the house out when we moved, our main concern was to keep the landscaping simple and easy to maintain (in the event that we got a careless tenant, the landscaping wouldn’t go completely crap) and our secondary concern was obviously keeping the cost of the project down (and I mean WAYYY down haha). We decided to go with all perennials, the idea being to plant once and relatively maintenance free. While our landscaping tips are fairly obvious, a lot of people seem to think that you need to purchase expensive and pretty annuals in order to give your garden a makeover. Don’t get me wrong, I LOVE annuals, as well as your more demanding perennials (such as roses), they’re beautiful and if you have the cash and the green thumb more power to you. I, however, have neither of those things, annual means once and that means that if I spend $200 and a whole weekend gardening this year, I will be spending $200 and a whole weekend gardening next year – EWWWW!  I like the more simple route, and I LOVE knowing that come snow, leaves, freezing rain, wind and whatever else the fall and winter have to offer, come spring those planted that I planted last season and forgot about until now, will come creeping up and grow themselves right back to their original beauty despite my lack of attention. Here is what we did, how we did it and our tips for landscaping on a budget!

WHAT WE DID:

  • WE DID OUR RESEARCH – Aside from the gardening I did with my Mom growing up (and by gardening I mean helping her to spend her money by going with her to choose annuals every year lol), I didn’t know much. So I hopped on the internet and asked the opinion of a few garden-savvy friends in order to get an idea of what would work best in our garden and most importantly within our budget. Once we decided what we wanted to plant we surveyed our little garden bed to see exactly how many of each plant we needed, the last thing we wanted was to have to make multiple trips to the nursery. Speaking of the nursery, be sure to ask their opinion as well, when I realized we were going to have a few empty spaces I asked one of the workers and they turned me onto a super cheap and easy plant that I’d never even heard of that totally worked!
  • WE SHOPPED AROUND – While it may seem tempting to hit up your local home improvement store for plants and supplies all in one shot this is probably not in your best interest budget-wise. When comparing prices of the plants we wanted we found that the hostas we wished to plant were actually $4.00 more expensive at Home Depot than at our local nursery, while the azaleas were almost $12.00 more expensive!!! Additionally, the quality of the plants at our local nursery was much higher than at our local chain home improvement stores. While this may not be the case for you, my point is to be sure to compare prices, if we had bought our plants at the same time as our other supplies we would have ended up paying upwards of $100 more on our landscaping project!
  • WE BOUGHT CHEAP AND EASY PLANTS – Well, duh that’s the point of this whole post lol. We went with the following plants (these are my pictures of them this year so here is your proof that they did in fact come back! lol):
    gardenblog3

    Azaleas (sorry for the crappy pic, but it’s just to give you an idea). These are beautiful springtime flowers available in vibrant colors that make your garden look fab. We planted small to save cash (I’ll explain later) but this particular variety has the potential to grow up to 4-5 feet tall. So in a few years the owner of this home will be thanking yours truly, although no thanks are really necessary since we only paid $11.99 per plant!

    gardenblog

    Hostas – These plants are amazing, they do well in shade or sun so they are perfect for planting under trees. They require almost zero maintenance and while when purchased they will look like a dinky little plant they will grow outwards so they are a great garden filler. Oh, and they sprout pretty little purple flowers at some point during the season (not sure when, lol). These cost us $4.95 per plant.

    gardenblog2

    Liriope (pronounced LY-ro-pee) – A worker at our local nursery turned us onto these, they almost look like beach grass and make a great green filler for empty garden space. They grow outwards not upwards and sprout pretty little flowers that look similar to lavender. Again, very little maintenance is required and cost a mere $3.95 per plant.

    gardenblog4

    Green Velvet Boxwood – The one in the pic is kind of going crazy and needs to be pruned but whatever :). These shrubs require zero maintenance and will grow pretty tall (some can grow up to 10 feet, but can be pruned to any height). Since we already had three (thanks previous owners), we did not have to purchase any more for this particular area of our garden but I know that similar bushes cost about $11.99 at our local nursery.

  • WE BOUGHT SMALL PLANTS – This was  important in our cost saving strategy. We very easily could have purchased shrubs at their fully grown size, however this would have ended up costing us more than double what we spent. While mature shrubs may have looked a little nicer and I sure do admire my neighbor’s fully grown azalea bushes, the next size up at the nursery (not much bigger than ours and certainly not anywhere near the size of our neighbor’s plants) came in at $25.99 per plant, meaning that we would have ended up spending more on three plants than all of our plants and supplies combined. So if budget is important to you and you’re willing to be patient your plants will mature in just a few year’s time and in the meantime I promise your budget friendly garden will look great!
  • WE KEPT IT SIMPLE – And I mean simple, lol. We didn’t even buy a shovel (we used my husband’s “e-tool”, a little fold up shovel that the military issues you with your gear haha, one of our neighbors actually felt bad and came over and lent us a shovel, people must think we’re so weird lol). In addition to the plants we bought edging stones, basic landscaping fabric and mulch (I will review the products and costs below) and took only about an hour to plant and arrange everything – BOOM lol.


gardbef

Our before and after picture (azaleas hadn’t bloomed yet, boo hiss!)! It only took us about an hour to complete the transformation! I wasn’t kidding about the use of shower curtains as a garden liner, see the before pic haha

TOTAL COST TO CREATE (YEAR 1)

Plants (3 azaleas, 3 liriopes, 7 hostas)  $82.47

Landscaping Fabric                                       $9.97  

*NOTE: we used landscaping fabric to prevent the growth of weeds and reduce the need for maintenance of the garden, it is not necessary, as we could have just laid the mulch on it’s own. A free way to mimic the function of the landscaping fabric would be to use newspaper, you would just have to replace it again the following season before you lay your mulch. Or you could use shower curtains … KIDDING, although that IS what the previous owners of the house did, so weird.                                                    

Edging Stones (18 @ $1.97 ea.)                $35.46

*NOTE: These were also not necessary but we considered this our aesthetic “splurge” for the project. You could easily find free things in nature to edge your garden (like large rocks of various sizes) or not edge it at all.

Mulch (3 bags @ $3.99 ea.)                       $11.97

TOTAL COST                                              $139.87


TOTAL COST TO MAINTAIN (YEAR 2)

Mulch (2 bags @ $3.99 ea.)                      $7.98

TOTAL COST                                              $7.98 <—– that’s right, total cost for the second year was $7.98!!!


Since all of our plants came back (miracle! lol) all we had to do was weed the garden then add some additional mulch, that’s it!!! If it doesn’t rain we give the garden a quick water every few days but other than that it takes care of itself. Now that you’re all hyped up about hostas and mulch (lol) I hope this inspires your own little budget friendly landscaping project, happy planting!!!

Grilled Thai Tacos with Peanut Sauce

thai7

So the weather has been getting progressively nicer, creeping into the high seventies and finally into the eighties today! Southern summer is in full swing (must have blinked and missed spring, lol). Needless to say with the exception of rainy days (and even on some of those too lol), I plan to prepare most of our meals on the grill. As I’ve said before I like to switch up our protein intake during the week (chicken and beef get boring), so I always keep frozen shrimp on hand. Since the nearest Thai restaurant is about 35 mins away (not to mention, the nearest payday is about a week away lol) I decided to satisfy my craving for some Thai with a little homemade Asian fusion in the form of Thai tacos! After a busy day of baby-birthday-partying and errands, us Schulzes reconvened at home to throw together a quick marinate for our shrimp before heading to the park so J could see baby P swinging on the swings like a big boy for the first time (awwwww!). Upon arriving back home we shuffled P off to bed (6 pm sharp lol am I a lucky mom or what!?) then J and I fired up the grill and whipped up a quick peanut sauce for these DELICIOUS Thai tacos, which were ready in 15 mins flat! These were another winner, and like so many of my other recipes, made with mostly pantry ingredients. If you like Thai/Asian inspired food, definitely throw these on the menu, they are quick and easy, can be made with any form of protein and like my hubby says “anything with peanut sauce is good!”.

First things first, how cute is baby P on the swings!?

thai4thai5thai6

Okay, now that you’ve had your squishy baby fill, here’s the recipe 🙂

GRILLED THAI TACOS WITH PEANUT SAUCE

TIPS 

  • Use a store bought peanut sauce if you are in a rush.
  • Switch it up: use the sweet chili marinade as the sauce and the peanut sauce as the marinade.
  • The recipe for the peanut sauce makes quite a few servings, freeze the other helpings in smaller portions and thaw in the fridge the night before making this recipe the next time (because there will be MANY next times 🙂 ) or use with other Thai dishes (satay anyone? yummmm).

For Thai Tacos:

INGREDIENTS

  • 1 lb. frozen shrimp (feel free to use fresh shrimp or any other protein for that matter)
  • 2 Tbsp. Chili Garlic Sauce (available in oriental section of most grocery stores, feel free to use any chili paste or sauce or if you prefer a non-spicy dish use red curry paste instead)
  • 1/4 cup honey
  • Juice of 2 limes
  • 2 Tbsp. Sesame Oil
  • 2 cups shredded napa or other cabbage
  • 1/2 cup green onions, sliced (for garnish, optional)
  • 6-8 flour tortillas
  • 1/2 cup peanut sauce (store bought or see recipe below)

DIRECTIONS

  1. Defrost your shrimp by placing in a bowl of cold water for about 5 minutes, then remove shells and tails (if not already cleaned). If you are using another protein disregard this step.
  2. Meanwhile, combine chili sauce, honey, lime juice and sesame oil in a freezer bag.thai
  3. Add shrimp or other protein to bag and allow to marinate 30 mins or overnight (for shrimp or fish marinate only about 30 mins).
  4. Preheat grill or grill pan.
  5. Skewer your shrimp and grill for about 4 mins on each side or until pink.thai1thai2
  6. Heat your tortillas on the grill or for a few seconds in the microwave, then assemble your tacos by placing a few grilled shrimp topped with cabbage and a drizzle of peanut sauce with green onions for garnish. Enjoy!thai3

For Peanut Sauce:

INGREDIENTS

  • 1/2 cup peanut butter
  • 1/2 cup coconut milk (about 1/2 can)
  • 1/4 cup water
  • 1/4 cup sugar
  • 3 Tbsp. Rice Wine Vinegar (or white vinegar)
  • 2 tsp. chili sauce or siracha sauce
  • 1/2 tsp. onion powder
  • 1/2 tsp. garlic powder

DIRECTIONS

  1. Combine all ingredients in a saucepan and whisk to combine.
  2. Bring to a boil then reduce to simmer.
  3. Allow to simmer for about 10 mins until slightly reduced and thickened.
  4. Serve with above recipe or any other thai dish! Note: this will make several servings, I divide them and freeze in small sandwich bags for later use.