

So I’ve been MIA from the blogosphere for the past week while my squishy baby and I traveled to NY to celebrate my nieces 1st birthday. We had lots of fun and right before I left I managed to eek out one of my favorite DIY/craft projects that I can’t wait to share with you – glass etching! I have mentioned before that I LOVE crafts and recipes that are super easy but appear really fancy and involved and make people say “you just had a baby how do you have time to do any of this!?” hehe little do they know ;-). Not only is this craft pretty quick, it’s easy and makes great DIY hostess or holiday gifts, and since wedding season is in full swing, these will also make great bridal shower gifts. This post will serve as the tutorial but you may view my separate post on etched glass DIY gifts (coming soon), where I’ll show you some other variations on this project.
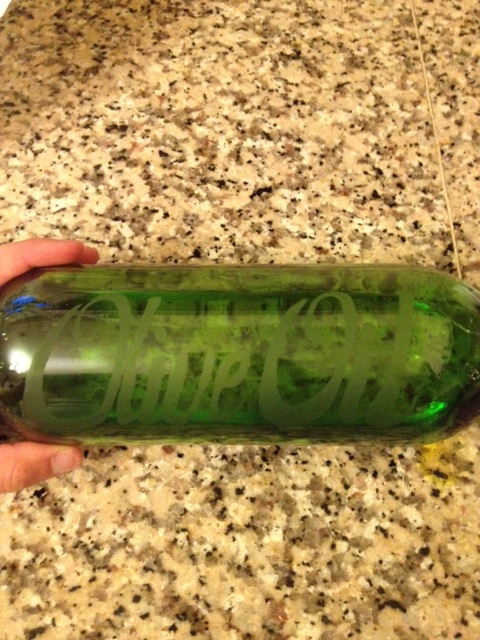
As for these DIY oil and dish soap dispensers, I had gotten sick of dragging the giant container of olive oil out every time I needed just a little bit (and then drowning my food due to lack of a slow dispensing top) and was equally as sick of looking at the gross Palmolive container of soap sitting on my counter, not cute. I had made an ADORABLE olive oil dispenser last year but alas, my pregnancy induced clumsiness caused me to knock it off the counter and shatter it into a million pieces (I cried real tears when that happened lol), so I was eager to replace it! This time instead of buying an actual oil dispenser (which you can totally do, they are available at Walmart and KMart for about $3-$4 a pop) and etching it I decided to repurpose wine bottles instead (yet another reason to love Trader Joe’s Two Buck Chucks!). Since I already had the empty wine bottles all I had to do was buy the bottle pourers (I found 6 for $6 on Amazon, link below). I was super happy with the result and happily left on my trip knowing that I would return to my cute little DIY oil and soap dispensers upon my return! I urge you to give this one a try, especially if you are tight on cash around the holidays or if wedding season has taken you for just about all that you’re worth lol, I promise you your recipient will love this just as much as their other gifts if not more and you will get to feel accomplished and a little less broke 🙂
GLASS ETCHING TUTORIAL
*NOTE: This project includes use of harsh chemicals and sharp objects, be sure little hands are far away if you decide to attempt this.
YOU WILL NEED:

- Armour Etch or other etching cream (available at Michael’s and other major craft retailers)
- Empty wine bottle or Olive Oil Dispenser (it MUST be glass, this will not work on other mediums)
- Dispenser top
- Paint Brush
- Latex Gloves
- Masking Tape
- X-acto Knife
INSTRUCTIONS:
Step 1: If you are using a store bought piece of glass skip this step. If you are using a wine bottle use either goo-gone or soap and water to remove the label. If you’re using a cheap-o wine like I was you’ll be fine just soaking it in a little soapy water then using the coarse side of a sponge to rub off the label and any remaining residue. When you are finished, wash your bottle with soap and water and dry.
Step 2: If you are using a plastic stencil, skip this step. Place masking tape over your piece as shown, the height and width will depend on how large you want your etching to be. When masking tape is on rub it down firmly with your fingers or use the edge of a credit card to burnish the tape and make sure that it is completely adhered to the glass.

Step 3: For the lettering there are a few ways you can do it. I consider myself pretty good at hand lettering (hair flip, lol) and didn’t want to be bothered with printing out a guide so I simply hand lettered the wording by looking at the text on my computer. If you’re not comfortable doing that you may either find a font you like print out the wording in whatever size you would like, cut it out and trace around it onto the masking tape or instead of cutting and tracing the wording just tape it over the masking tape and use your x-acto knife to cut the words out (cutting through the paper and the masking tape at once). One other option is to purchase a plastic stencil (sold at craft stores) and tape the stencils directly to the glass and use that as your wording guide, eliminating the use of masking tape and x-acto knife altogether. While the stencil route will limit you in font options, if you feel that you need a fool-proof method that might be the best option for you. *For my font I used “Birds of Paradise” on DaFont.com.
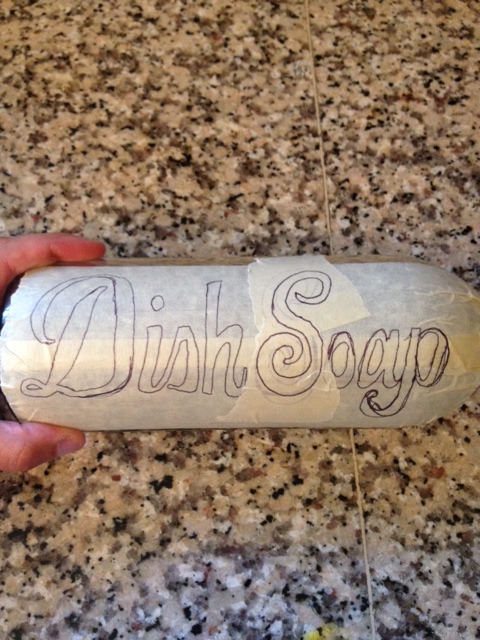
For whatever reason pencil wouldn’t work on the masking tape that I purchased this time so I had to use pen, the messy parts are where I corrected mistakes. Not too pretty but got the job done!
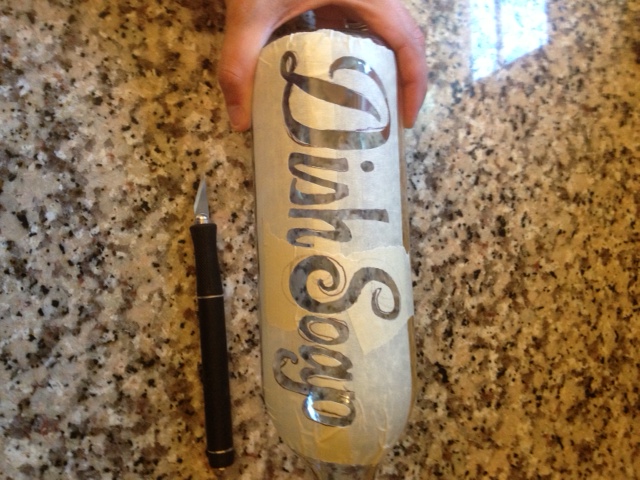
Step 4: Using your X-acto knife CAREFULLY cut out your lettering, making sure to leave the centers in letters like o, a and p. If you have never used an X-acto knife the thing is like a friggin scalpel and no craft is worth a trip to the ER so take care in cutting!
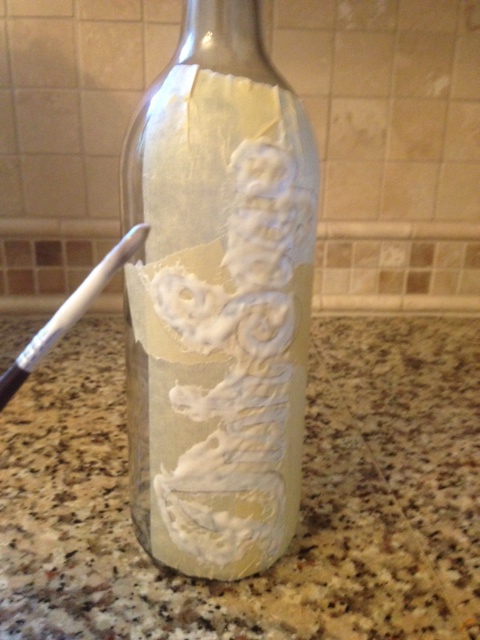
Step 5: If you are satisfied with your little masking tape stencil you are ready to apply your etching cream. NOTE: Obviously since you are using this stuff to etch glass so you know it’s harsh, this is a corrosive, abrasive substance and if it gets in your mouth or in your eyes or stays on your skin for an extended period of time you will calling poison control and heading to the ER, you do not want this, so wear gloves and work very carefully – you have been warned lol. That being said, use a small paint brush to apply a generous amount of the etching creme to your stencil, I glob it on there, don’t worry about wasting it because that tiny bottle has lasted me about ten projects and is still not empty! Once you have covered your stencil wash off your brush and set your timer for 15 minutes. NOTE: The bottle says to leave it on for 4 minutes, I found that to be far too short of a time and 15 seems to work best for me so that’s what I suggest.
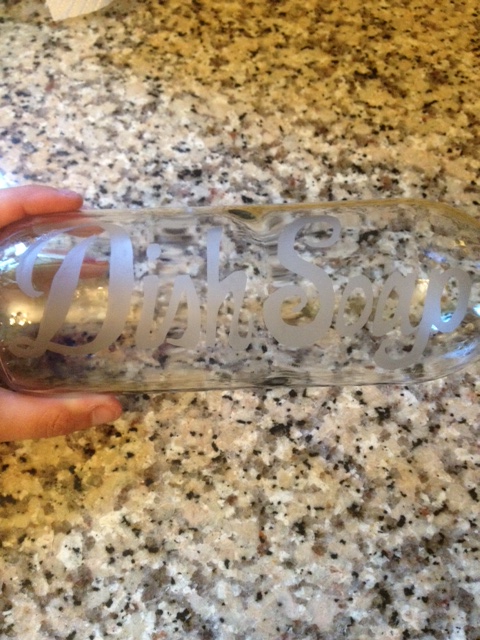
Step 6: When time is up, put on latex gloves and rinse your piece off in warm water, using your gloved fingers to peel off the masking tape as your rinse it. Once all of the etching creme is washed off, remove any remaining masking tape and re-wash your piece this time using soap and water. Dry it off an voila, you’re done!!! These make amazing gifts and people will not believe that you did it yourself! *If you are making an olive oil or soap dispenser here is the link to where I purchased the little dispensing tops on Amazon.
Sorry the quality of this photo is terrible but you get the idea, lol.
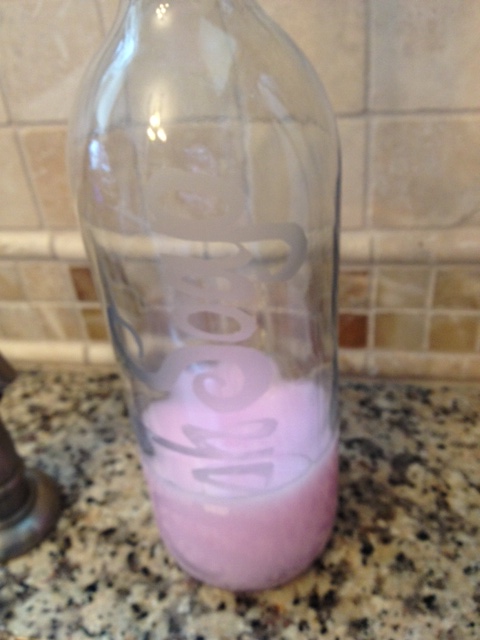
The pink soap in the clear bottle makes it hard to see the lettering so I am going to buy a clear soap next time.
Since I am yet to create my post on DIY etched glass gifts I will give you some quick ideas. While the possibilities are endless here are a few that I have done or plan to do:
- Bottle of Wine with personalized etched wine glasses
- Olive Oil Dispenser gifted with a bottle of specialty olive oils
- Soap Dispenser gifted with some fancy dish soap and dish towel
- Personalized mixing bowl gifted with some cake mix, mixing spoons etc.
