Meal Planning – Week of August 10th

This week was pretty easy as far as our meals went. Since the weather finally dealt us some non-stormy cards we were excited to get back outside and grill! As usual I tried to plan my meals so that the components of the first few meals could work easily into the meals later in the week, after all less prep work for Mama means a happier squishy baby :).

SUNDAY // Chicken Sushi Rolls with Bacon and Red Pepper Aioli – this is one of my original recipes and one of our new favorites. Since it takes a bit longer to prepare than our weeknight meals we prefer to make this one on a weekend day so that we can spend a little extra time preparing it together.

MONDAY // Shredded Beef Fajita Quesadillas – These were just a quick little something I whipped up using the left over beef from my Beef Barbacoa Tacos that we made on Friday. I simply used burrito sized tortillas, shredded cheddar cheese, sauteed onions and peppers, black beans and corn. Not only did using the left over beef help me stretch a buck, I saved some time by sauteing a large batch of peppers and onions so that I could use the extra in our Skinny Cheese Steak Sammies on Wednesday!

TUESDAY // BBQ Bacon and Chicken Kabobs – I used 4 cubed chicken breasts, two red peppers, 6 strips of bacon sliced into 2″ pieces, two onions cut into quarters and separated, threaded them onto metal skewers sprinkled with salt and pepper and basted with barbecue sauce before grilling. I grilled them until the chicken was cooked through and the bacon was crispy, basting a few extra times during the cooking process. Not only are these delicious but they are easy to prepare and a fun twist on regular chicken kabobs.

WEDNESDAY // Skinny Cheese Steak Sammies – This is my personal take on the traditional Philly Cheese Steak. I use sliced grilled skirt steak to keep the meal low cost, sauteed peppers and onions (the ones that were left over from my quesadillas), thin sliced provalone cheese (in place of cheese sauce to keep it light), broiled on a hoagie roll with some homemade chipotle mayo.

THURSDAY // Greek Salad Wraps – I grilled a few chicken breasts using my Quick Greek Marinade then cubed them and served all of the components of a Greek salad in a wrap – red onions, yellow peppers, sliced kalmata olives, sliced grape tomatoes, spring mix lettuce and feta cheese with Greek style dressing. This is my simple way of making a meal out of a simple Greek salad!

FRIDAY // Grilled Shrimp Tacos – This was an easy fix that I kind of made up by using ingredients I already had on hand. Since I always keep a bag of frozen shrimp in my freezer it’s easy to pull some out as needed. I marinated the shrimp in a bit of lemon juice, salt, pepper and chili powder then grilled them on skewers. I then served them in 6″ tortillas with a bit of chipotle mayo and spring mix lettuce (both left over from meals earlier in the week).

SATURDAY // Ordered In 🙂 – Since Saturday was our DIY day we ordered a pizza so we continued to craft the night away 🙂

Check out all of my favorite recipes on my “Tried and True” Pinterest board!

Faux Sangria

sang3

As if my Mom wasn’t already amazing enough, she is also the creator of this amazing drink that I am about to share with you! Whether or not she will actually read this post is debatable, as it took her about three years to finally master Facebook and a whole seven years to finally hop on the iPhone bandwagon (although she did just learn how to post pictures from her iPhone to Facebook, so there may be hope for her after all lol). Whenever I tell her about my blog she seems confused so either she doesn’t know how to navigate it or she is just too busy being awesome to find the time to read my nonsensical babble, so to give her the benefit of the doubt I’ll say it’s the latter lol.

Anyway, on my recent trip home my Mom offered me “faux sangria” and while all I heard was “diluted alcohol”  (yuck lol) when I tasted it I was pleasantly surprised to find that it actually tasted exactly like the sangria at one of our favorite mexican joints back home, day = made! I was even more excited when she told me that you could make it using only two or three ingredients, whaaaaaaaat?! Needless to say when we got back to NC the ingredients for “faux sangria” were at the top of my shopping list (and here I sit enjoying a glass as I write this post and pray that hurricane Arthur doesn’t knock out my power lol). I love a good summer cocktail and I especially love one that is easy to whip up and doesn’t cost a fortune in ingredients you will only use an ounce of (a problem I encountered when making  my whiskey punch for J’s 30th, I will post about this soon). While I know this isn’t the most creative recipe and is I’m sure, by no means an original, I still think it’s worth posting because I for one am always looking for new budget friendly cocktails, especially those that lend themselves to social gatherings a.k.a. ones that are cheap lol. I hope you whip up a batch for your next fiesta, even if you’re like me and your “fiesta” involves working on your blog while hubby and baby snooze haha.

sang4

I let baby P have at one of the apples while I was making the sangria, only 20 years and three months until he can give it a taste lol


FAUX SANGRIA

NOTE: This recipe can be doubled, tripled etc. It is GREAT for a party and you can use any combination of fruit, I actually plan to come up with a variety of “faux sangrias” using different wine, fruit and oj combos. If you’re on the “skinny” train lighten it up by using Trop50 or if you like a sweeter cocktail add some simple syrup.

INGREDIENTS

  • 1 750 mL bottle red wine (I like dry wines and think that the OJ gives the cocktail enough sweetness but if you’d like it sweeter use a sweet red)
  • 3 cups orange juice
  • Juice of half a lemon (this just brightens up the flavors, feel free to omit it if you don’t like/have lemons)
  • 1 Apple, cubed
  • 1 Orange, quartered and sliced thin

Combine all ingredients in a pitcher and refrigerate for at least an hour before serving – enjoy!

sang2  sang

DIY 4th of July Burlap Wreath


4th

Hi everyone! I know I have been just awful about updating the ‘ol blog these past few weeks but between moving and heading back up north for a mini family vaca I have been all over the place! Good news is that I am back on the grid lol, and prepared to pollute blogland with TONS of new posts including my hubby’s surprise 30th birthday bash (a whiskey and cigar themed party, a huge success btw) which I had to keep off the blog until now, as well as some new crafts and recipes I have been working on in between organizing the house and ripping my hair out in frustration over moving haha.

Okay, back to the wreath. Being that we were heading out of town just one short week before Independence Day, I knew I had to eek out my 4th of July wreath if I wanted it to be displayed leading up to holiday. This was not my first burlap wreath rodeo, I had tried my hand at it once before for my Easter wreath (a post that I am yet to get around to lol) and was super surprised at how easy it was to create given how impressed I was with the final product. So while J did his best to wrangle baby P (who is crawling lightening fast these days and getting into everything) I managed to get this wreath done in just about 20 minutes! I will give you a run down of the specific products I used but obviously it is not necessary that these items be used, as the thing I love most about burlap wreaths is that there are a variety of ways on which to elaborate on such a simple idea and that they can be adapted to fit any color scheme or holiday. If you’ve seen one on Pinterest and are hesitant to try it out, don’t be – it is almost impossible to mess up. I know a lot of the written explanations for weaving the burlap can be confusing but if you YouTube “burlap wreath tutorial” you will find a much more helpful guide to making one, I promise! Happy 4th of July everyone, please watch some fireworks for me, baby P goes to bed at six so chances are I will not be watching any aside from what I can see from my porch lol.

4th3

baby P looking adorable right before he started slamming the bouquet violently then trying to eat the petals lol.


4TH OF JULY BURLAP WREATH 

WHAT I USED:

4th1

  • 18″ wire wreath frame – I purchased mine for $2.50 at a local craft store specific to my area but you can get them on Amazon for around $5.00 or so.
  • 2 rolls of red and blue chevron wired burlap ribbon (10 ft. each) – I purchased mine from Walmart for $3.47 per roll but a Google search revealed that it can be purchased just about anywhere, lol.
  • 1 roll of plain burlap ribbon 5 1/2″ X 15 ft – available at any craft store.
  • white satin 1″ wired ribbon
  • Flag Print Faux Daisies – these just happened to work perfect and were available at Walmart, however, any red/white/blue flower combo would work or even a bow instead!  
  • 1 white wooden letter

HOW I DID IT:

Step 1: I began by weaving my burlap into my wreath, I will refer you to YouTube for the tutorial on how to actually weave the burlap in and out of the wire frame so as to not embarrass myself with an explanation that will make no sense, haha. I will say, however, that I did work by weaving the plain burlap for a few loops, then exchanging it with the chevron ribbon and I worked in “sections” of burlap instead of weaving the whole 15 feet through at once because that would have taken FOREVER. I would just work it through for a few feet then cut it and start over in the next section, since my chevron ribbon was wired it was easy to secure it even though I was not using the whole roll at once.

4th2

Step 2: Once I was done weaving my burlap and chevron interchangeably. I wove my 1″ white ribbon through the wreath in no particular pattern. This was simply to be the “white” in the red/white/blue holiday color scheme, the wreath looked perfectly fine without it.

Step 3: I cut three of each print of daisy from the bunch and stuck them through the wire frame, weaving the stem through the three metal bars so that the flower would remain secure. Then using a piece of twine I tied the wooden “S” to the wreath right atop the flowers.

inspecting the flowers again lol

inspecting the flowers again lol

Step 4: Once the wreath was complete, I took a few minutes to “poof” my loops and rearrange my flowers so they looked just right!

4th6

finished product!

This wreath cost me right around $15.00 to make and just out of curiosity I did a quick Etsy search for a “4th of July Burlap Wreath” and almost spit out my drink when I saw that the average wreath was going for an average of $50.00 plus shipping – WHAAAAAAAAT???!!! NO, NO, NO, people, you are getting ripped off, especially because you can buy almost all of the necessary components for one of these wreaths at Walmart. Furthermore, if you make a plain burlap wreath you can simply adjust it to each holiday or season by adding embellishments (a big benefit of the burlap wreath is that it is not permanent, if you mess it up or want to change it simply unweave and re-do) so potentially you can have the best wreath on the block time and time again for just around $10.00 for the year. So please, to keep me from having anxiety over thinking of people swipin’ that credit card for a $60.00 burlap wreath, at least attempt to make your own! Friends don’t let friends pay good money for cheap crafts lol. 

Bathroom Vanity Makeover – Cabinet Painting Tutorial

master3

The master bathroom was the last major house project we tackled before baby P was born. We had been putting off this particular project because we anticipated that it would be the most expensive of our DIY projects as well as the most work. Well, it took us two other bathroom updates (the guest bathroom and the half bath downstairs) to realize that replacing the entire vanity was a stupid idea. While both of the other bathrooms came out great and our cute little modern vanities look amazing, replacing  the old vanities meant ripping out the cabinets and sinks, having to sand and repaint the walls, install new tiles in the empty space that was left on the floor and replace the floor molding before installing the new vanities – SO much work. We spent hours laying tile, grouting and cutting molding when we very well could have just updated the old cabinets and just purchased a new vanity top. Oh, well, lesson learned and we still got two cute bathrooms out of it so no harm done. Needless to say when it was time to tackle the master bath, I was determined to simply repaint the cabinets and replace only the vanity top. Having already repainted our kitchen cabinets (I will post about this soon!), this was not my first cabinet rodeo, lol. When ordering the new vanity top, we ended up choosing a cultured granite in a light gray because it went with our color scheme but was also neutral enough to compliment really any paint color, should the new owners decide to change the wall color. After purchasing our vanity top, I  got to work on the cabinets. These were a super easy project (all the more reason I wanted to kick myself in the head for not doing this in the other bathrooms as well), especially when compared to the kitchen cabinet process, this one paled in comparison!

Now, I will get to the tutorial, but first some advice. If you buy an older home take a good look at the existing cabinets and fixtures before you look to do a complete overhaul of the place. While some things may be physically damaged beyond repair and need to be replaced for non-cosmetic reasons, if it is just ugly but still functional try to look beyond the hideous 1982 stock cabinetry because chances are you can save a lot of time (and maybe some cash too) with just a quick paint job! In our case the cost of the projects were going to be about the same (the cost of the custom vanity top was comparable to the cost of a new full vanity and replacing the floor tiles) so we didn’t necessarily save a significant amount of money by going the repainting route BUT we sure did save a heck of a lot of time and aggravation! I am a HUGE advocate for making simple cosmetic changes, it is AMAZING what a little paint and DIY decor can do for a room and with little to no effort and cash you can bring an old, dingy space back to life (and more importantly, into the 21st century, lol)!

REPAINTING BATHROOM CABINETS

*NOTE: This can also be applied to kitchen cabinets as well! Basically all of the same principles can be applied to painting wooden furniture, check out my post on re-doing old furniture here.

YOU WILL NEED: 

  • Semi or High Gloss Kitchen/Bathroom Paint (the label will say “kitchen and bath” these paints are specifically designed to withstand the moisture caused by showering and cooking. If you don’t want to buy a bathroom or kitchen specific paint go with a semi or high gloss regular latex paint, I DO NOT recommend any finish below satin, as eggshell and flat paint don’t hold up to moisture well at all).
  • Sanding Blocks or regular sand paper
  • Foam Brushes or Small Rollers (they make rollers specifically for cabinets, they are good for the large surfaces but I found that I needed to use the smaller foam brushes on the edges anyway so I recommend skipping the rollers altogether, as they won’t really save you too much time).
  • Polyacrylic Top Coat (I suppose this could be optional because you are using a high or semi gloss paint, however, I wanted the extra protection on the cabinetry).
  • Drop Cloth
  • Bonding Primer (optional)
  • Caulk (optional)

INSTRUCTIONS:

  1. Begin by removing all of the drawers and doors, then remove all hardware. If you are planning on reusing the hardware you can let it soak for a few minutes in warm soapy water then clean them with a toothbrush or you can repaint them using a satin spray paint).
  2. Give the surfaces of your doors and drawers a quick sand, no need to go nuts, just about a minute on each surface will do, you are simply trying to remove a good amount of the original sheen or varnish. Once you are done sanding, wipe all surfaces down with a damp cloth to remove any sanding dust. Don’t forget to sand the exterior body of the vanity as well. Once you are finished sanding, vacuum or dust the insides of the drawers and around the vanity itself to ensure that no particles will get on your wet paint once you begin working. NOTE: Some tutorials and cabinet painting kits (such as Rustoleum) suggest using deglosser (aka liquid sandpaper) in place of sanding. I have done both and I now prefer to just sand, it takes about the same amount of time and you won’t have to deal with the greasy disgustingness of the deglosser.
  3. Another optional step is using white paintable caulk to fill in any cracks or holes in the wood, this is a great trick! Just squeeze it in and smooth it out using your finger. This will make your cabinets look even newer as you will be hiding any wear and tear or factory imperfections. Most caulk is paintable after just a half hour. Again, this step is optional but if you are a perfectionist I wouldn’t skip it, as once you paint your cabinets (especially if you are using a light color) imperfections in the wood will be more apparent.
  4. Set up a work area for painting the doors and drawers, since this is usually a few day project, I do not recommend doing it outside. The garage or spare bedroom will probably be best (since I didn’t have any tiny humans crawling around at the time, I simply moved our dining table to the side, laid a giant plastic drop cloth of the tile floor and set up shop there). Lay a drop cloth (I suggest plastic) and you are ready to paint!
  5. If you are using stark white paint as I did you might consider applying a coat of bonding primer or cover stain first, that way you won’t require as many coats of paint to hide the wood color beneath. This is optional, however, and if you are using a darker color paint this is definitely unnecessary. As far as the method for painting the drawers and doors, the drawers can usually prop up on their own, but for the doors I use the same method as I do when cooking a whole chicken in the crock pot (lol), I create a few balls out of tin foil then prop each door up flat so you can easily paint the sides and edges. Now, give all exterior surfaces an even coat of paint, using even strokes in the direction of the original wood grain. I don’t paint the insides or sides of the drawers, when I first tacked my kitchen cabinets I posed this question to the Google gods (haha) and it seems that even professionals don’t paint the insides or sides of cabinets when refinishing them, which worked for me – less work, woo-hoo!!! Once you have applied your first coat of paint to the drawers, doors and exterior body of the vanity or cabinet itself, allow about 12-24 hours of dry time. I know that sounds like a lot of dry time, however, good dry time is key in ensuring that your piece will hold up and it is extra important in the case of cabinets as they will be handled on a daily basis. This is a good nap-time or after work project as you can spend an hour or so each day over the course of a few days.
  6. Repeat the painting process until you have applied the desired amount of coats, for darker colors this may only be two but for stark white you may need up to four if you choose to forgo the cover stain. Once your final coat has dried you can go ahead and apply your first coat of polyacrylic top coat if you are using one. I chose to apply two coats of the clear polyacrylic just to be safe. Once your final coats have tried go ahead and reattach your hardware and you are finished!!!

master2

I hope that by looking at these before and afters you can see what a difference refinishing your cabinets can make. You would NEVER know that my vanity was originally a piece of crap 80’s builder-grade cabinet! I will be making another post soon on our entire master bathroom re-do and give you some more budget-friendly decor pointers, so be on the lookout for that. In the meantime, here is a sneak-peak of the before and afters just to give you an idea.

master

master1

DIY Holiday Picture – Easter!

easter

Nothing makes me happier than my squishy baby P and since I feel like all the little thing has done since birth is grow, grow, grow, I try to take as many pictures of him as I can (and I am succeeding since my phone is currently at storage capacity lol). While I wish that I could get professional pictures taken of him for every holiday, my budget (and most people’s budgets) will not allow for this, so I have to improvise! Since I am big on sending cards for every holiday to friends and family, I love to stick a little picture of P in there to make it extra special (in this case EGGS-tra special lol). Now let me begin by saying, photography is not my forte unless you count being able to max out my phones storage space in under 3 months lol. I take all of my pictures using an iPhone camera and am yet to become proficient in Photoshop, so if this sounds like you, I am about to give you living proof that you can still whip up a cute little holiday photo for a few bucks in no time flat! When I first decided to do my own little baby-photo booth it was after I had seen a professional picture of a newborn on a cute little Valentine’s Day set and I’m no expert but from the looks of it, all it seemed to be was a baby on pillow, in front of a white background with some heart bunting, and I thought “hey, I can totally do this!”. I’ll share my Valentine’s Day and St. Patty’s Day pictures below as well. The best thing about this little DIY holiday picture is that it will probably cost you under $5.00 (or if it’s an Easter pic it will be FREE since you probably already have plastic eggs and a basket for the kiddos right?). So if you have a smart phone, a white sheet and access to a dollar store you’re good to go!

YOU WILL NEED:

  • Smartphone or other camera
  • White sheet or large piece of fabric (it doesn’t have to be white, but I feel like most of us have a white sheet lying around somewhere).
  • A room with a window.
  • Painter’s Tape (or any other kind of strong tape)
  • Props (get creative! I hit up my local Dollar Tree and pick up a few items that I think would work well, for Valentine’s Day I used the heart garland, St. Patty’s Day the little hat and for Easter the bunny ears, basket and eggs).
  • “Phonto” Free Picture editing App (if you want to add text to your picture)

HOW I DID IT: 

  1. Start by setting up your backdrop. Use a wall that is facing a window, this is a tip I got from a photography savvy friend, that way you’ll have lots of natural light for your photo. Take the sheet and tape it along the wall (I usually use painter’s tape so as not to damage the paint, but this time I didn’t have any on  hand so I just used shipping tape and the paint still survived haha) so that half of the sheet is against the wall and half is spread out along the floor below.
  2. Set up your props, then using your camera take a test picture to be sure that you like the way the photo looks and that you are able to capture your subject (child) and all of the props in the photo frame. These were my test pictures for Valentine’s Day and Easter (the Easter shot looks a little dark but I adjusted this using the enhance tool on my phone lol).                                                                                                                           east2 vday
  3. Set up your little cutie and snap your photos! FYI this works best with a happy child lol I shot for right after nap time.
  4. After you’re happy with your photos, use the “Phonto” App to add text if you wish. Next I will use the free Walgreen’s app to upload and print my photos for store pick up. Make sure you Google Walgreen’s coupons! For my Easter pics I was able to print 15 photos for $1.71 using a 40% off coupon!!!

TIPS: 

  • If you’re in need of a cute outfit for your babe, Walmart always has holiday themed outfits for between $3.00-4.00. The St. Patty’s Day onsie P is wearing below was $3.25.
  • This is a great idea for a kids holiday party or a play date! Just set it up and let your friends take pics!
  • If you want to add a little extra something pic up a half of a yard of holiday fabric, it’s always cheap and available at your local fabric store. I think the heart fabric I used in the Valentine’s Day pic cost about $1.00.


val2

The wooden crate I already had but was purchased at Walmart for $7.00 (it was good for this pic because P wasn’t sitting up yet). The chalkboard also had but was purchased on Amazon.

val

east


east1

stpat

This one I whipped up quick by simply draping the white sheet over a chair.

DIY Chalkboard – No Chalk Paint Required!

mirrrrr

As much as I love to craft and create, the easier the project the better! I love chalkboards and had been searching for one to display in our kitchen as a menu/note board for quite some time. Problem was, anything I was finding on Etsy or at local homegoods shops like Marshalls was way too expensive for my decorating budget. After hopping on Pinterest and seeing what my DIY options were, I found that most people were using either old frames or mirrors and inserting a piece of plywood painted with chalk paint or simply painting over the existing mirror with chalk paint. I knew this would be perfect since I had two dresser mirrors left over from my repurposed entertainment center, good thing I resisted my husband’s pleas to take them to the dump every weekend, my subconscious must have known I would be able to reuse them somehow, haha! I began this project while snow-bound during our “snow storm” aka 3″ of snow which is nothing to us northerners but apparently here in the south it was enough to get my hubby a week off of work, lol. After inspecting the mirror I was going to use I decided to go with adding a piece of chalk-painted plywood instead of painting over the mirror since the existing piece was super heavy and I have a phobia of hanging super heavy items on the wall with a soon-to-be-crawling baby in the house. I removed the mirror from the piece (very carefully!) and disposed of it, left with only the wood frame I prepped it to be painted (see my tutorial on how to paint wooden furniture here). After finally getting out of the house (4 days inside is NOT fun lol), I headed to Lowes to pick up my sample size paint (I used Farmer’s Market by Valspar to match our dining chairs), chalk paint and plywood. Here’s where the “no chalk paint required” part comes in, the craft gods must have been smiling upon me that day because Lowe’s saw was broken so they were going to be unable to cut my plywood to size, so I decided to go to Home Depot instead. There as I was picking out my piece of plywood in the lumber aisle I found that they had pieces of plywood that were ALREADY CHALKBOARDS, WHAAAAAAAT??!!! I was so thrilled! This was amazing since it eliminated quite a few steps in making my chalkboard, now all I would have to do was paint my frame and glue the board in place. I even saved some coin since the chalkboard only cost about $9.00, and the chalk paint alone would have cost $9.00 in addition to whatever the plywood would have cost me, I still have quite a few pieces left over for future chalkboard projects. This was a fun and easy project and is great for birthday boards, menu boards, you name it! Here is my tutorial:

YOU WILL NEED:

  • Mirror or empty frame
  • Chalkboard cut to size (available at Home Depot here, they cut it for me for free)
  • Latex Paint or spray paint (if repainting frame)
  • Black Foam Brushes (if repainting frame using latex paint)
  • All Purpose Crafting or Wood Glue (preferably something that is fast-bonding, but as long as it dries clear and works on wood, you’re good to go).


HOW I DID IT:

  1. If you are using an empty frame, go right to step 2. If you are using an old mirror, CAREFULLY remove the mirror from the frame. Mine was not secured with any adhesive so it came out easily. I do not recommend busting up the mirror, I’m no health professional but I do know that nobody wants a DIY project to land them with a hospital bill, which WILL happen if you cut yourself with a piece of mirror glass or drop a heavy mirror on your foot. You have been warned lol.
  2. If your frame is wood you can follow my steps for repainting wooden furniture using latex paint here  . If  your frame is metal or even if it is wood, you can hit it with spray paint if you’re looking to save time. My frame was very think and ornate so I painted it using my latex paint method, but since the piece wasn’t going to see much action I cut down on the dry time allowing only about 6 hours between coats, then using 2 coats of polyacrylic as a top coat.
  3. Once your mirror is painted and dried, you are ready to glue in your chalkboard. Apply a line of glue to the inside of your frame where the board will sit, then insert your board, pressing down hard (I used a tackier glue so that it wasn’t running all over the place and I made sure that after pressing it in I turned it over to wipe up any glue that had gooped out onto the front). Allow the glue to dry for the recommended time and you are done! Check out my before and afters below.

mirroba

Here is my before and after of the mirror. You can see from the before pic why my husband wanted to throw them out, what the heck were we ever gonna do with these things? lol I didn’t include the cost of the paint because technically I purchased it to use on a bigger project that I am working on. The color is “Farmer’s Market” by Valspar. COST: ~$9.00

mirrorblu

Since I had an extra mirror and I’m an awesome sibling haha, I made one for my sister’s apartment to match her jungle-y printed chairs. I used a sample size of “Painted Parrot” by Valspar. COST: ~$3.98


Repainting Wooden Furniture – Latex Paint Tutorial

securedownload

My obsession with repainting furniture was born when we moved into our new home. Trying to furnish a large house on a small budget was presenting us with quite a task, so I decided to get creative. After experiencing success using gel stain on the dresser I repurposed (see my tutorial here), I decided to redo two chests for our bedroom (since our dresser and all the closets in our home still weren’t enough to house all of my clothes lol). I located one at a thrift store for $35.00 and another on Craigslist for only $15.00!!! Since both of the chests were going to be used in our bedroom, I painted them black to match our bedroom furniture, not too exciting in the creativity department but they look great in the space!

My next wooden redo (and the mother of all projects) was a super long dresser that I repurposed as an entertainment stand/center for our living room. This is probably my favorite redo yet. Given what it looked like to begin with this came out amazing and I am so proud of it! I spent quite some time looking for a piece that would work as our living room entertainment center, everything I was finding was too small and the ones that did fit my size requirement were too pricey. I finally located a long ornate looking dresser at one of our local thrift shops and knew it would be perfect, especially for the price – it was only $85.00! Yet again, I am sad to say that I do not have step-by-step pictures of these projects but I will do my best to explain in detail, check out my pics below for before and after images of all three projects. Here’s how I did it:

YOU WILL NEED:

  • Sanding blocks or sandpaper (100-150 grit)
  • Latex Paint (I use 8oz sample paints available at your local home improvement store, I talk about them here). *Note: when possible purchase a flat latex paint (it will adhere to the furniture best and resist chipping), that is what I used on the black dressers. If you are purchasing sample size paints they are only available in satin finish which I’ve found to work just fine.
  • Wood Filler (if you need to patch any holes or cracks)
  • Clear Top Coat (gel or polyacrylic)
  • Black foam brushes
  • Drop Cloth
  • Rags


HOW I DID IT:

  1. First, I removed all hardware, to include the pulls and any metal pieces that you will either discard or replace after the fact.
  2. Remove the drawers. If your piece of furniture is super dirty, wipe it down with a little soapy water using a rag. This is not a super important step, I only did it to one piece that had some kind of sticky residue on it. You’ll find that sanding will remove most dirt anyway.
  3. Next, begin sanding (I always do steps 3 & 4 outdoors to keep my indoor workspace clean). I don’t go nuts with sanding, my goal is simply to remove a good amount of whatever varnish or clear coat is original to the piece, I don’t try very hard to get it down to the wood grain, I find this is only really necessary when re-staining a piece. I sand for about a minute on each surface, paying attention to the edges and grooves. My repurposed entertainment center had some very ornate designs on the front, I didn’t bother sanding inside every groove since they wouldn’t be exposed to getting hit or bumped into once the project was complete.
  4. Once you have finished sanding, take a damp rag and wipe down the whole exterior of the dresser and drawers to remove any sanding dust. I also take the time to vacuum or dust out the insides of the drawers since you don’t want any dust sticking to the paint once you being the painting process. After the wet wipe-down is complete dry the piece off with a dry cloth and you’re ready to begin – YAY!
  5. I set up my painting area so I have plenty of room to move around and be sure that all of my work space is covered by a drop cloth of some kind. Begin your first coat by using a foam brush to apply an even coat of paint, when painting furniture always paint in the direction of the original wood grain, not against. Since you will be allowing 12-24 hours dry time in between coats, feel free to wash and reuse your foam brush.
  6. After you have finished putting the first coat on all of the pieces you are finished for the day. At this stage it’s not going to look good at all, don’t worry, it will get there!!! If you are using a flat paint it is going to look very streaky and uneven, this is fine, any places where the light hits the paint weird will be covered by the top coat. I allow 12-24 hours between coats, so I will generally return to the piece the same time the next day to apply the second coat, this makes it a great after work project or naptime project for all you fellow mamas out there!
  7. The amount of coats you will require for each piece will depend on the color of your paint choice. For instance, the black dressers required only two coats, where as the long dresser required three coats. I must note that I do not sand in between coats when painting or when applying my top coat, many tutorials (and the outside of the top coat can lol) will tell you to do this, I just found that it was an extra step I did not need but feel free to add it if you want, it won’t hurt! After your final coat is applied and dry you are ready to start your top coat. Take a black foam brush and begin applying the clear coat in an even layer using even brush strokes, be mindful not to leave behind any bubbles (sometimes the polyacrylic will do this, just go over the area with your brush) and not to allow the clear coat to pool at the edges of the piece. I generally apply three top coats, allowing 12-24 hours dry time in between coats. *Note: For wooden furniture I am partial to the gel top coat, I have found it to be super durable and easily cleaned, but if you are not comfortable using oil based products then a polyacrylic is a good substitute.
  8. The final step is replacing the hardware. For the two chests, I purchased new pulls (here is a link to the exact ones I used, available at Lowes), I got a little obsessed with the farmhouse pulls lol. If the original pulls are in good shape, which was the case for my repurposed entertainment center, simply clean and reuse them or update them with some spray paint (I use a black Rustoleum satin finish spray paint when repainting my pulls).
  9. You’re finished! Do a touchdown dance and get ready to blow peoples minds when they ask you if you got your piece at Pottery Barn (which has happened to me!) and you tell them “no, bish, I MADE THIS!!!” 🙂

BEFORE & AFTERS:

chest2

This is one of the chests that I redid for our bedroom (sorry the before picture is so crappy, I had already removed the hardware and sanded the piece before I remembered to take one). I found this one on Craigslist for $15.00 which was amazing because it was in great shape! I half thought it was a ploy that would lure me to my death, but for a $15.00 dresser I was going to take my chances haha jk. I used flat black paint (any brand will do, black is usually sold pre-mixed in the paint aisle but you can also have a sample sized tinted to black if you don’t want to purchase a pint) and the General Finishes Gel Top Coat. Follow the link I mentioned in the tutorial for the pulls I used, I purchased them on sale but according to Lowes website they will run you about $3.30 each, still not bad price-wise but not necessarily a bargain so try for something cheaper or repaint the existing hardware if you’re working with a tight budget. The baskets I purchased at Michael’s on sale for about $4.00 each. This piece has held up extremely well, I have moved it, bumped it and put drinks without coasters on it and it has proved super durable and easy to clean. COST: ~$35.00

chest

After redoing the $15.00 chest mentioned above, I decided I needed one more small dresser to contain the rest of my shirt overflow (yes, this dresser contains only shirts and not even all of them lol). I was excited to find this dresser for $35.00 at a local thrift store, albeit a little bummed that I wasn’t going to be getting too creative with it since I wanted it to match the other chest in our bedroom. Since my husband said I was getting a little “basket crazy” lol I decided to leave all the drawers in tact on this project. As you can see I just removed the weird metal emblem (if you encounter one of these on your projects just wedge a flathead screw driver underneath and it should pop off fairly easily, then just patch the holes with wood filler) and replaced the pulls. Unfortunately I spend about $25.00 on pulls for this dresser but it was all made worth it when the realtor that was touring our home pointed to the dresser and dead serious said “Pottery Barn right? I think I saw that there.” I was super flattered and he couldn’t believe that I had made it! Like the piece above, I used a flat black paint and General Finishes Clear Gel Stain. This piece has held up great as well. COST: ~$60.00

living2 livingroom


This piece is my favorite redo so far! It is also my Everest lol This beast is over 70 inches long, weighs as much as a car (at least that’s what it feels like lol) and has nine drawers (the same amount of months pregnant I was when I took on this project lol), needless to say this one was quite the project but my hubby helped me a ton so he deserves a lot of the credit :). After we decided to move our TV stand into the nursery I was on the hunt for a new “entertainment center” and by that I mean a dresser whose drawers could house the Xbox, cable modem, DVD player and all the wires. The issue I was faced with was the fact that for the length I was looking for (something that could eventually accommodate a 55″ TV, not the dinky one pictured above), I was only finding dressers that cost upwards of $200.00. After about a month of trolling the local thrift stores and Craigslist postings I came across this gem for $85.00, I was super happy that J trusted my vision on this one because it looked rough lol. As I mentioned before it weighs about as much as a house, it took three guys to load it into my car (which it was too long for, we had to drive with it hanging out the back, haha), and since I couldn’t participate in any of the lifting when we got home my hubby had to just shove it out the back of the car and hope that it didn’t shatter into a million pieces (it didn’t lol). On this particular piece I used “Borough” by Valspar and General Finishes Gel Top Coat (which was a total bitch because in fear of my child coming out with five arms, every time I put on a coat I would have to leave the house for hours because of the fumes lol). If you notice from the pictures, we repainted the original hardware using a Rustoleum black satin spray paint, they are still in good shape and haven’t faded or chipped at all. Lastly, my hubby drilled holes in the back so that all the wires could connect to the electronics inside the drawers while remaining out of sight. This piece has held up great, since P’s arrival I am constantly bumping it with toys and rockers and what have you and it is yet to chip! We feel bad for the movers that will have to transport this beast to our next home, but we love it!!! I almost forgot to mention, this piece came with two hideous mirrors that the thrift store basically forced us to take even though we told them we didn’t want them, check out my easy chalkboard tutorial to see how I turned them into a neat DIY project! COST: ~$95.00


Grilled Portabella Sandwich

gpsan

So my dear ‘ol hubs is in NYC for a conference for a few days, leaving me and master P to rot here in Jacksonville lol kidding. Anyway, I always joke that when he is out of town I save so much money because I could literally eat one thing the entire time and be fine with it (usually it’s some kind of pasta dish that I love but he wouldn’t consider a “meal” .. like what? it’s carbs therefore it’s all you need lol). I used this opportunity to make something using one of my most loved (but one of my hubby’s most hated) ingredients – mushrooms! While my hubby and I agree on pretty much everything, mushrooms are not one of those things, but I guess if that is the only point of contention in a relationship, you’re doing okay! lol. Since I had along day (poor little P had to get his shots) and didn’t want to spend a ton of time preparing a meal for myself, I decided to recreate a sandwich from the Brickhouse Brewery back on LI. A little background info about this sandwich, it basically sustained myself and bff Tiffany during the summer of 2010 when our diets consisted of more alcohol than food haha. While I would be lying if I were to say I remember with absolute certainty what was on it besides portabella mushrooms and mozzarella (since it was usually preceded and followed by many Jack & Diets lol) I do know that there are a lot of fun memories surrounding this sandwich lol. From what I can recall it was super delicious and me and T would always split it, I miss her (and that summer) so much and wish I had her here tonight to split this one with me and sing “You Can Call me Al” 🙂

The recipe is super simple but who wants difficulty when cooking for one? 🙂


GRILLED PORTABELLA SANDWICH

*Serving size is 1 sandwich, you can easily make as many as needed 🙂


INGREDIENTS

  • 1 portabella cap
  • olive oil
  • balsamic glaze
  • salt & pepper
  • roasted red peppers (jarred or homemade)
  • fresh mozzarella, sliced
  • 1 Kaiser roll


DIRECTIONS

  1. Heat outdoor grill or indoor grill pan. Clean mushroom and remove stem.
  2. Brush mushroom with olive oil on both sides and sprinkle with salt and pepper.
  3. Place mushroom bottom side down on grill, wait about 5-8 mins and flip.
  4. mush

    Ignore how filthy my grill is, it’ s just starting to see some action with all of this nice weather we’ve been having. Cleaning it will be tomorrow’s naptime project!

  5. Once mushroom has been grilling top side down for about 5 mins layer your sliced cheese on top and place your bun on warming area of grill to toast it. Allow cheese to melt.mush2
  6. Once cheese has melted assemble your sandwich by placing the portabella and cheese on the bun, followed by the roasted red peppers and a drizzle of balsamic glaze. Enjoy!

mush3 mush4

*Feel free to use a more budget friendly cheese or add extra grilled veggies! There are endless options with this delicious sammie 🙂


Redoing furniture on the cheap – my favorite products!


funr3

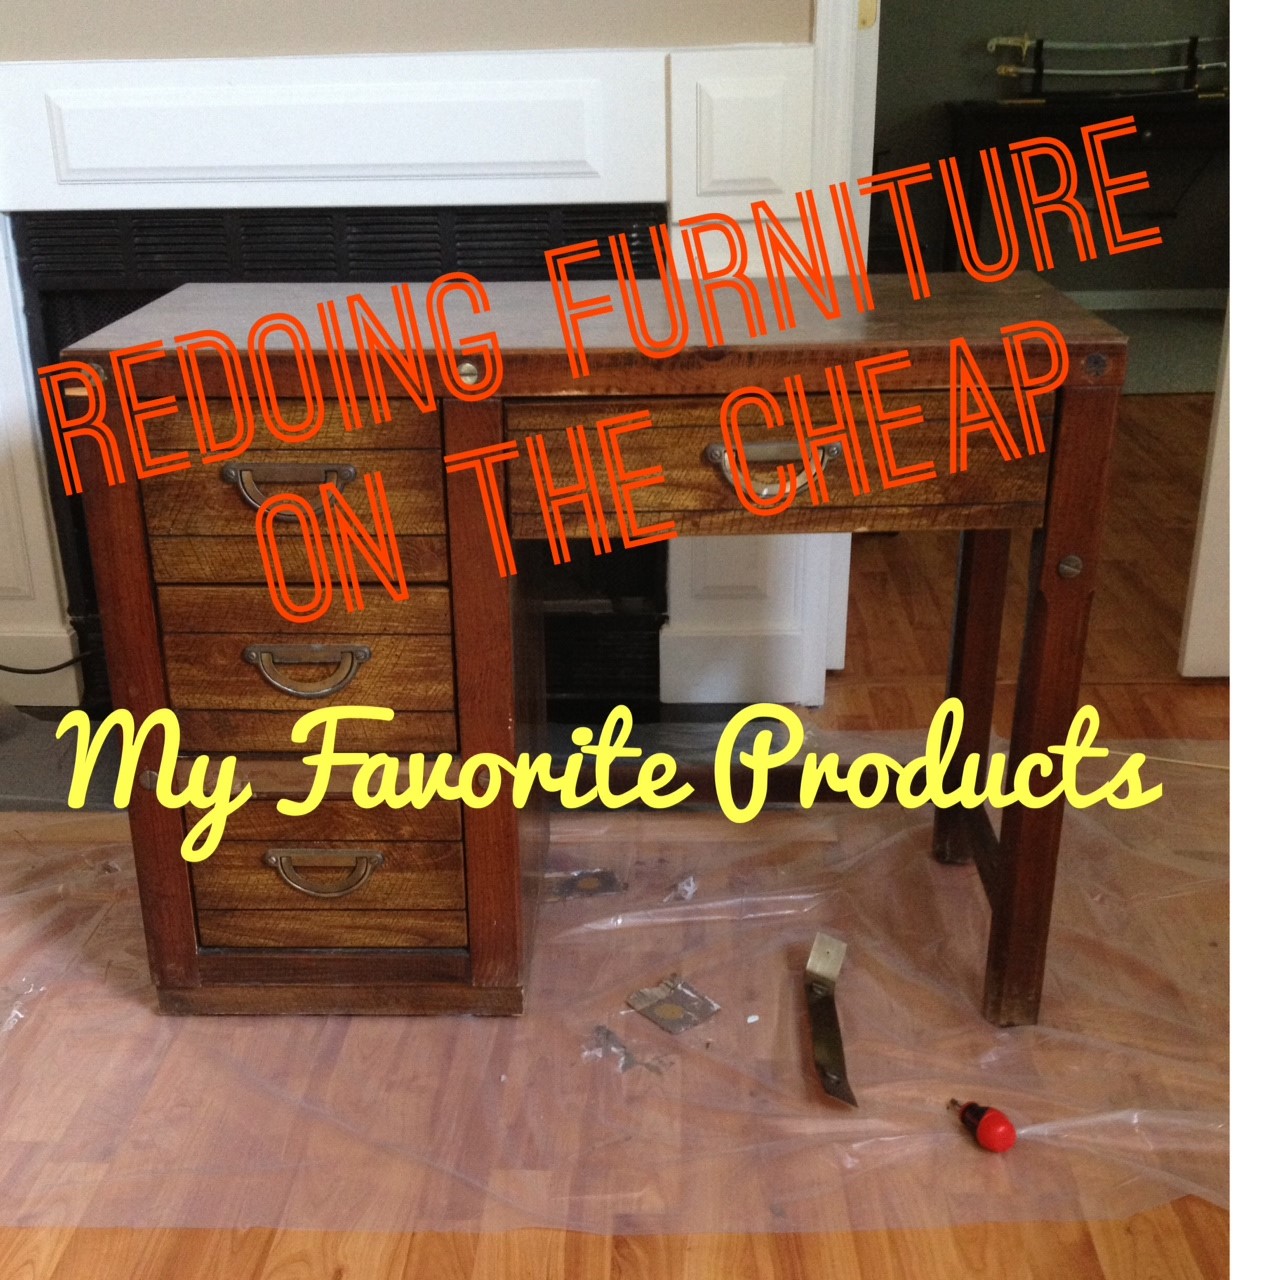
Some of my favorite projects have been my furniture re-dos. I love being able to see the finished product sitting there in my house each day as if to say “oh, hey lady, good morning, remember when you made me for $30? Yea, you’re awesome!” lol. My interest in refurbishing furniture was sparked by our move to our house here in Jacksonville. Up until  then we had been living in a one bedroom condo with little need for much more furniture than the few IKEA pieces we’d purchased when we moved in. Suddenly we found ourselves living in about triple the square footage with our tiny condo’s worth of furniture at hand. Having seen a few things on Pinterest, I figured I’d give these re-dos a try. So I hopped on Lejeune Yard Sales (our local version of Craigslist) and found a few pieces for  a few bucks and an obsession was born, haha.

Now I consider myself a novice furniture re-doer (is that a word? oh, well lol), I won’t say expert because I’m sure there are actually experts out there that will read this and cringe at my use of sub-par products and corner-cutting techniques, which brings me to my next point. My goal from the beginning has been to re-do my pieces on a budget, so I try to use products that are readily available at local home improvement stores at a low price point. Should I ever decide to re-do furniture for resale I would consider more expensive products, however, until that day my ways have worked for me and I’m sticking to ’em! Here are some of my favorite products (in no particular order) that I’ve used on many of my projects and while some are rather obvious, it will be easier to refer to this list when posting individual tutorials.


1. SANDING BLOCKS – I don’t to a ton of sanding on my pieces, just rough them up a bit and try to get any existing varnish dulled down. If you’re just looking to re-do an old piece you purchased for a few bucks or looking to upgrade and existing piece of old furniture, you probably don’t want to invest in an electric sander that you’ll probably use once. I happen to own an electric sander but I HATE that it generates so much dust and I find that sanding by hand has been fine in terms of how well my pieces have held up. These sanding blocks are easy to grip and great for giving a quick sand with even pressure as opposed to regular sheets of sand paper. I usually buy a 6-pack of 100-150 grit at Walmart or Lowes for about $6 (I found a 3-Pack here on Amazon for $7.30), tthese are great because they are reusable so a few will last you a few projects.

2. WOOD FILLER – This won’t be necessary for every piece, but for instance if your dresser comes with some weird metal piece that you’d like to pop off before you paint, this will fill the holes left behind. Additionally if your piece has any damage to it, such as deep cracks, dents in the wood or imperfections that can’t be fixed with sanding, this will do the trick. If you want to get supper crafty and change a two-pull dresser to a single knob just fill in the old holes with wood filler and drill new holes. Once you paint over it you will never know there was a hole or ding! Also, this tube is cheap and will last for many projects (I think I’ve been using the same tube for a year – impressive!!! lol). I usually go with the “natural” color, but it doesn’t matter what you choose as long as it’s paintable.

Carpenter's® Interior Wood Filler Natural -3.25oz

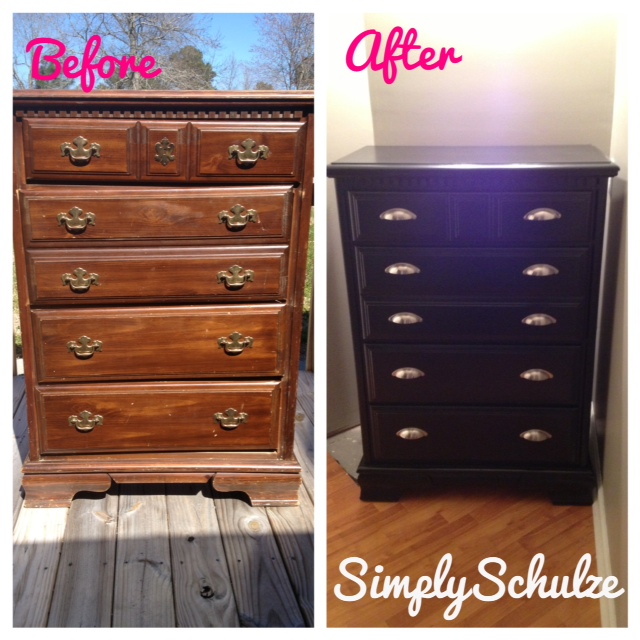
3. GENERAL FINISHES GEL STAIN – This stuff is awesome! It is technically a stain but goes on like paint. I originally used General Finishes which I purchased here on Amazon after seeing a tutorial recommending this particular brand (pictured below is my before and after of the dresser I re-did for P’s nursery and here is the tutorial). That being said I’d like to point out that recently Minwax has started making gel stain available in a variety of colors and is available at local home improvement stores, if you’d prefer to just buy it in-store as opposed to online. I prefer gel stain to regular stain because of the simple fact that it is so easy to work with. Regular stain is messy and requires a LOT of prep work and sanding which I am just too lazy for lol. That aside, I think that the gel stain gives it a more modern look. I also love the gel clear satin top coat (also available here on Amazon), it’s a little pricey but well worth it, when stored correctly a pint will last you MANY projects. NOTE: These GF products are not low VOC meaning that you will require lots of ventilation while doing your projects, no shutting yourself inside your garage for hours on end in the dead of winter, you need mask on, fans going and windows open! That being said breathing the stuff for a bit won’t kill you or but if zero or low VOC or eco-friendly paint is important to you please disregard this product recommendation.

4. FOAM BRUSHES  – Okay this is kind of an obvious one lol but painting furniture with regular paint brushes will leave brush strokes. These foam brushes will put on a nice even coat of paint are easy to work with. Best of all they are SUPER cheap so you can buy a bunch and don’t have to worry about cleaning them in between coats, just chuck it and use a new one when you return to the project later. I have also used 4″ foam rollers designed for painting cabinets but only because I already had them from my cabinet re-do, it wouldn’t really be cost effective to buy a small roller set just for a dresser or what-have-you since you will still end up needing foam brushes for the corners, edges and grooves. Like I was saying, I always keep a ton of these foam brushes on hand since I end up using them on so many crafting projects, I purchase the 2″ ones at either Lowes ($0.79 ea) or Walmart ($0.47 ea).

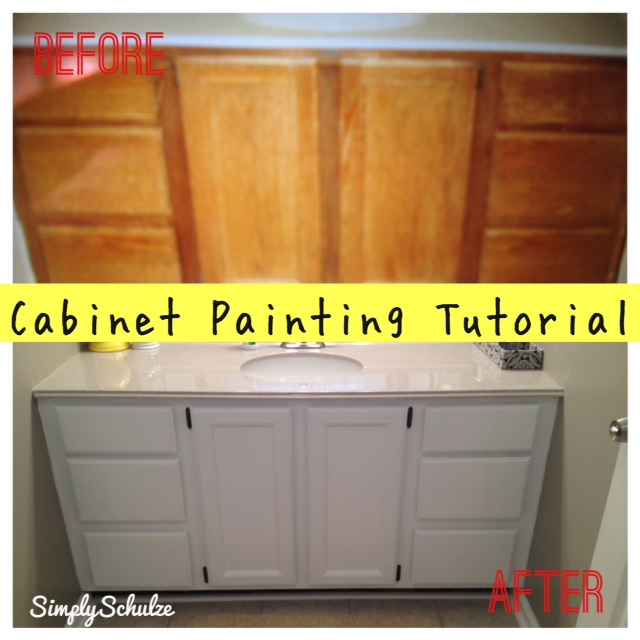
5. BONDING PRIMER – This product comes in SUPER handy when refinishing laminate or fiberboard furniture. That being said, when possible try to stick to refinishing solid wood furniture, the finished product is much more durable and looks a lot nicer, BUT if you already have something lying around that you want to spruce up or happen to come across something for super cheap like I have, go nuts! Since you can’t sand fake wood, this bonding primer helps whatever paint you use adhere to the piece with minimal chipping (we hope, lol). The brands I use are Zinsser and Kilz but there are tons out there, as long as it is labeled “bonding primer” you’re good to go. Good thing is, you’ll only require one coat of this so a quart will last you a few projects. Check out my tutorial for re-doing laminate pieces here. NOTE: This is also some powerful stuff, it is oil-based so it can be messy and SUPER strong in the fumes department so be sure to keep those windows open! For a few more bucks, I think Lowes now offers an “odorless” version.

KILZ Gallon Interior Oil PrimerZinsser Gallon Interior Oil Primer

6. SAMPLE SIZE LATEX PAINT – If I was listing these in order of favorites, this would be number one. I know that there are tons of tutorials out there using chalk paint and furniture wax and while the finished products are beautiful, I am yet to try it. Latex paint has worked great for me, it’s cheap and I’ve found that as long as you have a solid piece of furniture and/or a good top coat it will be just as durable. I started becoming obsessed with these sample-size paints after I redid the dresser for P’s room using the java gel stain. I ended up using not even an eight of a quart and didn’t plan on using it for any other furniture in the foreseeable future (I’m pretty sure it’s still sitting in my garage and is most likely a solid block by now lol). In the interest of not wasting money like that on my next piece, I went to Lowes and instead of purchasing a quart of paint in my desired color, I had them tint an 8oz sample size (see below). Get ready to have your money-saving mind blow – it cost $2.98 (say whaaaaaaaat?!!?), I thought to myself “why you no think of this soon stooooopid???” haha. The truth is, for a lot of pieces, you’ll find that even with this tiny sample size you’ll have a ton left over. Be sure to keep it, they’re great for other craft projects! NOTE: Unfortunately, these little samples are only available in satin finish which is not ideal for furniture (a flat paint would adhere better), however, my pieces look great and I haven’t experienced any chipping so I guess it’s not that big of a deal.

Valspar 8-oz Cathedral Stone Interior Satin Paint SampleOlympic 8-oz Aqua Smoke Interior Satin Paint SampleValspar 10-oz Radiant Orchid Interior Satin Paint Sample

7. POLYACRYLIC TOP COAT – This is a great top coat, it holds up well but is water-based so it’s a good alternative to a heavy oil-based top coat. I have used this on many of my pieces. If the piece is more for looks and isn’t going to experience a lot of bumps and day-to-day wear and tear (I used this on my chalk board frame and the little make-shift bathroom pedestal), I always opt for this product because it is easier to work with and requires less dry time than the oil based gel top coat. I usually purchase the satin finish because I prefer my pieces not to look super shiny, but if you’re piece is going to be touched and need to be wiped down a lot a gloss finish may be better suited to your project.

8. PLASTIC DROP CLOTHS – Here in NC our weather is not too conducive to painting outside, as most of the seasons have one factor or another that will make it pretty difficult (spring – rain, winter -cold, summer -humid etc.). Since multiple coats and a lot of drying time is required for furniture, the chance of you getting a solid 12-24 hours where there is no rain, the temperature is favorable and there is no wind to blow debris or bugs onto your project is pretty much none, haha. Additionally the fluctuating temperature makes it hard for me to paint in my garage since the temp in the garage is pretty much always the same as it is outdoors. Taking this into consideration I do all of my furniture painting projects in my living room or office on a big plastic drop cloth and even though my house will look like a project-zone for a few days it is well worth the finished product! I prefer plastic to canvas drop clothes because I am always paranoid that spilled paint or stain will seep through the cloth and onto the floor, which would not be the case with plastic. When I am finished I simply take it outside shake it out and fold it up to reuse for my next project!

 12-ft x 9-ft Plastic Drop Cloth