DIY Hand Painted Sign

handsign7

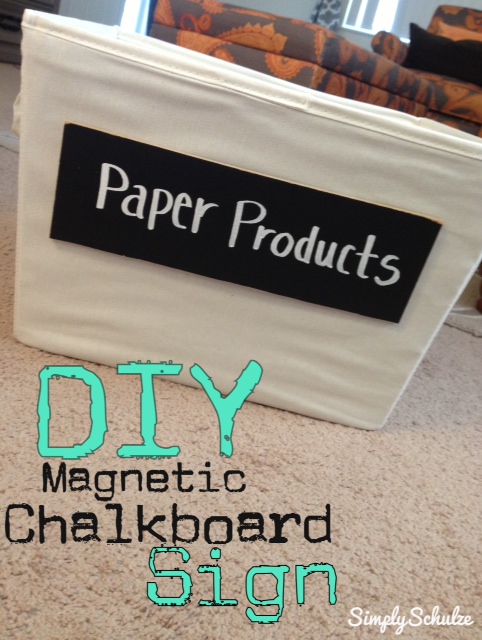
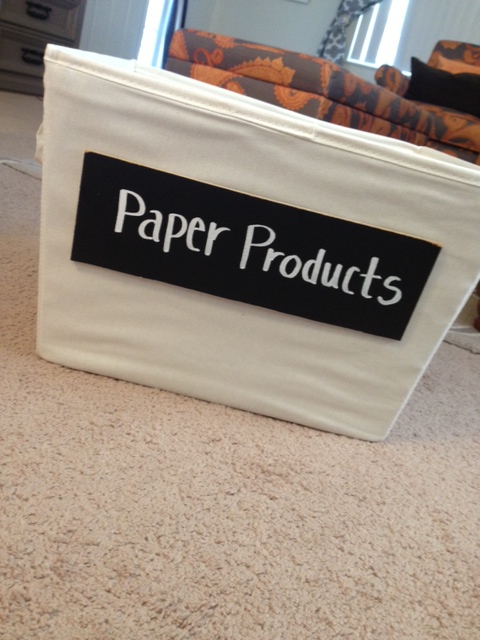
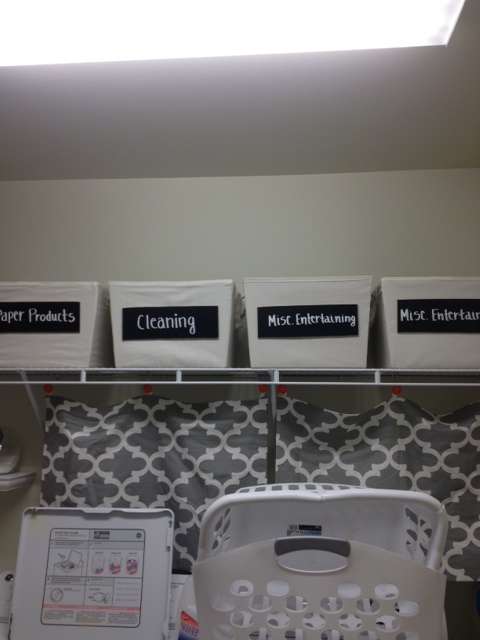
Please forgive that my past few posts are all related to the laundry room/command center that I am yet to post about (I promise to do so soon!), but it just so happens that a lot of my DIY projects as of late have been part of that particular little room makeover. This little sign I made as decor for our little family command center, emphasis on “little” since I didn’t have much space to work with, this cutsie little sign was the perfect thing to jazz it up. Another reason I am so excited about this little sign is because it was my first attempt at a hand painted sign using this particular method (printing out the wording and using painters tape cut with an X-acto knife to create a stencil). Additionally this project was my guinea pig for what will be two larger painted decorative signs that I am now planning to get to work on in the next few weeks given that this one came out so well! So if you’re like me and love the idea of DIYing something that fetches a fortune on Etsy (like hand painted signs!), give this one a try, all you need is wood, some painter’s tape and a steady hand. I also want to add that my inspiration for this project was both my glass etchings (see tutorial here which is generally the same idea only with glass and etching cream as opposed to wood and paint) and my friend Courtney of Wildly Domestic’s tutorial for her growth chart ruler in which she uses this same technique for stenciling and painting the ruler! If you’re skeptical about your ability to pull this one off give it a try anyway by practicing on some scrap wood, just be careful with that X-acto knife, I wouldn’t want my project to be the reason for any DIY-induced ER trips :-P.

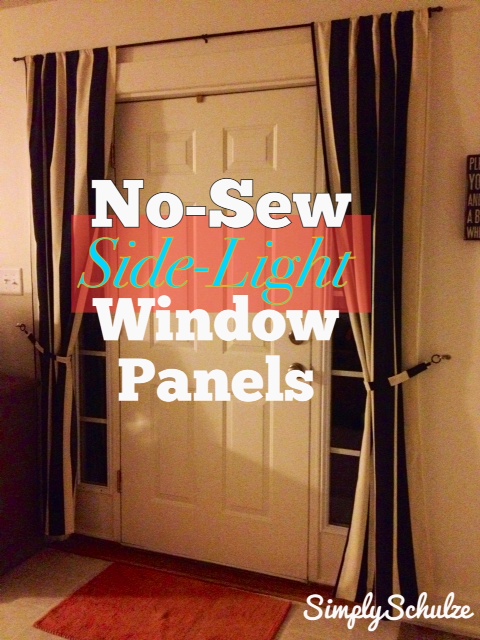
DIY HAND PAINTED SIGN

WHAT I USED:

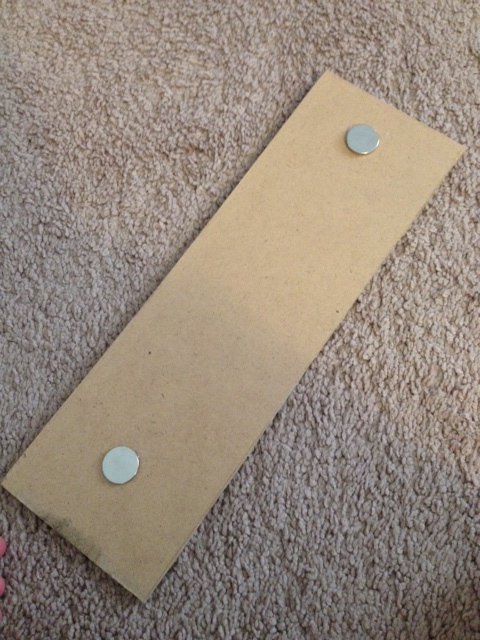
  • 1 small wooden plaque – normally I would just use scrap wood or cheap lumber from Lowes, however, my laziness got the best of me when I saw this little pre-cut plaque at Michael’s for only $2.99 that fit the space perfectly and already had a decorative edge.
  • chalk paint – you need not use chalk paint, that is just what I had left over from my previous projects and the color was right for the space. Any latex or even acrylic paint will do. Check out my post on using homemade chalk paint here. For this particular piece I used “Stone Mason Gray” by Valspar, read about my love for sample size paints here!
  • white paint – for distressing the wood. If you do not plan to dry-brush the wood for a distressed look you can skip the white paint altogether. I just used latex trim paint we had lying around from our work on the Honey Tree house.
  • acrylic paint – I used acrylic paint for the wording but latex paint will do as well if you have some lying around in your desired wording color, it will just take a little longer to dry than if you were to use acrylic.
  • sanding blocks or sandpaper
  • foam brushes, for painting
  • regular paint brush, for dry-brushing
  • small paintbrush, for wording
  • clear topcoat – I used this Krylon Matte Spray Finish purchased at Walmart for about $3.00, since I had it leftover from my DIY Painted Plastic Planters (post coming soon!)
  • painter’s tape
  • scotch tape (or any clear tape)
  • X-acto knife

INSTRUCTIONS:

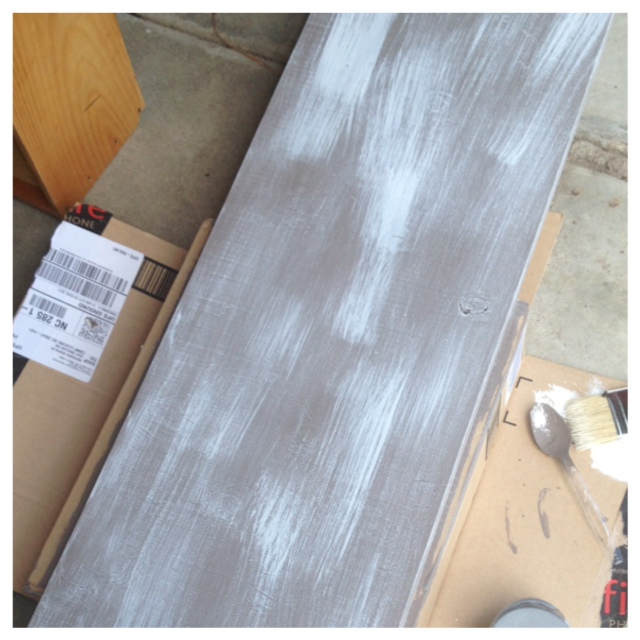
Step 1: I began by preparing and painting my piece of wood. For a more detailed description of how I dry-brushed and distressed the wood check out my DIY Rustic Picture Display to see the step-by-step instructions on a larger piece. For the purposes of this post I’ll give a more concise version  – first I sanded down the wood surface quickly so as to remove any roughness or scratches, then I painted the wood piece with a coat of chalk paint (you may need more than one depending on your paint color, I only used one). Once the coat of chalk paint had dried, I dry-brushed the surface using a regular 2″ paint brush (see above mentioned post for detailed instructions) and once that had dried I sanded down the edges and a bit on the surface to give the wood a distressed look and wiped it clean with a dry rag.

handsign1 handsign

Step 2: Once my wood was prepped, I used painter’s tape to cover the surface of my wood. Then I simply created a document in Word of my wording in my chosen font and printed it out. I cut each of the words out individually and used scotch tape (any clear tape will do) to secure them onto the painter’s tape by covering the entire surface of the words with clear scotch tape.

handsign2handsign3

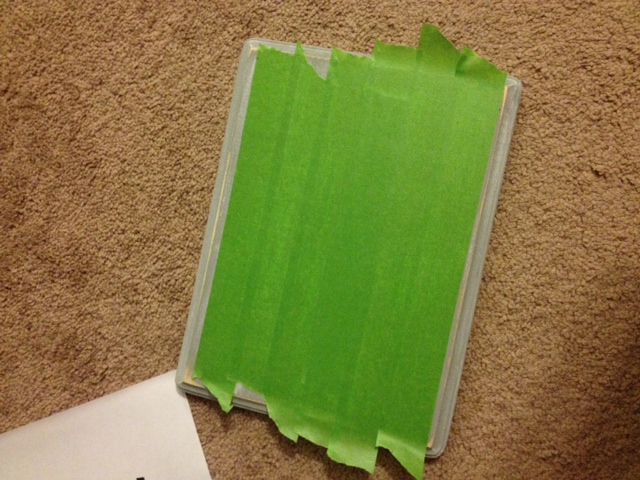
Step 3: I used an X-acto knife to carefully cut out each of the words. This is pretty tedious but goes much faster if you have some SVU re-runs on in the background :).

handsign4

Step 4: Once you’ve cut out all of your words use your smaller paint brush to paint the wording onto wood inside of your makeshift stencil. As soon as you have finished painting all of your words carefully remove the painter’s tape from the wood (I gave mine a few minutes to dry before removing the paint but didn’t wait too long because I didn’t want any of the edges to glob up against the painter’s tape and dry in weird pattern).

Step 5: As soon as your piece has dried apply your top coat and you are finished! If you like the way your piece looks sans topcoat this is fine too since your sign will most likely be mounted on a wall indoors, there isn’t much need for added protection to the wood.

handsign6

DIY Magnetic Chalkboard Sign

chalktotes

I get super excited when I come up with ideas for crafts using supplies that have been left over from previous projects. This particular project was created out of necessity for descriptive labels to attach to our fabric storage totes in our newly updated laundry room/command center (reveal coming soon!!). Since we will be on the move again in less than a year I didn’t want to permanently label the totes in the event that they wouldn’t be serving the same purpose at our next house. I considered several different options such as using velcro to attach laminated labels or using a hook to hang a small wooden sign from the edge of the bin, however, once I remembered that I still had some pre-made chalkboard left over from my mirror-turned-chalkboard, I quickly formulated an idea to easily create a few magnetic chalkboard signs for my bins. This “project” was hardly a project at all, in my case I had to have my hubby cut them down to size using his circular saw but if I had purchased a new piece of pre-made chalkboard at my local home improvement store they would have cut it for me at no charge, so all that is really required is some hot glue and magnets! This is an awesome organization strategy for a renter as you won’t need to deface anything permanently, since the signs are held in place by magnets on either side of the fabric and they can be switched from bin to bin (or surface to surface) seamlessly. I will definitely be returning to this project when I get around to organizing our pantry in the near future.

chalktotes3

DIY MAGNETIC CHALKBOARD SIGN 

*The amount/size of your supplies will depend on your specific need and how many signs you plan to make.

WHAT I USED:

chalktotes1

  • Chalkboard MDF, cut to size – Available here at Home Depot, when I made my original project they cut mine at no extra charge. Since I was using left overs from another project my hubby cut mine down to size, they are roughly 12″X4″ because that is what best fit my totes. NOTE: You can always use very thin MDF wood painted with chalkboard paint if you do not have access to this pre-made product!
  • STRONG magnets – I purchased these small disc magnets via Amazon for $8.99 per pack of 10. If possible test that the magnets you have will hold securely through the bin, I only required two per sign (or 4 per bin, two for the sign and two to hold on the opposing side of the tote) however, if your signs are larger or your tote fabric is on the thicker side you may require more than two magnets.
  • Glue Gun/Hot Glue

INSTRUCTIONS:

Step 1: If your chalkboard has already been cut to size by your local home improvement store disregard this step. However, if you are either making your own chalkboard or you are like me and reusing left overs you will need to cut your pieces to size using an electric or hack saw. I had my hubby cut them to 12″X4″ pieces.

Step 2: Next take your magnets and use a dot of hot glue to secure one to either side of the back of your piece of chalkboard, if you would like a stronger hold use three spaced equally apart. NOTE: I know nothing about magnets but if you purchase the ones mentioned above they are STRONG, lol. When I was messing around with them when unwrapping them two of them snapped together on my finger and I almost cried, haha. Don’t get me wrong, this is what you want because I’m not sure that a plain old fridge magnet would hold the weight of the wood through the fabric and body of the tote, but still,  you have been warned! Another note, before you glue your magnets be sure that you have set aside sets of two that will attract and that you are gluing them on with the correctly attracting side facing out. Now all you have to do is hold your sign in place where you would like it displayed on the front of the fabric tote and match up the opposing magnets to the inside front of the tote. How easy is that!?

chalktotes2


Without giving away too much of my awesome laundry room makeover here is how I have the chalkboard signs displayed on my totes!  

chalktotes5 chalktotes4


Quick No-Sew Sink Skirt

sinkskirt3

So this post is one of the prequels to my long anticipated laundry room/command center makeover! I’m so excited to finally reveal the project as a whole but for now I’ll share this quick little DIY job that was one of the finishing touches. The sink in our laundry room doesn’t see much action (although I am grateful to have a larger sink basin available to wash off baby P’s high chair trays as they will not fit in our dishwasher or kitchen sink) and is quite honestly an eyesore, as it is just a big ol’ stained plastic basin. Needless to say when I decided to give our laundry room a style makeover, I knew that I needed to do something to downplay the ugliness of the sink. Since I had seen lots of examples of sink skirts and had lots of fabric left over from my DIY no-sew side-light window panels, so I thought that it would be a cute and quick no-sew addition to the room. We are technically “renting” this home so when figuring out how to rig up a sink skirt that wouldn’t require any kind of permanent hardware, I decided the easiest solution would be to either suspend a tension rod between the wall and the washing machine or to use temporary velcro to attach the fabric directly to the outer basin of the sink. I chose to go with the latter, simply because I already had some removable Command velcro strips on hand (I may decide to go with the tension rod idea later on but for now I think this looks good enough!). This project is easy-peezy and could work anywhere you need to cover an empty (or cluttered, lol) space or ugly appliance! Additionally I love that the fabric lends a lot of style to the space, even though the skirt really serves no purpose, sometimes it’s all about looks 🙂

May not look like much now, but when I reveal the whole room it really adds a lot :)

May not look like much now, but when I reveal the whole room it really adds a lot 🙂


QUICK NO-SEW SINK SKIRT

WHAT I USED:

  • Indoor/Outdoor Decorator Fabric in “Vertical Stripe Ebony” – purchased on sale at $8.00/yard, left over from my side-light window panels.
  • Iron-On Hem – Available at your local craft store, Walmart etc.
  • 2-3 Command Damage-Free Hanging Velcro Strips
  • Glue Gun/Hot Glue
  • Iron
  • Scissors
  • Measuring Tape

WHAT I DID:

Step 1: I began by measuring out my fabric to the correct length and width (allowing for an extra 2 inches on top, bottom and sides for creating my fold-over hem) and cutting it accordingly.

sinkskirt


Step 2: I then used iron-on hem to fold over the edges (top or bottom first doesn’t matter) and create your hem. Check out my DIY No-Sew Curtain Panels to read more about this process, just disregard the instructions for creating the panel pocket. NOTE: If you plan to suspend the sink skirt using a tension rod, follow the previously mentioned tutorial exactly, pocket included.

Step 3: Once all of my hems were made I removed the sticky backing to one side of each my Command strips and used hot glue to secure it to the top, inner edge of the fabric panel. Next I adhered the other two Command strips to the top edge of sink, right below the lip using just the regular sticky backing of the strip (these things are super strong, they’ll hold no problem).

sinkskirt1

FYI, this is just to show placement, the sticky side will be down and velcro side will be facing up. I removed the paper from the strip, then put my hot glue directly onto the sticky part and firmly pushed the strip onto the hem.


DIY No-Sew Side-Light Window Panels

sidelight1

When I chose this house I did so in a total rush and in true Natasha fashion, an extreme panicky nature, lol. We were about to go to closing on our Honey Tree house and if I wasn’t able to secure us a house on base we would be faced with the prospect of being homeless (well not really, lol, but the whole point of selling the house was to move on base not to have to rent a house out in town). Luckily the housing office on base had several homes available but when they showed me one right on the water and right across the street from one of my closest friends I am not exaggerating when I say I considered absolutely nothing before jumping up and down saying “I’ll take it, I’ll take it!!!”, lol. Now don’t get me wrong I love this house and faced with the decision again I would have picked the same one because I absolutely love living on the water, however, there are definitely certain aspects of the house that make it a less than ideal choice. For instance, we are the only house in the whole neighborhood without a storm door, which annoys me to no end mostly because I can’t open the door and enjoy the fresh air come fall and also because my fun and festive wreaths aren’t protected from the elements, haha (serious first world problems over here). I’ve also realized that we are one of the only homes in the neighborhood with sidelight windows that run the entire length of the door, which in terms of natural light is quite nice, but come nighttime you can see right into our house and not just a little bit, like a lot, like even if you are driving by you could tell which episode of Friends I’m watching, lol. Lucky for the neighbors, we aren’t into anything weird, haha but I still want a little privacy in the evening so instead of buying special sidelight rods and covers, I decided I would reuse a cafe rod from our old home and DIY some no-sew curtain panels. Initially I  was a little skeptical about this project would turn out since I had only seen sidelights covered with actual sidelight curtains but was pleasantly surprised upon hanging the finished product because when looking at the pictures I think you’ll agree that they not only serve their purpose but also add a little something extra to the design of the room. I hope that you can pull a little inspiration from this post, even if you don’t have sidelight windows this could definitely work on any form of  small window.

Sweet squishy baby watching the UPS man :) He melts my heart.

Sweet squishy baby watching the UPS man 🙂 He melts my heart.

WHAT I USED:

  • Indoor/Outdoor Decorator Fabric in “Vertical Stripe Ebony” – purchased on sale at $8.00/yard.
  • Adjustable Cafe Rod
  • Iron-On Hem – Available at your local craft store, Walmart etc.
  • 2 Small Coat Hooks – purchased at Walmart for $2.98
  • 2 Drapery Clip Rings (optional) – Like these, available anywhere curtains are sold. Mine were left over from my bedroom curtain project. *You do not need to use these, the fabric will hook onto the wall hook all by itself without a clip.
  • Scissors
  • Measuring Tape
  • Iron

WHAT I DID:

Step 1: I began by laying out my fabric and measuring the appropriate length then cutting it. Next, since the sidelights are not anywhere close to as wide as a normal window, I cut my 54″ wide fabric in half.

Step 2: I followed my steps in this post for creating no-sew curtain panels.

Step 3: Next, I made the tie backs for the curtains by cutting a piece of fabric about 12″ long and 4″ wide. Next I used another piece of iron-on hem to fold the piece in on itself and ironed to seal (when you are finished it will look like the picture below). I used a left over drapery clip from another project to hold my tie back together and later hook it to the wall, but if you would like you can use a dot of hot glue to seal the two ends of the tie back (to create a big fabric loop) that way it can just hook to the wall hook without any additional hardware.

I love that I was able to use these little Walmart coat hooks in place of curtain tie-back hardware! They are small, discrete and cost about a quarter of the price!

I love that I was able to use these little Walmart coat hooks in place of curtain tie-back hardware! They are small, discrete and cost about a quarter of the price!

Step 4: I hung my curtain rod and attached my hooks to the wall, then hung the drapes! Done and done! Check out the finished product below!

sidelight

Sorry for the horribly lit picture but you get the idea!

DIY Felt Flower Wreath

ffwreath4

Ever since I made my first DIY wreath this past Easter I was hooked and decided that I was going to try my best to create a different wreath for each month. Not only do I love switching up my front door but it gives me a fun project to look forward to at the end of each month (as if I don’t have enough projects going the rest of every month, haha). Since we are coming into football season and the holidays and I’ve got a full list of festive wreaths that I’m planning on creating come fall, I wanted to give one last crafty hoorah to summer with a fun floral wreath for August. I was inspired by a similar wreath I found on Pinterest and especially loved that with very few (and very inexpensive) supplies I could quickly and easily create a fun wreath to send the summer season out with a crafty bang! Before I get to the tutorial allow me to place some emphasis on how amazing fast this craft was – it only took me about 15 minutes to create the flowers and about 5 to attach them to the wreath (so about half an SVU episode worth of time, lol), which is good because according to my new-wreath-on-the-first-of-the-month plan I was already two weeks late in getting it up on display – better late than never! lol

DIY FELT FLOWER WREATH

*There are so many variations on this wreath, if your outdoor decor works on a particular color scheme you can easily adapt this wreath to fit it 🙂

WHAT I USED: 

  • 6 pieces of felt – I purchased a crafting variety pack of felt from Walmart for $1.99 (it came with about 20 pieces!). If you’re looking for specific colors your local fabric store should carry a ton at about 50-99 cents a piece.
  • 10 medium-large buttons – a variety pack I also purchased from Walmart for $5.99 but if you have buttons laying around any will do!
  • 12 inch grape vine wreath – I purchased mine at a local home decor store for $3.99
  • Scissors
  • Glue gun & hot glue sticks
  • ruler

WHAT I DID:

Step 1: I began by measuring and cutting your felt. This part is subjective, as your wreath may be a different width than mine and allow for larger or smaller flowers, but mine worked best with 10 flowers (3 large, 3 medium, 4 small). For my large flowers I cut strips of equal width and length (again, this is up to you), my large, medium and small length measurements were somewhere around 5, 3 and 2 inches, respectively. Then for the amount of flowers that you plan to make, cut a round circle of felt (about 2 inches in diameter) for each.

ffwreath

Step 2: Next I assembled all of my flowers by taking each piece of felt and folding it over to create a loop (these will be the “petals” of your flowers), then securing each with a dot of hot glue. Then gluing each petal onto the felt circle working in an overlapping/fan fashion. Once all of the petals were secured, I glued a button to the center of each flower.

Sorry for the gross finger pic, I'm a nail biter lol

Sorry for the gross finger pic, I’m a nail biter lol

ffwreath2

Step 3: Once I had established the correct design, I glued each flower on one by one, using a generous amount of hot glue.

ffwreath3


That’s all folks! It has been out in the elements for about a week now and is still holding up great even with a few rainy days and no storm door. Keep this in your pocket for next spring OR you can even adapt the colors to fit a fall scheme for the coming months! 


DIY Rustic Picture Display

peeboard6

As I mentioned, we’ve been brainstorming ways to brighten up these hospital-white walls in our new home. Since we’re only going to be here for under a year we decided that painting the walls would just be silly. However, as you can imagine and entire house painted in flat white paint (that was clearly just slapped on by maintenance after the previous occupants vacated the home) is not ideal. The obvious solution would be to hang LOTS of decor items and pictures, but given our tendency to move every two minutes (lol) picking up expensive wall decor when we don’t have the slightest idea about the layout of our next home just won’t work for us. So our plan is to keep it simple and as budget friendly as possible by refinishing old frames to hang our pictures (more on that later!) and using our DIY skills to copycat some expensive decor.

The first place I picked up some inspiration for “operation DIY-decor” I was in Michael’s craft store and saw this gorgeous distressed picture display (shown below) that was way out of my budget at $69.99, I knew immediately that I could probably recreate it so I snapped a photo and moved on. A few months later when our new home on base was finally beginning to take shape and I was brainstorming a few finishing decor touches, I came back to the photo I had taken at Michael’s a few months back and knew it would be prefect for the small space between the doorway and the window in our dining area. The project took me only two naptimes (or two hours lol) and once I had completed it I was SO glad that my DIY-eye caught this one, because not only is the finished product beautiful but it only cost me $10.25 to create! Since I was adapting my version of this picture display to work into the color scheme of my dining and living room I was able to use paint that I already had on hand from some of my previous refinishing projects which meant I only needed to purchase an unfinished board from Lowes (which didn’t even need to be cut, woo-hoo!) and a few thrift store frames (which cost a total of $3.25 for all 4!).

In coming up with exactly how I wanted to go about creating this picture display the project took on many different forms in my head in terms of what kinds of frames I would use, what color, how many and how they would be fastened to the board. My first idea was to mod podge the pictures onto the wood then remove the glass from the frames and fasten it to the board around the picture, then my next thought was to saw holes into the back of the wood as an access to the frame so that the pictures would not have to be permanent (decided that option was too much work, lol). Finally I decided to make it super easy by simply fastening the frames permanently to the wood using hot glue (for the time being it has held good, I may decide to pop them off and reglue them using gorilla glue so that I can be certain that the frames will stay fastened to the wood). While I may at some point in time want to change the pictures out, for the time being I am absolutely obsessed with baby P’s six month photos and couldn’t dream of putting anything else in there, that being said I’m sure it won’t be difficult to pop the frames off, change the pics out and reattach them should I change my mind down the road.

If you’re looking for an inexpensive way to jazz up your decor without hanging individual photos or artwork this could be a great DIY project to try! This would be an especially good decor option for a renter, since the board can be hung using a hook that requires only one small nail which is much easier than hanging multiple pictures and means that you won’t have to patch multiple holes on your way out. That being said you could even use a larger board and attach a bunch of frames kind of like a removable gallery wall, the options with this project are endless so have fun with it!

peeboard5

TUTORIAL 

*This is simply what I did step by step as a guide, there are so many variations on this project check out my tutorial on painting wooden furniture or painting with homemade chalk paint to get some inspiration for finishes and colors!

WHAT I USED:

Before!

Before!

  • 1 unfinished board (mine was 1″ thick X 4 ft. long X 10″ wide .. I think lol)
  • 2 8X10 wooden frames
  • 2 5X7 wooden frames
  • 4 pictures
  • chalk paint (for frames and board) – see link to see how I made my own chalk paint, for a great tip on saving money by purchasing sample size paints see this post.
  • white latex paint
  • regular 2″ paint brush
  • black foam brushes
  • Electric sander or sanding blocks
  • Minwax Paste Finishing Wax in “Special Dark” (available here via Amazon)
  • glue gun and hot glue or gorilla glue/wood glue
  • 1 sawtooth picture hanger
  • measuring tape
  • level
  • hammer
  • mounting hook (I used something like this)

WHAT I DID:

Step 1: I began by giving my board a quick sand down with the electric sander with a 150-grit (fine) sand paper just to remove any jagged pieces on the edges and to smooth out any scratches, this took me less than a minute. It doesn’t need to be perfect, the knots in the wood will add to the “rustic” character of your finished product, also keep in mind that your frames will end up covering most of the board’s surface area.

Step 2: Next I painted the front and sides of the board with a coat of chalk paint (mine only required one coat, depending on your color you may need two or three) in “Borough” by Valspar using a 2″” black foam brush.

Step 3: While my board was drying I got to work on  my frames. I removed the glass and gave the wood a quick sand by hand just to remove any varnish or dirt then wiped them clean with a damp cloth. I then used a black foam brush to apply two coats of chalk paint in “Farmer’s Market” by Valspar (this color has become my accent” color for most of my projects for the living/dining rooms), waiting about 30 minutes in between coats. NOTE: For a larger piece I would allow more dry time but since they were only frames that wouldn’t be handled much I figured I could rush a bit.

peeboard8

frames after first coat

Step 4: Once my board had dried I used a regular 2″ paint brush to “dry brush” the top and sides of the board with regular white latex paint (I had some trim paint left over from our old house). For a more detailed explanation of the technique of dry brushing just do a Pinterest search for “dry brush painting”, but very simply all you need to do is take your dry brush, dip it into the paint so that there is just a very small amount of paint on the tip of your brush, then dab your brush on a piece of paper towel/cardboard/scrap paper (whatever) to remove any excess paint then begin to brush your wood very lightly and randomly, in the same direction. I started out with very light strokes, barely swiping the board and increased  my pressure of stroke as the brush became dryer. Repeat this process until you have achieved the desired “rustic” look to your board. Allow about 30 minutes of dry time.

The dry brushing will look something like this before distressing.

The dry brushing will look something like this before distressing.

Step 5: Once my white paint dried I returned to my board and used my electric sander and 150-grit sand paper to distress the board (if you do not have an electric sander you can do this by hand using sanding blocks or regular sand paper, it will just take you a bit longer), focusing on the edges and randomly along the surface, I applied various pressures along the edges to give it a more authentic distressed look. The amount of distressing you do is up to you and if you are going for a modern look you need not dry brush or distress the piece at all!

peeboard11

Step 6: After distressing my board I wiped it clean of any sanding dust since it was now time apply my paste finishing wax. Using a rag, I applied a thin coat of the wax to the front and sides of the board, then did the same to my frames. After the recommended amount of time had passed, I buffed them all out using a clean rag. I just recently started using the finishing paste and I love it because it doesn’t require any dry time other than the 15 minutes you have to wait in between applying the wax and buffing it, once you buff your piece it is ready to use!

frames with wax applied before buffing

frames with wax applied before buffing

Step 7: Next I used a level mark a line at the top center of the board (about 5 inches down) where I wanted to attach my sawtooth hook (make sure you use a level or else your board will hang crooked!), and used a hammer to nail the hook into the board.

Step 8: Next I put my pictures into the frames and made sure that any existing hooks on the back of the frames were removed so that they would lay flat once attached to the board. I then laid the frames out on my board and measured out equal distances for placement (you may use a level for this part too if you would like), making small pencil marks for where each would go. Once I had marked my board for the placement of each frame I began attaching them by applying a generous amount of hot glue or wood glue to the back of each frame (if using hot glue work quickly so that the glue doesn’t harden!) and then pressing it firmly onto the board. NOTE: As I mentioned above this display is on a sort of probationary period to see if the hot glue will in fact hold, lol. If I feel that the frames are starting to come loose I will return and re-glue them using gorilla glue or wood glue to ensure a permanent hold. Once your glue is dry and your pictures are securely fastened your board is ready to hang!

peeboard3

peeboard1

The project as it’s displayed in our home! Baby P is obsessed with it haha

peeboard peeboard2

DIY Dry-Erase Paint Chip Calendar

paintchip2

This project has me so excited and I’m not sure why since it’s nothing crazy. Probably because it’s the first step in finally getting my laundry room and family command center in order! I had seen something like this on Pinterest a while back and had decided against making it since we didn’t have the place for it our old home, however, now that we have a laundry room and soon-to-be family command area, I knew this would be the perfect addition. 

So today, teething baby in tow, I headed to Lowes to fetch my free paint chips. Now, I’m sure the staff couldn’t care less about my taking thirty-five (that’s how many I needed) paint chips since they are after all, free, but I couldn’t help feeling that I was abusing my paint-sample privilege. I didn’t feel too bad considering I was purchasing other items, but I was sure I was going to get in trouble anyway, haha. At one point the lady at the paint counter motioned me over and said “I saw you over there and couldn’t help but notice …” and I was sure she was going to say “that you had a few stacks of paint chips in your hands, put those back”, lol but of course she went on to ooh and ahh over my squishy baby who apparently couldn’t stop smiling at her while I was busy abusing the paint chips. So proud of that baby P, already aiding and abetting in my questionably kosher crafting adventures! Anyway, moral of the story is, nobody cares, go nuts and take as many paint chips as you want :).

Once I got home this took me about 45 minutes to put together and since it didn’t require any hazardous materials I was even able to do it in the presence of baby P! The frame was a thrift store find that I had redone (aka hit with some spray paint) when we were planning on putting up a gallery wall in the old house (more on that later, as we’ll be putting up a smaller scale gallery wall in this house soon!), so the frame was essentially free which means that this project cost me ninety-seven cents (the cost of the poster board)!!! I can’t wait to hang it in my command center as part of my new and improved laundry/mudroom. Apparently we really needed this calendar too, when my hubby got home and I showed it to him he all sorts of questions about the events on it, none of which he knew were happening, lol. Here is my tutorial, it’s quick, easy and can be customized to fit any color/decor scheme! 

NOTE: If you have a rotary cutter this project will probably take you significantly less time. Personally I didn’t care if my lines weren’t perfect but if you’re a stickler for a perfect job I would definitely consider using one. 

Sorry that my pictures are so awful, I was so excited to post this I didn’t even hang the calendar which is why it’s leaning on a chair lol. I will post better ones soon!

Baby P watching our lawn getting mowed while I worked on the calendar :)

Baby P watching our lawn getting mowed while I worked on the calendar 🙂

YOU WILL NEED:

paintchip

  • 35 paint chips – I used seven different colors, five of each color. You can do it the opposite or use all different colors if you prefer. Try to stick to lighter colors so that your dry-erase marker will show up well against it. I used the Valspar chips from Lowes since the little square at the top is perfect for inserting the date.
  • 1 piece of white poster board – any other light color will do as well.
  •  16X20 frame – based on the size of the paint chips I think this size works best.
  • Glue Stick or other crafting glue
  • Scissors
  • Ruler

INSTRUCTIONS: 

Step 1: Begin by cutting your poster board to size. Then comes the tedious part – cutting all of your paint chips. I simply cut them down to eliminate any wording (for example the name of the paint and it’s code). This is a great project to do while watching a show!

Step 2: Line your chips up on your poster board, seven across and five down. Make sure you leave enough room at the top to write the name of the month and if you’d like, some room on the bottom to write “notes” or “monthly goals”. Once you are happy with their placement, use your glue stick to glue each one down. 

paintchip1

Step 3: Along the top either write the days of the week or as I did, print them out and glue them on. 

paintchip4

I chose colors that complimented our home’s color scheme, in case you’re into paint colors they are all Valspar. From right to left: Terra Cotta Red, Desert Rose, Roasted Squash, Hazy Stratus, Toasted Apricot, Urban Sunrise and Apricot Honey.

Step 4: Place your calendar into the frame and boom, DONE! Use a dry-erase marker to fill out your dates and happenings then display it proudly because you my friend, are a DIY diva (or dude, whatever lol)!  

paintchip5 paintchip6  paintchip3

Easy Scrapbook Distressed Wooden Letter

scrapletter

This is just a quick little project that has done double duty for me in the way of both home decor and DIY gifting. I love it because it’s super quick and easy and can be customized to any gift or decor scheme, making it a perfect addition to a diaper cake to later be used in a nursery or as part of a gift basket to later be displayed in the recipient’s home! Any crafting enthusiast will most likely be familiar with mod podge and it’s seemingly limitless crafting applications. Personally I have used it as a sealer and glue as well as a top coat to many of my projects. This particular project simply involved mod podging a piece of craft or scrapbook paper to a wooden letter and sanding the edges a bit. From start to finish it takes about 10 minutes (not including dry time)! When creating gifts I love adding little extras that don’t cost a lot to produce so this is the perfect addition to any gift (I’ll give some examples below), this particular project cost a little over $2.00. I hope this one makes it onto your next diaper cake or gift basket!

YOU WILL NEED:

  • 1 wooden letter (I purchased mine at Walmart for $1.97)
  • 1 piece of craft or scrapbook paper
  • mod podge (glossy or matte, whatever you prefer)
  • black foam brush
  • Sanding block or sand paper (medium grit)

INSTRUCTIONS:

Step 1: Begin by laying your scrapbook paper print side up and placing your wooden letter right-side up on the paper. Using a pencil, trace around the letter.

Step 2: Next, cut out the letter that you just traced, it does not need to be perfect, you will be sanding off any rough edges later in the process.

Step 3: Using your foam brush, apply a generous coat of mod podge to the back of your scrapbook paper letter then carefully place it onto your wooden letter, adjusting it so that it lines up as closely as possible. Use your fingers to gently smooth the letter out, pressing the paper onto the wood. Use a tissue or paper towel to wipe any excess mod podge from the edges. Allow to dry, this will probably take about an hour but may be done in as little as 20 minutes. Be sure to wash out your brush so that you may reuse it later!

Step 4: Once the letter has dried, use your foam brush to apply another coat of mod podge to the letter atop the scrapbook paper, this will seal it. Be sure to brush any clumps of mod podge off of the sides of the letters. Allow another hour or so of dry time.

Step 5: Once the top coat has dried, use your sanding block to sand the edges of the letter (focusing on the top edges not the sides), this will give it a distressed look and really make it look like the paper is painted onto the letter. Once you are happy with your level of distressing on the edges you are finished! If you feel the need you can apply another coat of mod podge or if your paper has lifted at all on the edges you can apply some mod podge to those specific areas.

This quick project helped me add a little something extra to the two gifts below!

Here it is as part of my “Whale-of-a-Time” Diaper Cake. Since I forgot craft paper at the store that day I decided to improvise. Since baby Brian’s room is whale themed I simply printed the lyrics to “Baby Beluga” on some blue card stock that I already had.

diapercake1 diapercake

Here is a “J” I made for baby Jackson as part of my friend’s baby shower decor. She had been a huge fan of my Spring Chevron Wreath so I made her one as a gift and at her shower we displayed it with the “J” on the door as part of the decor (I also made her a welcome burlap mini banner to go with it). Oh, and check out my tutorial for DIY fabric flowers if you like the ones on this wreath!

scrapletter1 scrapletter3

DIY No-Sew Curtain Panels

curt7

So since it’s too hot outside to work on any of my DIY projects in the garage, I’ll take this time to share one of my recent DIY decor projects – no-sew curtain panels! Now, if you are a sewing expert or enthusiast avert your eyes because this project will probably make you cringe and break out in hives, lol, but if you’re like me and sewing isn’t particularly (or at all) your thing, then this may definitely be of interest to you!

I’m a big fan of this project and this wasn’t my first time attempting it, in fact, at our old house after my first successful attempt on our no-sew bedroom curtains prompted the creation of two other curtain projects (I will post about these soon as well!). When designing our bedroom (a grey and yellow theme with black accents), I couldn’t for the life of me find any curtains that I liked (those I did fancy either didn’t work with my color scheme or were way out of my price range). Now let me just say that my original plan was to finally learn to use the ol’ sewing machine and actually sew the curtains. However, after finding an affordable decorating fabric option in a print that I liked, and a little Pinterest research and found (and became obsessed with) a non-sewer’s dream – iron-on hem! Iron-on hem has become my substitute for sewing in almost all of my projects that would otherwise require a needle and thread (check out my no-sew bow-ties!). Granted in some situations there is no way to duplicate a stitch, but I am always willing to try :). 

These particular curtains were born out of my love for Pottery Barn’s “Kendra Trellis Drape” which came in at $99 per panel … seriously?! Since I didn’t (and probably won’t ever) have that kind of coin lying around to spend on curtains but nonetheless desperately needed a window covering in a fun print to distract from these hospital-white base housing walls, I came back to my trusty DIY curtain project once more. For these particular curtains I chose a grey and white trellis pattern (similar to the one on the overpriced PB curtains), to compliment our grey and orange furniture (see below for details and pricing). It took me about 20 minutes per panel to create these pocket curtain panels, so I would just work on them at night while my hubby and I caught up on our shows, this way I could be certain that any tiny fingers would keep out of the way :). Now that the curtains are hung I am thrilled with the outcome, and while I know I could have very easily gotten some cheap Walmart or Target brand panels for a comparable price I like that I was able to pick from literally thousands of fabric patterns to find exactly what worked for me … and of course that I was able to make a project out of them :). As I do, when you see an interior decorating or design piece in a store that is either outside of your budget or just not quite what you’re looking for always try to get creative and think of a way you can DIY it, chances are you’ll pleasantly surprise yourself!

DIY NO-SEW CURTAIN PANELS

WHAT I USED:

  • Decorator Fabric – purchased from Fabric.com, I used Premier Prints “Fynn” Slub in Ash Grey (no longer available, but there are plenty of the “Fynn” trellis print options available in a variety of other colors). The amount you will need will depend on how many panels you are making and the height of your walls, I simply measure the length in inches and convert it to yards. There are all sorts of complicated methods for taking into account bunching at the top, fabric print repeat etc. Personally this just confused me, I was fine with the width of the fabric so I just paid attention to the necessary length.
curt

It will get delivered in a giant box like this, your UPS man will not be pleased lol

  • Iron-On Hem – available at any major fabric retailer (or super Walmart). I purchased the “Stitch Witchery” brand in heavy-weight, 1″ wide. Again, the amount you need will depend on how many panels you are making and the length of your panels.

curt3

  • Iron
  • Hand Towel
  • Measuring Tape

WHAT I DID:

Step 1: Anytime you order a large quantity of decorator fabric it will usually come rolled on a giant cardboard cylinder (kind of like a giant toilet paper roll, lol). So I began by rolling out my fabric and measuring out the necessary length, which for me was 91″ with three additional inches added to accommodate a one inch hem at the bottom and a two inch fold-over at the top to create a pocket for the curtain rod (the size of your pocket will depend on the girth of your curtain rod, make sure you measure accordingly), for a total of 94″ per panel. After measuring my 94″ length I cut five 94″ pieces, as I was going to be making five panels.

curt1 curt2

Step 2: Starting with my first panel, I began by laying the piece of fabric upside down on a towel. I was too lazy to dig the ironing board out of the garage so I just did this project on the floor, using the towel to protect my carpet. Now, when doing a pocket curtain it is very important that you hem the sides FIRST I made the mistake of reversing this project on one of my panels in our old house and while you couldn’t really tell, I always knew it was wrong and it bothered me to no end.

Step 3: Heat your iron. Starting with one of your sides, lay a long piece of iron-on hem (I find it is easier to work in sections so you can ensure a straight hem) parallel to your fabric edge about an inch in. NOTE: Follow the directions on the iron-on hem package for the actual ironing process, as the method can differ by brand. Mine required that you dampen a towel (where the hand towel comes in), fold the fabric over the iron-on medium then place the wet towel over the hem and iron over that, apparently the steam will activate the “bonding” process. I have, however, used brands that just require you iron directly on the fabric so be sure to read the directions.

curt4

Step 4: After you have completed one side, move onto the other side. Once your sides are complete you are ready to hem the bottom and the top, the order you do this in doesn’t matter. For the bottom simply repeat what you did on the sides, simply fold over about an inch worth of fabric and fuse.

Step 5: For the top of the panel, fold over enough fabric to create your pocket. Be sure your pocket is big enough to fit your curtain rod, I was using a pretty skinny rod so folding over just about two inches of fabric was fine for me. Then simply continue with the same process you used to fuse the bottom and sides, the only difference is you will  have created a pocket at the top.

Voila! You are done! Now, they may not all be 100% even but I’m telling you nobody (probably not even you) will notice, I have gotten so many compliments on my curtains and even though they aren’t perfect they work perfect for me. 🙂        

curt6 curt5  

A FEW TIPS:

  • Try to stick to heavier decorator fabric. I know it may be tempting to use the $2.00/yard cotton options but unless you are using them solely for decor, you’re going to want a heavier fabric to achieve any level of functionality, as you are not lining them.
  • Try to measure as accurately as possible. Once you cut the fabric you cannot return it. I somehow wound up with about three extra yards but plan to use it on other DIY projects.
  • When working on the sides and bottom make your hem as small as the strip of iron-on hem will allow, as you do not want to create an unwanted pocket. 
  • If you find that your second folds (top and bottom) are having a hard time bonding at the corners just use a little dot of hot glue and that will do the trick.

SOURCES:

  • Fabric // Fabric.com Premier Prints “Fynn” Slub in Ash Grey (no longer available, but there are plenty of the “Fynn” trellis print options available in a variety of other colors such as this “Cool Grey“). It cost me $7.18/yard so in purchasing a total of 15 yards the total cost was about $108.00 (so for what one curtain panel would have cost me at PB I got FIVE!). Don’t forget to Google those free shipping coupons!
  • Curtain Rods // “Kenny Ball Deco Curtain Rod” in champagne silver, available here via Amazon for $12.00/piece. They are kind of cheap looking up close but they look just fine up on our walls, nice and simple! 
  • Curtain Tie-Backs // “Urbanest Colette Decor Drapery Tie Back” in Pewter. Available here via Amazon for $6.99/piece. I knew I wanted the “knob” looking tie-backs and was obsessed with one design that I found at Anthropologie but knew that at $32.99 per knob those ones just weren’t going to happen for me, lol. Although these ones are not actually metal they don’t look cheap at all even though they were the cheapest ones I found price-wise!  

DIY Menu Chalkboard

chalk

Since I’ve been posting so many recipes I wanted you all to still believe that I am actually still crafting in my very limited free time :). As our new home slowly comes together, we have finally been getting some things up on the walls, one of which is my DIY menu chalkboard which was basically free to make (read all about how I created it using a free mirror here). Even though we had a ton of wall space in our old home, my pride and joy of a chalkboard project has had to spend all of it’s time in our garage since it’s creation because I could never find a good spot for it. When we moved to our new house I knew that I wanted to display it and figured that a menu board (which is what I originally intended it to be) would be the perfect use for it!

Between documenting my pregnancy and baby P’s growth via chalkboards for over a year now, I have gotten pretty handy with my chalkboard lettering so all I did was use the chalk hand lettering shaded font as a guide and hand lettered my “menu” title as well as the abbreviated seven days of the week. I decided to use chalk pens as I do for my monthly chalkboard updates for baby P because knowing me I may change my mind one day and decide that I want to re-purpose the chalkboard but if you are sure that you want a menu board you can simply have one of the many wonderfully creative individuals on Etsy make you up some vinyl decals to use as your headers and then use chalk to change it week by week. I know this isn’t a super original idea but since I love to DIY and meal plan this sure made me happy! I hope it inspires you to make your own 🙂

Chalkboard transformation :) Be sure to check out the post on how to DIY this one, it's super easy and can be done using any old mirror or frame!

Chalkboard transformation 🙂 Be sure to check out the post on how to DIY this one, it’s super easy and can be done using any old mirror or frame!