

As I dive back into blogland after my extended hiatus I figure I will get back into the mix by sharing a few posts about Baby P’s first birthday which although is now three months past (how is time going so quickly!?) still makes me super happy to talk about :). Since baby P has a lot of baby friends who are toddler age and older I wanted to make sure the party would still appeal to the older children by having a bounce house and of course a piñata! While I knew that it was possible to create your own piñata I had never actually had a reason to attempt one before so I figured this would be a good opportunity to save a little cash (my DIY piñata only cost me the candy since I used left over materials from other projects) and to try out a fun new project.
Generally, piñatas are either made using cardboard or paper mache so I went with the cardboard option to save myself both time and mess. Since the party theme was “Where the Wild Things Are” I modeled the piñata itself after one of the “wild things” which lucky for me was a pretty easy design. After seeing my finished product I was pretty pleased, not only was it free to create it also held up well and given my unique party theme I would have been hard pressed to find another “Where the Wild Things Are” piñata elsewhere, lol. Hopefully this prompts a little piñata DIY for your kiddo’s next birthday party, it was super easy and can be made using items that you’ll most likely have around the house or that could be purchased at the dollar store, after all, who wants to spend money on something that the kids will beat to shreds anyway? 🙂
WHAT I USED:
- Large cardboard box – the size will depend on how big you need your piñata to be. I used a large box left over from our move which was perfect to cut the two large circles for my wild thing’s head.
- Poster Board
- Masking Tape
- Tissue Paper
- Construction Paper
- Scissors
- Glue Stick
- Twine (or other heavy weight string)
- Popsicle Stick or Plastic Knife
INSTRUCTIONS
Step 1: I began by cutting two large cardboard circles (about 18-20″ diameter), using a large decorative bowl as a guide.


Step 2: I then cut two long strips of poster board (enough to reach around the entire circle edge of the circle) about 4 or so inches wide.
Step 3: Before creating the body of my piñata I cut two slits in the top of one of my cardboard circles (about two inches deep). This formed a little flap through which I would later fill the piñata with goodies! Then using masking tape I attached the two cardboard circles using my two strips of poster board (make sure your candy flap is at the top!). Use enough tape to hold it firmly in place, keeping in mind that once you fill it with candy it will need to hold up, but don’t use so much tape that the kids will have a hard time beating it! Once this part was finished I tied my twine securely to my plastic knife (I know, weird choice but I didn’t have a popsicle stick handy so this worked in a pinch, lol) then sliced a small hole in what would be the top of the piñata and shimmied my knife (a.k.a. string holder) inside so that just the long end of the twine stuck out the top (this was how I tied it to the tree for the piñata hitting).

notice the hole at the top for candy!

Step 4: Next I cut large strips of tissue paper. Then keeping them in a pile so that I could work with multiple pieces at once, I cut vertical strips in the tissue coming within about a half inch of the edge to form the “fringe” for the piñata.

Step 5: Once I had all of my tissue paper cut into strips and fringed, I began using my glue stick to attach the strips of white tissue paper fringe to the body of the piñata, working from the bottom up, placing each strip about two inches above the last. Next, I moved onto my “hair” (the black tissue paper on the sides) also working from the bottom up.
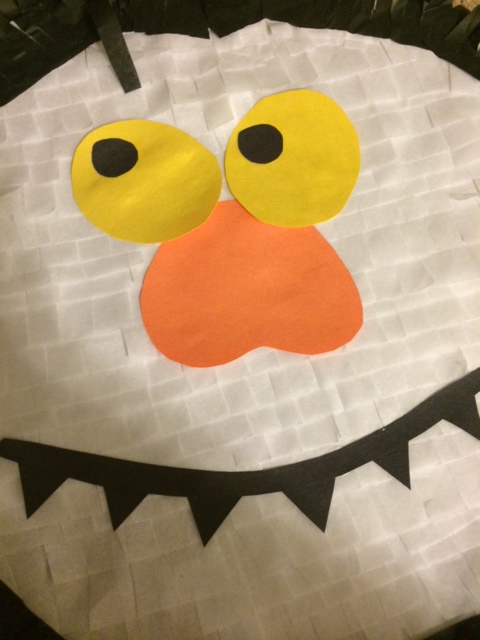
Step 6: Once my piñata was covered in tissue décor, I cut pieces of construction paper to form the eyes, nose and teeth then fashioned two horns out of left over poster board. I attached all of these components using a glue stick. Finally, I was ready to fill it with candy! NOTE: while I *think* my piñata would have held up just fine otherwise, try to chooses light weight candy such as mini Twizzlers, Sweet Tarts and the like. Try to stay away from large tootsie pops and heavier candy that may cause the rounded bottom of your piñata to bust out before the kids get a go at it 🙂

Finished product!

Pinata fun!

Pingback: DIY “Where the Wild Things Are” Tissue Paper Character Poms | simplyschulze
Hi Natasha –
I found your blog because I was searching online planning my son’s 1st birthday party for WTWTA! You have so many great ideas! You wrote in your blog that you wouldn’t mind sharing your invite and tags/stickers and I wanted to email you because that would be awesome! I can’t find your email address…so I am hoping your’ll see my comment and respond.
thank you! Carrie
Thanks for checking out the blog! I would love to send you my invite/tags just send me an email at Natasha.schulze@ymail.com 🙂